English
- 13 -
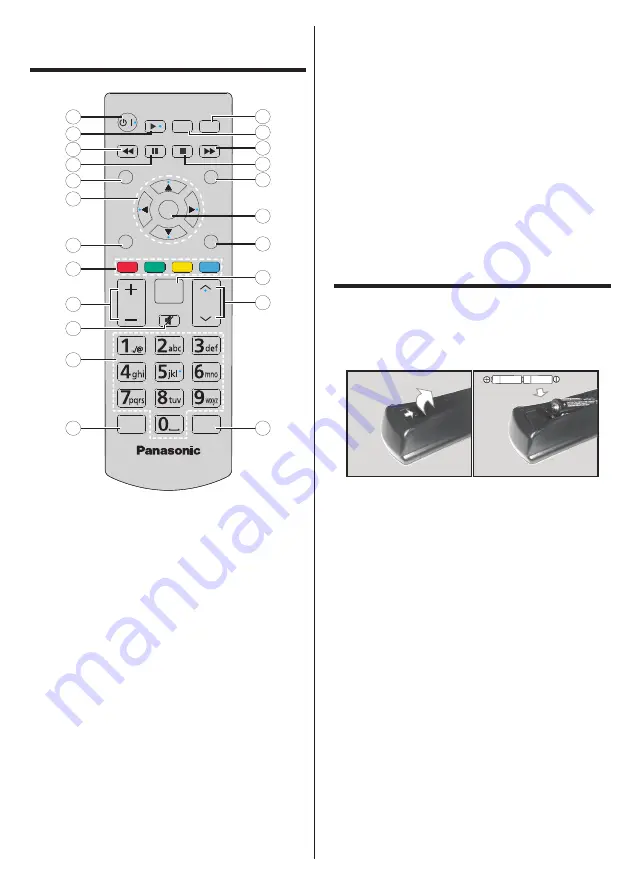
Remote Control
PICTURE
RECALL
RETURN
VOL
DISPLAY
INPUT
MENU
EXIT
/
ENTER
MENU
Q.
USB V.
W.D splay
ASPECT
5
3
1
7
8
4
6
2
17
9
10
11
12
13
14
16
18
19
20
21
22
15
1. Standby:
Switches On / Off the Display
2. Play:
Starts to play selected media
3. Rapid reverse:
Moves frames backwards in media
such as movies
4. Pause:
Pauses the media being played
5. QUICK MENU:
Displays picture, sound and system
setting menus
6. Directional buttons:
Used to operate the menu screens,
content etc.
7. EXIT:
Closes and exits from displayed menus or returns
to previous screen
8. Coloured Buttons:
Follow the on-screen instructions
for coloured button functions
Green:
Used in the Scheduler Settings menu.
Blue:
Stops the video. Press it again to release it. Audio
is output even when the video is stopped.
9. VOL +/-:
Increases or decreases the volume
10. Mute:
Completely turns off the volume of the Display
11. Numeric buttons:
Enters a number or a letter in the text
box on the screen.
12. WIRELESS DISPLAY:
Opens the wireless display
connection screen
13. ASPECT :
Changes the aspect ratio of the screen
14. INPUT :
Switches input to display on the screen
15. MENU:
Displays the main menu
16. RETURN:
Returns to previous screen
17. ENTER:
Confirms user selections
18. RECALL:
Displays information about on-screen content
19. Stop:
Stops the media being played
20. Rapid advance:
Moves frames forward in media such
as movies
21. USB VIEWER:
Opens the media browsing screen
22. PICTURE:
Cycles between picture modes
Inserting the Batteries
into the Remote Control
Remove the back cover to reveal the battery compartment.
Insert two size
AA
batteries. Make sure the (+) and (-) signs
match (observe correct polarity). Do not mix old and new
batteries. Replace only with same or equivalent type. Place
the cover back on.


