background image

25

VQT4U56

Troubleshooting

Before requesting service, make the following checks. 
If you are in doubt about some of the check points, or if 
the solutions indicated in the following guide do not 
solve the problem, consult your dealer for instructions.

Do you have the latest software installed?

Occasionally, Panasonic may release updated software for 
this system that may add or improve the way a feature 
operates. (

l

23)

The CD unit and the speaker unit are not wirelessly 
connected.
The sound is interrupted.
The standby/on indicator on the side of the CD unit 
lights red.
The display shows “NOCONNECT” or 
“CANNOT ACCEPT”.

This system has a wireless communication problem, 
follow the instructions below.

1

Check that the AC mains leads are connected to 
the both units.

2

If the devices which use 2.4 GHz are being used 
near this system, turn them off temporarily.

3

Move the both units closer together.
A wireless connection will be automatically 
established.

If a wireless connection is not established, set the 
communication mode to "C.MODE1". (

l

24

)

If the problem persists, connect the units with 
cables. (

l

8

)

Only the speaker unit’s display turns on

Press any button on the CD unit, or select “CD”, 
“IPOD_DOCK”, or “IPOD_PORT” as an audio source.

Humming heard during play.

An AC mains lead or fluorescent light is near the cords. Keep 
other appliances and cords away from this system’s cables.

MP3 cannot be read.

You may not be able to play MP3 if you have copied a 
multi-session disc that has no data between sessions.

When creating a multi-session disc, it is necessary to close 
the session.

The amount of data on the disc is too small. Set the amount 
of data to above 5 MB.

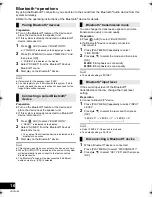
Pairing cannot be done.

Check the Bluetooth

®

 device condition.

The device cannot be connected.

The pairing of the device was unsuccessful or the registration 
has been replaced. Try pairing the device again. 

This system might be connected to a different device. 
Disconnect the other device and try pairing the device again. 

The device is connected but audio cannot be heard 
through the speaker unit.

For some built-in Bluetooth

®

 devices, you have to set the 

audio output to “SC-NE5” manually. Read the operating 
instructions for the device for details.

The sound is interrupted.

The device is out of the 10 m communication range. Bring 
the Bluetooth

®

 device closer to this system.

Remove any obstacle between this system and the device.

Other devices that use the 2.4 GHz frequency band (wireless 
router, microwaves, cordless phones, etc.) are interfering. 
Bring the Bluetooth

®

 device closer to the speaker unit and 

distance it from the other devices.

Select “MODE 1” for stable communication. (

l

16).

Incorrect display or play will not start.

Make sure that the disc is compatible with this system.


(

l

5)

There is moisture on the lens. Wait for about an hour and 
then try again.

No response when [

1

/

;

] is pressed.

Disconnect the USB device and then reconnect it. 
Alternatively, turn this system off and on again.

The USB drive or its contents cannot be read.

The USB drive format or its contents is/are not compatible 
with this system (

l

5).

The USB host function of this product may not work with 
some USB devices.

Slow operation of the USB flash drive.

Large file size or high memory USB flash drive takes longer 
time to read.

The elapsed time displayed is different from the 
actual play time.

Copy the data to another USB device or backup the data and 
reformat the USB device.

To return all settings to the factory preset

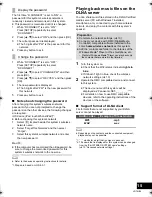
When the following situations occur, reset the 
memory of both the CD unit and the speaker unit:

There is no response when buttons are pressed.

You want to clear and reset the memory contents.

1

Disconnect the AC mains lead. (Wait for at least 
3 minutes before proceeding to step 

2

.)

2

While pressing and holding down [

Í

/I] on the 

unit, reconnect the AC mains lead.

Keep holding down [

Í

/I] until “--------” appears 

on the display.

3

Release [

Í

/I].


All the settings are returned to the factory preset. You will 
need to reset the memory items.

Common problems

Bluetooth

®

Disc operations

USB operations

SC-NE5DB~VQT4U56.book  25 ページ  2013年1月21日 月曜日 午後6時18分

Содержание SC-NE5DB

Страница 1: ...E5DB Included Installation Instructions l 3 28 29 The installation work should be done by a qualified installation specialist Before commencing work carefully read these installation instructions and the operating instructions to ensure that installation is performed correctly Please keep these instructions You may need them when maintaining or moving this system Model number suffix EB denotes UK ...

Страница 2: ...ted Setup Mark is a mark of the Wi Fi Alliance Wi Fi Wi Fi Protected Setup WPA and WPA2 are marks or registered marks of the Wi Fi Alliance MPEG Layer 3 audio coding technology licensed from Fraunhofer IIS and Thomson The Bluetooth word mark and logos are owned by the Bluetooth SIG Inc and any use of such marks by Panasonic Corporation is under license Other trademarks and trade names are those of...

Страница 3: ...ilated Do not obstruct this unit s ventilation openings with newspapers tablecloths curtains and similar items Do not expose this unit to direct sunlight high temperatures high humidity and excessive vibration Button type battery Lithium battery Danger of explosion if battery is incorrectly replaced Replace only with the type recommended by the manufacturer Insert with poles aligned Mishandling of...

Страница 4: ... battery N2QAYC000090 For the United Kingdom and Ireland 2 AC mains lead K2CT2YY00097 For Australia and New Zealand 2 AC mains lead K2CJ2YY00093 1 DAB antenna RFA3425 Wall mounting accessories 1 Safety holder RGQ0660 K 1 Screw XTB3 8JFJK J 2 Wall mount brackets RMQX1082 S Do not use AC mains lead with other equipment Product numbers provided in these operating instructions are correct as of Januar...

Страница 5: ...ou numbered them or may not play at all Creating MP3 files on a CD R RW Maximum number of tracks and albums 999 tracks and 254 albums Excluding Root folder Disc formats ISO9660 level 1 and level 2 except for extended formats If the disc includes both MP3 and normal audio data CD DA this system plays the type recorded in the inner part of the disc This system cannot play files recorded using packet...

Страница 6: ...OTH IPOD_PORT USB IPOD_DOCK AUX b 3 Basic playback control buttons 4 iPod port for iPod iPhone iPad and USB devices l 5 9 5 Adjust the volume 0 min to 50 max 6 Network setup button l 11 7 Standby on indicator While this system is turned on The indicator lights in green when the CD unit and the speaker unit are connected successfully blinks in green when they are connecting and lights in red when t...

Страница 7: ...stem near equipment or in an environment that is sensitive to radio frequency interference example airports hospitals laboratories etc Remote control 1 Turn this system on or off 2 Select the audio source iPod USB IPOD_DOCK IPOD_PORT USB CD RADIO CD DAB DAB FM b AUX BLUETOOTH AUX 3 Basic playback control buttons 4 Enter setup menu 5 Enter the iPod iPhone menu Change displayed information 6 Set the...

Страница 8: ...ayback on the connected device To select the sound input level of the external device 1 While in AUX mode press PLAY MENU to select INPUT LEVEL and then press OK 2 Press 3 4 to select NORMAL or HIGH The default setting is NORMAL Switch the equalizer off or turn the volume of the external device down to reduce the input signal High level of input signal will distort the sound For details refer to t...

Страница 9: ...careful not to scratch the CD Make sure you place the centre of the CD onto the CD spindle of the unit Note Remove the CD only after it stops rotating Connect an iPod iPhone iPad 1 2 or USB device Charging an iPod iPhone iPad 4 Charging starts when an iPod 2 iPhone iPad is connected to this unit During standby mode charging will not start from the USB cable connection however it will start as usua...

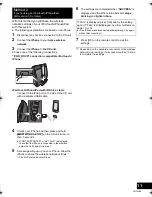
Страница 10: ...y information on your wireless network router refer to http panasonic jp support global cs This site is in English only Using the WPS Push Button Configuration PBC 1 Press and hold s WPS on the speaker unit WPS flashes on the display The Wi Fi status indicator blinks blue Complete step 2 within 2 mins 2 After WPS is indicated press the WPS button on the wireless network router 3 The settings are c...

Страница 11: ...PPORTED or SET WI FI is displayed check that the iPhone is connected to the wireless network and try again from step 1 5 A message will pop up on your iPhone Allow the iPhone to share the wireless network settings 1 The Wi Fi status indicator blinks 6 The settings are completed when SUCCESS is displayed and the Wi Fi status indicator stops blinking and lights in blue 7 Press OK on the remote contr...

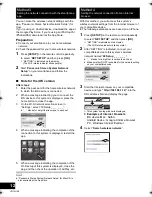
Страница 12: ...isplayed restart the app 5 When a message indicating the completion of the Wi Fi setup of this system is displayed close the app and then check the operation of AirPlay etc Panasonic Stereo System Network Setup for Mac OS is also available at the App Store With this method you will access this system s wireless network settings from the Internet browser of your compatible device The following expl...

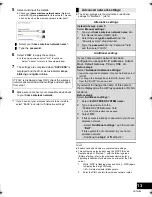
Страница 13: ... wireless network router 1 Select your home wireless network name 1 2 Type the password If FAIL is displayed press OK check the wireless network password and other settings and start again from step 1 Advanced network settings Alternative settings Instead of steps 4 and 5 Select Manual settings 1 Type your home wireless network name into the Network name SSID field 2 Select the encryption method f...

Страница 14: ...Advanced network settings With this function set to ON you can stream music from the iOS device or Mac PC iTunes 10 2 2 or later to this system without the need of a wireless network router Previous network settings will be deleted when this function is set to ON The following explanations are based on an iPhone 1 Press SETUP repeatedly to select D CONNECT 2 Press 3 4 to select ON and then press O...

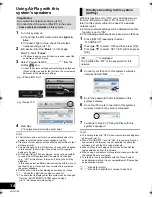
Страница 15: ...nstructions for details 1 Steps are based on iOS 6 0 1 Playing back music files on the DLNA server You can share music files stored in the DLNA Certified media server PC with Windows 7 installed smartphone etc connected to your home wireless network and enjoy the contents with this system s speaker 1 Turn this system on Check that the Wi Fi status indicator lights in blue If it doesn t light in bl...

Страница 16: ... the connected device is indicated on the display for 2 seconds 3 Start play on the Bluetooth device This system can only be connected to one device at a time When BLUETOOTH is selected as the source this system will automatically try and connect to the last connected Bluetooth device The Bluetooth device will be disconnected if a different audio source e g CD is selected You can change the transm...

Страница 17: ...hat use the 2 4 GHz band This system may not function properly if radio waves from a nearby broadcasting station etc is too strong Intended usage This system is for normal general use only Do not use this system near an equipment or in an environment that is sensitive to radio frequency interference example airports hospitals laboratories etc Media playback operations The following marks indicate ...

Страница 18: ... press OK When using an iPod iPhone iPad or Bluetooth device use the setting on the device if available During random play you cannot skip to the previous track CD The mode is cancelled when you open the door for discs AirPlay The applied settings will remain until it is changed 1 AirPlay Perform the settings during playback A _ _ _ MP3 album number T _ _ _ MP3 track number _ stands for the album ...

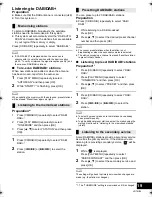
Страница 19: ... repeatedly to select DAB DAB 1 While listening to a DAB broadcast Press OK 2 Press 3 4 to select the desired preset channel number and then press OK You cannot preset stations when the station is not broadcasting or when the secondary service is selected The station occupying a channel is erased if another station is preset in that channel Listening to preset DAB DAB stations Preparation 1 1 Pres...

Страница 20: ...AN FAILED is still displayed repeat steps 1 to 3 until a station is memorised If the situation does not improve try using an outdoor DAB antenna or consult your dealer Checking the DAB DAB signal reception quality 1 While listening to the DAB broadcast Press PLAY MENU repeatedly to select SIGNAL QUALITY and then press OK The current frequency block is displayed and then the reception quality is in...

Страница 21: ...AL and then press OK 3 Press 6 or 5 9 to tune to the required station To start automatic tuning press and hold 6 5 9 until the frequency starts scrolling Tuning stops when a station is found To preset the channel 4 While listening to the radio broadcast Press OK 5 Press 3 4 to select the channel and then press OK To improve FM sound quality 1 While receiving FM broadcasts press PLAY MENU repeatedl...

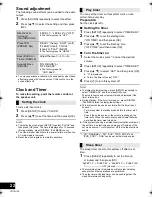
Страница 22: ... To display the timer settings press SETUP repeatedly to select TIMER ADJ and then press OK once The music source and volume will also be displayed if the timer is turned on During standby if the timer is turned on press DISPLAY iPod MENU twice to display the settings This system can be used as normal after the timer is set however Turn this system to standby mode before the timer start time Even ...

Страница 23: ...net If D CONNECT is set to ON change the setting to OFF and connect this system to a wireless network that is connected to the Internet Updating the CD unit 1 Download the latest firmware from the following website and burn it to a CD R to update the firmware http panasonic jp support global cs This site is in English only 2 Insert the CD R to the CD unit 3 Press CD RADIO repeatedly to select CD 4...

Страница 24: ...aration Connect this system to the wireless network l 10 1 Press SETUP repeatedly to select NET STNBY and then press OK 2 Press 3 4 to select ON and then press OK To cancel this function select OFF in step 2 The factory preset is OFF If this function is set to ON the standby power consumption will increase Display the name for the connected wireless network SSID 1 Press and hold s WPS on the speak...

Страница 25: ...ice Disconnect the other device and try pairing the device again The device is connected but audio cannot be heard through the speaker unit For some built in Bluetooth devices you have to set the audio output to SC NE5 manually Read the operating instructions for the device for details The sound is interrupted The device is out of the 10 m communication range Bring the Bluetooth device closer to t...

Страница 26: ... l 24 and then turn this system off and on Reconnect the compatible device to the Wi Fi network and then select this system as the AirPlay speakers again My wireless network router is WPS PBC compatible but the pairing does not work If the network is set to be invisible the push button configuration does not work In this case either make the wireless network visible while you set up the network fo...

Страница 27: ...tes Try moving this system closer to the wireless network router NOCONNECT This system cannot connect to the network Check the network connection l 10 This system has a wireless communication problem between the CD unit and the speaker unit l 25 NODEVICE The iPod iPhone iPad device is not inserted correctly Read the instructions and try again l 9 The battery of the iPod iPhone iPad is depleted Cha...

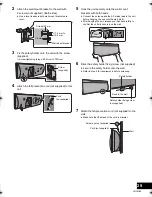
Страница 28: ...t 1 5 mm 1 Measure and mark the position of the wall mount brackets Both sides Use figures below to identify the screwing positions The position to attach the wall mount brackets Space required Installation accessories Keep the safety holder out of reach of children to prevent swallowing Keep the screws out of reach of children to prevent swallowing Keep the wall mount brackets out of reach of chi...

Страница 29: ...ns lead to the unit before hanging the unit onto the wall l 8 After hanging the unit release your hands carefully to confirm the unit sits securely on the wall 6 Drive the safety holder fixing screw not supplied to secure the safety holder onto the wall Refer to step 2 for requirements before screwing 7 Attach the fall prevention cord not supplied to the wall Make sure that the slack of the cord i...

Страница 30: ...stations Frequency range 87 50 MHz to 108 00 MHz 50 kHz step Antenna terminals 75 unbalanced DAB memories 20 channels Frequency Band Wavelength Band III UK Only 10B 211 648 MHz 11B to 12D 218 640 MHz to 229 072 MHz Band III Europe Australia 5A to 13F 174 928 MHz to 239 200 MHz Australia 9A to 9C 202 928 MHz to 206 352 MHz Sensitivity BER 4x10 4 Min Requirement s98 dBm DAB External Antenna Terminal...

Страница 31: ...ocator In addition to your rights under this warranty Panasonic products come with consumer guarantees that cannot be excluded under the Australian Consumer Law If there is a major failure with the product you can reject the product and elect to have a refund or to have the product replaced or if you wish you may elect to keep the goods and be compensated for the drop in value of the goods You are...

Страница 32: ...ur waste disposal service or the point of sale where you purchased the items Penalties may be applicable for incorrect disposal of this waste in accordance with national legislation For business users in the European Union If you wish to discard electrical and electronic equipment please contact your dealer or supplier for further information Information on Disposal in other Countries outside the ...

Отзывы: