


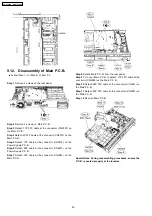


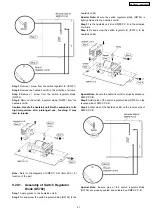


9.12. Disassembly of Main P.C.B.
•
•
•
•
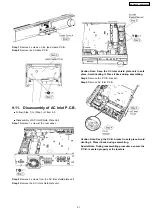
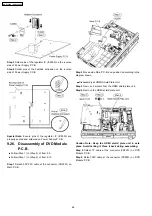
Follow (Step 1) to (Step 3) of Item 9.3.
Step 1 Remove 3 screws at the rear panel.
Step 2 Remove 2 screws on Main P.C.B.
Step 3 Detach 17P FFC cable at the connector (CN2007) on
the Main P.C.B.
Step 4 Detach 4P FFC cable at the connector (CN2013) on the
Main P.C.B.
Step 5 Detach 13P cable at the connector (CN2016) on the
Power Supply P.C.B.
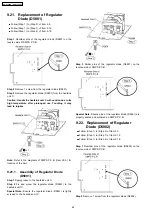
Step 6 Detach 28P cable at the connector (CN6001) on the
Power Supply P.C.B.
Step 7 Detach 14P cable at the connector (CN2003) on the
Main P.C.B.
Step 8 Detach Main P.C.B. from the rear panel.
Step 9 Turn over Main P.C.B. to detach 17P FFC cable at the
connector (CN2009) on the Main P.C.B.
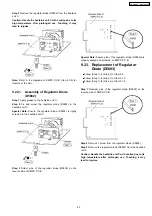
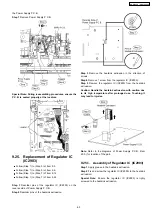
Step 10 Detach 50P FFC cable at the connector (CN2001) on
the Main P.C.B.
Step 11 Detach 22P FFC cable at the connector (CN2801) on
the Main P.C.B.
Step 12 Remove Main P.C.B.
Special Note: During reassembling procedures, ensure the
P.C.B. is seated properly at the locators.
52
SA-PT960P / SA-PT960PC
Содержание SA-PT960P
Страница 12: ...12 SA PT960P SA PT960PC ...
Страница 44: ...44 SA PT960P SA PT960PC ...
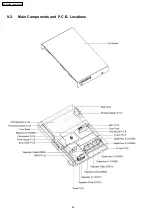
Страница 46: ...9 2 Main Components and P C B Locations 46 SA PT960P SA PT960PC ...
Страница 80: ...14 Voltage and Waveform Chart 14 1 DVD Module P C B 80 SA PT960P SA PT960PC ...
Страница 92: ...SA PT960P SA PT960PC 92 ...
Страница 102: ...102 SA PT960P SA PT960PC ...
Страница 130: ...CN5501 Fig 3 Fan Connector 130 SA PT960P SA PT960PC ...
Страница 132: ...Table 1 132 SA PT960P SA PT960PC ...
Страница 136: ...136 SA PT960P SA PT960PC ...
Страница 141: ...24 Exploded Views 24 1 Cabinet Parts Location SA PT960P SA PT960PC 141 ...
Страница 142: ...24 2 Packaging SA PT960P SA PT960PC 142 ...