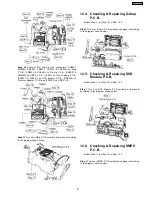
Step 16
Connect FFC cable at the connectors (CN2001,
CN2003, CN2007, CN2010, CN2013 & CN2020) on Main
P.C.B., (CN5050 & CN5501) on D-Amp P.C.B., (CN5801 &
CN5802) on SMPS P.C.B. (CS901) on Tray Loading P.C.B.,
(FP8251 & FP8531) on DVD Module P.C.B., (CN6300) on
Wireless Adapter P.C.B. and (FP9002) on USB P.C.B.
Step 17
Turn over Main P.C.B vertically and place it according
to the diagram shown below.
12.4. Checking & Repairing D-Amp
P.C.B.
·
Follow (Step 1) to (Step 16) of Item 12.3.
Step 1
Turn over D-Amp P.C.B vertically and place it according
to the diagram shown below.
12.5. Checking & Repairing DVD
Module P.C.B.
·
Follow (Step 1) to (Step 16) of Item 12.3.
Step 1
Turn over DVD Module P.C.B vertically and place it
according to the diagram shown below.
12.6. Checking & Repairing SMPS
P.C.B.
·
Follow (Step 1) to (Step 16) of Item 12.3.
Step 1
Turn over SMPS P.C.B vertically and place it according
to the diagram shown below.
67
SA-PT550GCP
Содержание SA-PT550GCP
Страница 3: ...3 SA PT550GCP ...
Страница 12: ...12 SA PT550GCP ...
Страница 22: ...8 New Features 8 1 About HDMI 8 1 1 What is HDMI 8 1 2 Advanced Digital Pictures 22 SA PT550GCP ...
Страница 23: ...8 1 3 Advanced Digital Sound 8 1 4 Easy to Use 8 1 5 HDMI Compatible Products 23 SA PT550GCP ...
Страница 49: ...10 2 Main Components and P C B Locations 49 SA PT550GCP ...
Страница 65: ...Step 3 Remove the middle chassis Step 4 Remove the traverse unit 65 SA PT550GCP ...
Страница 68: ...68 SA PT550GCP ...
Страница 82: ...SA PT550GCP 82 ...
Страница 92: ...92 SA PT550GCP ...
Страница 110: ...SA PT550GCP 110 ...
Страница 118: ...SA PT550GCP 118 ...
Страница 126: ...25 Exploded Views 126 SA PT550GCP ...
Страница 127: ...25 1 Cabinet Parts Location SA PT550GCP 127 ...
Страница 128: ...SA PT550GCP 128 ...
Страница 129: ...25 2 Packaging SA PT550GCP 129 ...


