Menu navigation
42 - ENGLISH
Settings
Menu navigation
Navigating through the menu
▶
■
Operating procedure
button
1) Press the <MENU> button on the
remote control or the control panel.
▶
z
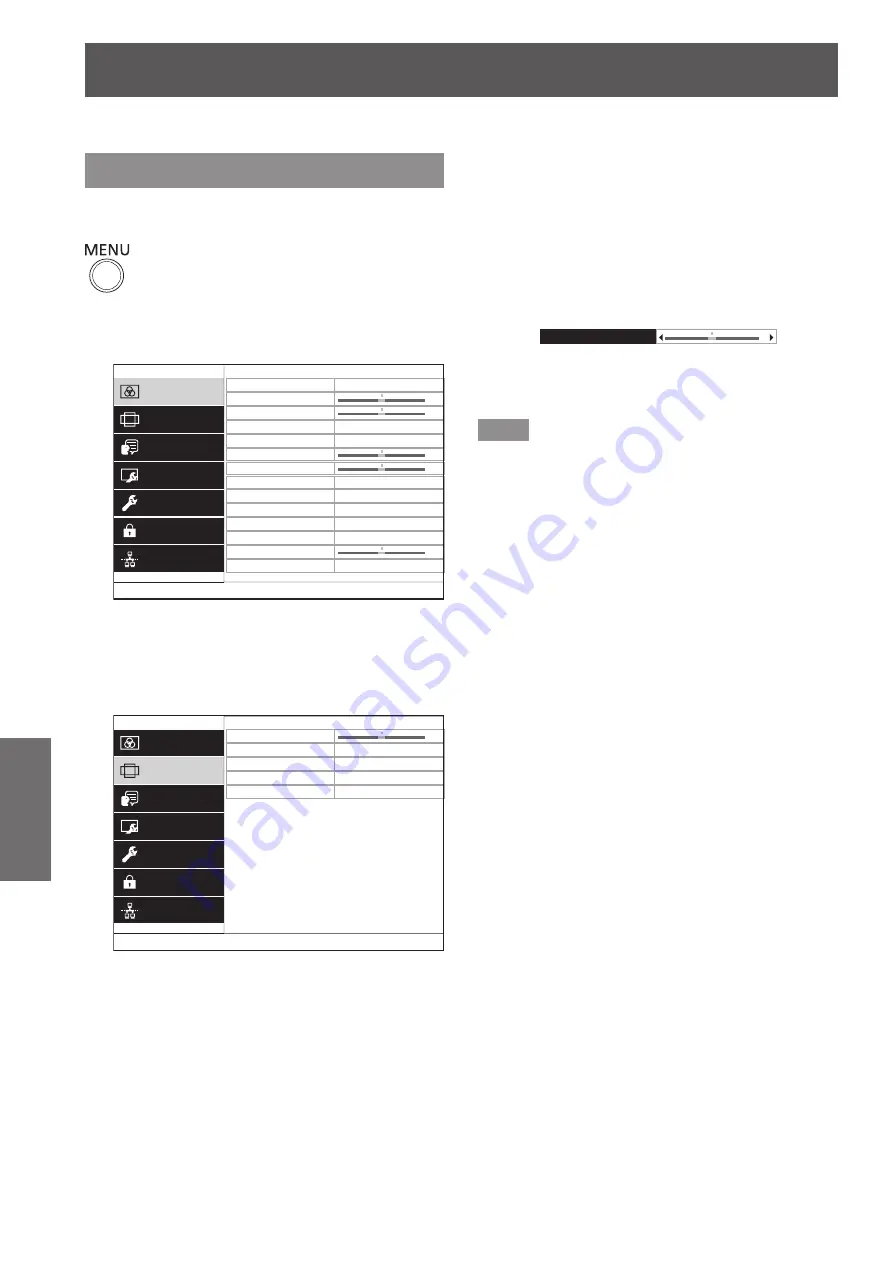
The main menu screen is displayed.
0
0
0
0
0
PICTURE
POSITION
LANGUAGE
DISPLAY OPTION
PROJECTOR SETUP
SECURITY
NETWORK
PICTURE MODE
CONTRAST
BRIGHTNESS
COLOR
TINT
SHARPNESS
COLOR TEMPERATURE
DYNAMIC IRIS
WAVEFORM MONITOR
ADVANCED MENU
DAYLIGHT VIEW
STANDARD
ON
AUTO
AUTO
DIGITAL CINEMA REALITY
NOISE REDUCTION
RGB/YC
B
C
R
2) Press
▲▼
to select the main menu
item.
▶
z
The selected item is highlighted in yellow.
▶
z
The sub-menu of the selected main menu item
is displayed on the right.
0
0
0
PICTURE
POSITION
LANGUAGE
DISPLAY OPTION
PROJECTOR SETUP
SECURITY
NETWORK
KEYSTONE
SHIFT
OVER SCAN
ASPECT
FRAME LOCK
NORMAL
H :
V :
OFF
3) Press the <ENTER> button.
▶
z
Sub-menu items become selectable.
4) Press
▲▼
to select the sub-menu
item, then press
◀▶
to change the
settings or adjust the parameter
values.
▶
z
For some items, press
◀▶
to display an
individual adjustment screen with a bar scale as
shown in the following diagram.
0
KEYSTONE
▶
z
For items that are only names, pressing the
<ENTER> button displays the next screen and
advanced settings can be performed.
Note
z
Pressing the <RETURN> or <MENU> button
when the menu screen is displayed returns to the
previous screen.
z
Some items may not be adjusted or used for certain
signal formats being input to the projector.
z
Some items can be adjusted even if signals are not
input.
z
Individual adjustment screen is cleared
automatically if no operation is performed for
approximately five seconds.
z
Refer to “Main menu” (
page 44) or “Sub menu”
(
pages 44 to 45) regarding the menu items.
The on-screen menu (Menu) is used to perform various settings and adjustments of the projector.


