background image

40

System setting (continued)

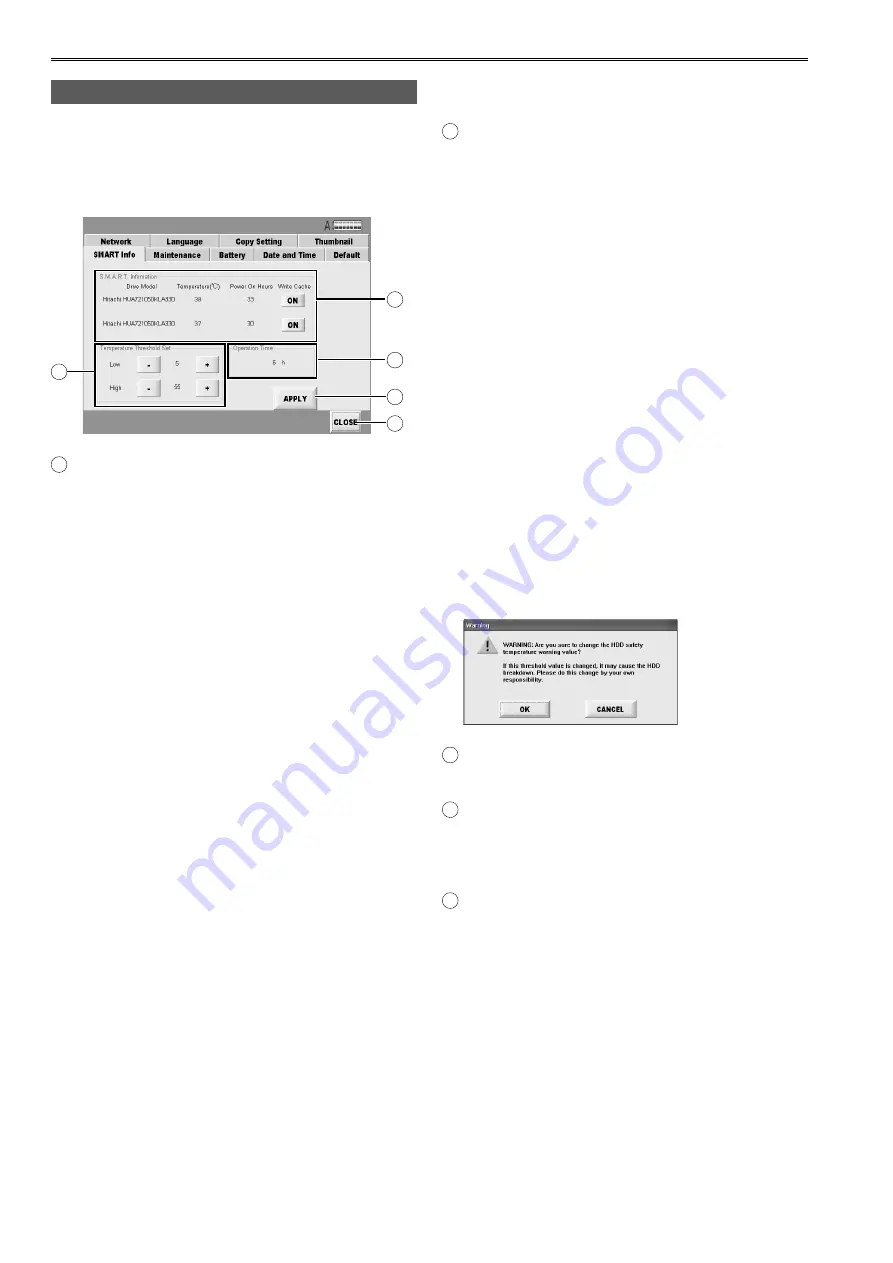
Checking SMART Info

“SMART” is an abbreviation of “Self-Monitoring, 
Analysis and Reporting Technology”.
This function is incorporated within hard disk drives in 
order to quickly discover any problems the drive and 
estimate the extent of the damage.

A

B

C

E

D

A

 S.M.A.R.T. Information


 Drive Model

     The model numbers of the HDD currently used 

are displayed in this column.


 Temperature (°C)

     The current temperatures of the HDD are 

displayed in this column.


 Power On Hours

     The total power-on time of the HDD are 

displayed in this column.


  Write Cache

     These can be used to set the Write Cache of the 

HDD to ON or OFF.

ON button:

  The response to data writing is faster but it may 
actually take a short while for the data to be 
written on the HDD.


OFF button:

     The response time is longer than at the ON 

setting, but the data will definitely be written.  
(This is the factory setting.)

B

  Temperature Threshold Set

Alarm messages are displayed if HDDs exceed the 
specified temperature. If the APPLY button is not 
pressed after these settings have been changed, 
the new settings will not be reflected.


 Low (Setting range: 0 °C to 10 °C)

      When the temperature falls below this setting, 

the low-temperature alarm is displayed. (Factory 
setting: 5 °C)


 High (Setting range: 50 °C to 60 °C)

     When the temperature rises above this setting, 

the high-temperature alarm is displayed. (Factory 
setting: 55 °C)


 + button

     When this is pressed, the temperature setting is 

increased.


 – button

     When this is pressed, the temperature setting is 

reduced.

When these settings are changed, the following 
message is displayed.

C

  Operation Time

Displayed here is the main unit's operation time.

D

 APPLY button

Set the Write Cache mode and the Temperature 
Threshold Set value in the S.M.A.R.T. Information 
box.

E

 CLOSE button

Return to the main screen.

Содержание P2HD AJ-HRW10G

Страница 1: ...ing Instructions Hard Disk Storage Unit Model No AJ HRW10G Before operating this product please read the instructions carefully and save this manual for future use VQT2C68 S0409H0 M D Printed in Japan ENGLISH ...

Страница 2: ... Broadcast Television Systems Company 1 800 524 1448 This device complies with Part 15 of the FCC Rules Operation is subject to the following two conditions 1 This device may not cause harmful interference and 2 this device must accept any interference received including interference that may cause undesired operation FCC Note This equipment has been tested and found to comply with the limits for ...

Страница 3: ...waste perchlorate To remove the battery Main Power Battery Ni Cd Ni MH Li ion Battery To detach the battery please proceed in the reverse order of the installation method described in this manual Refer to page 8 for the detail If a battery made by any other manufacturer is to be used check the Operating Instructions accompanying the battery Back up Battery Lithium Battery For the removal of the ba...

Страница 4: ...tion 16 Setting the RAID function 17 Viewing basic RAID information Basic Information 18 Setting up RAID drives Create RAID 18 Deleting RAID drives Delete RAID 19 Rebuilding RAID drives Rebuild 20 RAID Setting 21 Copying 22 Copying entire cards 22 Manual copy mode 22 Auto copy mode 23 Confirmation after copying 24 Checking the clips in P2 card HDD 25 Copying individual clips COPY 27 Deleting indiv...

Страница 5: ...ld separately Precautions for Use Points to bear in mind when destroying or transferring the P2 cards or hard disk drives Formatting memory cards or hard disk drives hereafter HDDs or deleting data on them using the format or delete function on the unit or on a computer will only change the file management data it will not completely delete the data on the memory cards or HDDs It is recommended ei...

Страница 6: ... E LCD panel with touch panel All the operations are done on the touch panel except power ON and OFF Front Panel HEADPHONES HDD1 HDD2 A F B C G D E H I J K F 5 inch bay units used to install the HDD You can install the HDD SATA which you purchased with the 5 inch bay unit For details on the installation method and the HDDs which can be used refer to the procedure described separately and proceed w...

Страница 7: ...ear POWER switch is ON Back Panel F LAN connector These LAN connectors support speeds of 1000 100 and 10 Mbps Please set the IP address in GUI of this unit page 38 Use of external DC power supply Make sure that the output voltage of the external DC power supply meets the rated voltage of the unit before connecting the power supply Inrush current occurs when the unit is turned on and insufficient p...

Страница 8: ...e lever 3 Set the battery type Specify the type of battery on the Battery tab of the SETTING screen page 41 Removing the battery Completely push down and hold the release lever on the battery holder Then slide the battery in the opposite direction to the arrow while holding the lever down The following is a list of batteries that have been tested and verified to work with this unit PROPAC14 TRIMPA...

Страница 9: ...t panel and remove the panel Total 4 screws Exercise caution when removing the front panel since the screw at the top left in the figure above will catch on the transparent panel 3 Remove the screws x2 each securing the 5 inch bay unit cover to the front panel and then remove the cover 4 Loosen the left and right anchoring screws of the 5 inch bay unit brackets and then remove the brackets from th...

Страница 10: ...d SATA signal connector on the back of the bay unit For connection details refer to the operating instructions for the 5 inch bay units 7 Anchor the 5 inch bay unit brackets to the main unit using the left and right anchoring screws 8 Put the front panel back in its original position using the 4 screws 9 Close the top panel and tighten the top panel screws x2 We recommend you to use the following ...

Страница 11: ...eration refer to the HDD user manual for information on installation and use When moving the unit after setting the rear POWER switch to OFF be sure to wait until the HDDs stop rotating about 2 minutes before moving the unit to avoid subjecting the unit to shock or vibration After the unit is turned OFF HDDs continue spinning from inertia for a while Before moving the storage unit be absolutely su...

Страница 12: ...d in diluted neutral detergent after wringing the cloth well Use a dry cloth to wipe it dry If you use a chemically treated dust cloth follow the precautions for use Handling the touch panel Do not press pointed objects hard metallic objects or objects such as pencils or ballpoint pens against the touch panel This may damage the screen If there is any oil or other substance adhering to the surface...

Страница 13: ...ntil they click and lock into place If a ferrite core moves along the cable and cannot be fixed in place attach binders on both sides of the ferrite core to immobilize it Cut the binders with scissors to adjust the length Handle ferrite cores with care Dropping or subjecting the cores to impact may break them in two Always use a shielded LAN cable Use of external DC power supply Use an external DC...

Страница 14: ...rn the unit on 2 Insert a P2 card in a P2 card slot When a P2 card is inserted an icon is displayed on the control panel Also at this time the P2 CARD ACCESS LED for the corresponding slot indicates the status of the P2 card Ejecting P2 card 1 Press the EJECT button next to the P2 card slot 2 After the EJECT button emerges press it again to eject the P2 card EJECT button During access or detection...

Страница 15: ...ature of HDD the HDD may be damaged Please move the unit to a cooler place and do not use it until the temperature is melt You can check the HDD temperature on the screen after startup For the rating temperature refer to the specifications of each HDD used Power OFF To turn off the power either press the front POWER button or the EXIT button on the main screen displayed after startup and then pres...

Страница 16: ...stored G SETTING button page 38 Do various settings H UPDATE button page 45 Update the application I ABOUT button page 45 Check the current version of application J EXIT button page 15 Turn OFF or RESTART Power indication The icon at the top right of the screen indicates the power supply status as shown by the displays below Icon Information External DC power supply Battery power supply full or ne...

Страница 17: ...he JBOD setting C Delete RAID page 19 This deletes the JBOD or RAID1 logical drive Proceed with this when Using an HDD this was previously used with the JBOD setting now with the RAID1 setting Using an HDD this was previously used with the RAID1 setting now with the JBOD setting D Rebuild page 20 This starts and finishes the data rebuilding process Proceed with this when either of the following ev...

Страница 18: ...ntinues settings E CLOSE button Return to the main screen Setting up RAID drives Create RAID Viewing basic RAID information Basic Information The statuses concerning the HDDs used and RAID are displayed A B C A Physical Drive The following information about the HDD installed is displayed Drive Model Display the HDD product numbers Port Display the numbers of the ports where the RAID boards are con...

Страница 19: ...elect the device you want to delete and press OK button a confirming message will display Press OK button and the selected theoretical device will be deleted from the theoretical device list After the finished message is displayed Press the OK button Press NEXT button after setting the confirming screen will display Please press OK button In the RAID1 mode In the JBOD mode When HDDs of different c...

Страница 20: ...ss When Need Rebuild was displayed this button is shown with black text C STOP button Stop the rebuilding D CLOSE button Return to the main screen When the STOP button has been pressed a confirmation message such as the one shown below is displayed To stop the rebuilding press the OK button to cancel the stopping press the CANCEL button If an HDD has been replaced due to trouble while setting RAID...

Страница 21: ...ebuilding time Slow Normal Fast Playback frame skip amount Low number of frames Middling number of frames High number of frames The rebuilding time is about 2 hours for 500 GB The rebuilding times given are estimates only and will vary depending on the HDD used and operating environment B Automatic Rebuilding Status Enable button Rebuild automatically Disable button Rebuild manually To initiate re...

Страница 22: ...opied from inserted P2 cards To switch between auto and manual copy modes and complete the settings access the Copy Settings tab on the SETTING screen page 39 Manual copy mode Insert the P2 card to copy and press the COPY button on the main screen Next complete the copy settings as follows A B C D In the RAID1 mode A B C D In the JBOD mode A SOURCE Select the P2 card to copy Multiple cards in slot...

Страница 23: ...e amount of recordable memory on the HDD is less than that on the P2 card If a copied card has been inserted into the HDD while ON is set for the copied card check function Card Check auto copy will not be executed To re copy an already copied card press the Copy All button Manual copy mode continued Take the steps below for manual copying 1 In SOURCE select the P2 card to copy More than one card ...

Страница 24: ... is restored Once copying starts in manual or auto copy mode the sequence of processing is as follows The copying state and the progress of each card displays on the screen A B C A Status displays The meaning of the status indicated is described below Copying The contents are being copied to this destination Waiting Copy standby state Verifying State in which copying is completed and the data on t...

Страница 25: ...the file blue framed and press this button the copying destination will be displayed This function button is not displayed when HDD is selected E DELETE button page 27 Press this button will delete the selected clips blue framed F PLAY button page 32 Start the application to play the selected clip blue framed G PROP button page 28 Press this button the property of the clip yellow framed in cursor ...

Страница 26: ...ayed here O DUR The recording duration of the clip yellow framed where the cursor is positioned is displayed here P V_FORMAT The recording signal format of the clip yellow framed where the cursor is positioned is displayed here Q OPEN button Select the folder you want to view and press this button to open it R CLOSE button P2 cards Close the thumbnail screen and go back to the folder displaying sc...

Страница 27: ... button is pressed on the confirmation screen the EXPLORE screen which displays the folders and icons on the HDD will appear If the NO button is pressed instead the main screen is restored Deleting individual clips DELETE When the DELETE button is pressed on the EXPLORE screen the selected clip blue framed can be deleted DELETE CLIP NUMBER displays the number of clips selected A B You can do delet...

Страница 28: ...ayed D NEXT button The property of the one chip after the one in cursor will be displayed E EDIT button When this button is pressed the Meta Data Edit screen with the items shown on the right is displayed and the Meta Data can be changed F CLOSE button Close the property screen and go back to the thumbnail screen The cursor moves to the thumbnail displayed last on the property display screen Editi...

Страница 29: ...ress the ENTER button Select listed devices device selection buttons When the Device Selection Button is pressed on the EXPLORE screen the devices to be displayed on the thumbnail screen are selected A B C D E F A ALL SLOTS button This displays all the slots B ALL HDDS button This displays all the HDD This display will not appear when in RAID mode C HDD1 button HDD2 button RAID1 button HDD will be...

Страница 30: ...eyword click the input field input the word using the soft keyboard screen and enter it For details on the soft keyboard refer to page 29 Checking the clips in P2 card HDD continued After entering the keyword press the APPLY button and the OK button to proceed with filtering If there are no clips which match the keyword concerned a message indicating that no such clips exist is displayed If clips ...

Страница 31: ...following display appears when the SORT button is pressed on the EXPLORE screen A B C D E F A START TC button This button rearranges the clips in the START TC order Each time it is pressed the start TC of the clips is switched between ascending or descending order B CLIP NAME button This button rearranges the clips in the CLIP NAME order Each time it is pressed the clip names are switched between ...

Страница 32: ...he final clip press the button again to jump to the end of the clip G Volume Up button This increases the volume level of the sound H Volume Down button This reduces the volume level of the sound I VOLUME The slider is slid by operating the and buttons on the left J SETTING button page 33 Set the speed in the REW and FF K CLOSE button Stop playing clips in PLAYER and go back to EXPLORE screen L TI...

Страница 33: ...eed button Clips are played rapidly while skipping frames at a speed equivalent to 4 times the normal speed B 8Xspeed button Clips are played rapidly while skipping frames at a speed equivalent to 8 times the normal speed C 16Xspeed button Clips are played rapidly while skipping frames at a speed equivalent to 16 times the normal speed D CLOSE button This restores the PLAYER application screen ...

Страница 34: ... in unshared state B SHARE ALL button Press this button to share all the folders C UNSHARE ALL button Press this button to make all the folders in unshared state Sharing is on the basis of individual folders D DELETE button When this button is pressed the selected folder can be deleted page 27 E OPEN button Select the folder you want to view and press this button to open it F In this status the ne...

Страница 35: ...n label to SELECT ALL B SELECT button UNSELECT button Move the cursor to desired clips and folders and press the SELECT button to select them The button label changes to UNSELECT when the cursor is moved to selected clips and folders Pressing the UNSELECT button clears the selected status When the button is double clicked its display is switched between SELECT and UNSELECT A B C D E C ERASE button...

Страница 36: ...tted if the write protect switch is set to Protect The device is formatted by taking the following steps 1 Select the device and press START button the FORMAT confirming screen will display 2 Press OK button in this screen the further confirming screen will display 3 Press OK button again and begin the formatting Please understand that it can not be canceled once the formatting begins The ending c...

Страница 37: ...er format please press FORMAT select button on the bottom of the screen A Slots Write protected P2 cards are identified by a mark next to the slot number B Format select button This indicates the used memory and total memory USED ALL in minutes MIN for the corresponding format One of the following 5 buttons is displayed DVCPRO DVCPRO 50 DVCPRO HD AVC I50 AVC I100 C CLOSE button Close the INFO scre...

Страница 38: ...ad on this screen and press CONFIG IP button to set IP Address Indicate the IP address you set or set by the server Sub Mask Indicate the sub mask you set Gateway Indicate the gateway you set D Keyboard Use this numeric keypad to input IP address when setting address manually E CONFIG IP button Press this button to confirm manual IP address setting after inputting the address F CLOSE button Return...

Страница 39: ...vate OFF C Automatic COPY This function will automatically copy inserted P2 cards ON button OFF button Set the AUTO COPY function to Activate ON or Deactivate OFF Destination HDD button Set the destination for AUTO COPY Destination HDD will be displayed as RAID1 when in RAID1 mode D DEFAULT VALUE button Restore Copy Setting screen settings only to factory settings E CLOSE button Return to the main...

Страница 40: ...than at the ON setting but the data will definitely be written This is the factory setting B Temperature Threshold Set Alarm messages are displayed if HDDs exceed the specified temperature If the APPLY button is not pressed after these settings have been changed the new settings will not be reflected Low Setting range 0 C to 10 C When the temperature falls below this setting the low temperature al...

Страница 41: ...CLOSE button Return to the main screen Setting the date and time Date and Time Set the unit s date and time A D F C E B G A yyyy mm dd Set the date year month day B hh mm Set the time C button Use this to increment the numerical values D button Use this to decrement the numerical values E CANCEL button Use this to undo the change made to a numerical value F APPLY button Use this to set the date an...

Страница 42: ...o restore all the settings except the ones below to the factory settings Network Battery B CLOSE button Return to the main screen 1 To restore the settings to the factory settings press the INITIALIZE button Bear in mind that all the settings except for Network and Battery will be restored to the factory settings ...

Страница 43: ... any time press the STOP button The check operation is stopped and the results of what has been checked so far are displayed It takes about 2 hours to check 500 GB of data so use the external DC power supply Only HDD1 is accessed when the unit is used in the RAID1 mode To check both HDDs set the RAID1 mode to the JBOD mode and check each HDD in turn A Select Select HDD on which to perform maintena...

Страница 44: ...stalled 2 Press the LOG button at the bottom right of the Maintenance tab screen on the SETTING screen The latest registration data is created automatically 2 3 On the computer mentioned in step 1 access the registration folder on the unit P2Writer PASS over the network and acquire the registration data You can now review a variety of information about the unit and manage records 3 After registrat...

Страница 45: ... step 1 into the unit s version update folder C P2WriterUpdate over the network from the PC used to download the data 4 After copying the data please push the OK button 5 If a new version is found the version will be updated automatically A message prompting you to restart the unit is then displayed so restart the unit If only the data for an old version is found the version is not updated 6 After...

Страница 46: ...t is also possible to connect discrete HDDs by using the interfaces The contents may be deleted in the OS such as Windows Macintosh Linux for the clips are in FAT32 format Please understand it when you access to HDD We recommend that you make a backup on a separate storage media in order to protect the important data saved in the HDD It is necessary to check the volume of the storage media which u...

Страница 47: ...10 to 85 In order to protect the HDD if the internal temperature of the HDD exceeds the specified temperature range of the unit a warning is displayed and some operations are disabled because operation under these conditions may damage the unit Requirement for connecting to PC Be able to connect to Microsoft Network Be able to connect the PC using a Gigabit LAN Specifications of HDD which can be u...

Страница 48: ...r more information about collection and recycling of old products and batteries please contact your local municipality your waste disposal service or the point of sale where you purchased the items Penalties may be applicable for incorrect disposal of this waste in accordance with national legislation For business users in the European Union If you wish to discard electrical and electronic equipme...

Отзывы: