VCR Mode
-60-
Playback Digital Effect Functions
During playback, special digital effects can be
added to the recorded pictures. The same
effects as those of Picture Effects, which are
used during recording, are obtained.
1
Press the [
1
] Button
(79)
.
2
Press the [SELECT] Button
(68)
on the
Remote Controller to select a desired
digital effect.
≥
When the [SELECT] Button is pressed
repeatedly, the digital effect selection
changes.
≥
The same setting can be done using
[DIGITAL EFFECT] Sub-Menu on the
[VCR FUNCTIONS] Main-Menu.
To suspend Playback Digital Effect
Temporarily
Press the [OFF/ON] Button
(70)
to suspend or
restart the digital effect. When the digital effect
is paused temporarily, the selected effect’s
indication flashes.
To Cancel the Digital Effect
Press the [SELECT] Button
(68)
on the Remote
Controller and clear the digital effect indication.
ª
Wipe Mode and Mix Mode
1
Press the [
1
] Button
(79)
.
2
Press the [SELECT] Button
(68)
on the
Remote Controller and select [WIPE] or
[MIX].
3
Press the [STORE] Button
(69)
at the
moment you want to save as a still picture.
≥
The [
B
] or [
C
] Indication appears,
and the image is saved.
4
Press the [OFF/ON] Button
(70)
in the
scene in which you want to use the Wipe
or Mix effect.
≥
The scene changes as a result of the Wipe
or Mix effect.
≥
The Wipe Function and Mix Function can be
used only from the Remote Controller during
playback.
≥
If the [OFF/ON] Button
(70)
is pressed while
Wipe or Mix is carried out, the effect will stop
temporarily at that point. Pressing the [OFF/
ON] Button
(70)
again will bring back the
effect.
INDEX
INDEX
SELECT
STOP
K
L
∫
V
/REW
STILL ADV
T
W
s
V
PLAY
PAUSE
FF/
W
STILL ADV
6
1
5
;
E
D
(79)
SELECT
STORE
K
L
∫
OFF/ON
P.B.DIGITAL
T
W
MENU
ITEM
SET
VAR.
SEARCH
P.B.
ZOOM
(68)
(70)
INDEX
INDEX
SELECT
STOP
K
L
∫
V
/REW
STILL ADV
T
W
s
V
PLAY
PAUSE
FF/
W
STILL ADV
6
1
5
;
E
D
(79)
SELECT
STORE
K
L
∫
OFF/ON
P.B.DIGITAL
T
W
MENU
ITEM
SET
VAR.
SEARCH
P.B.
ZOOM
(68)
(69)
(70)
≥
For other notes concerning this item, see
-66-
.
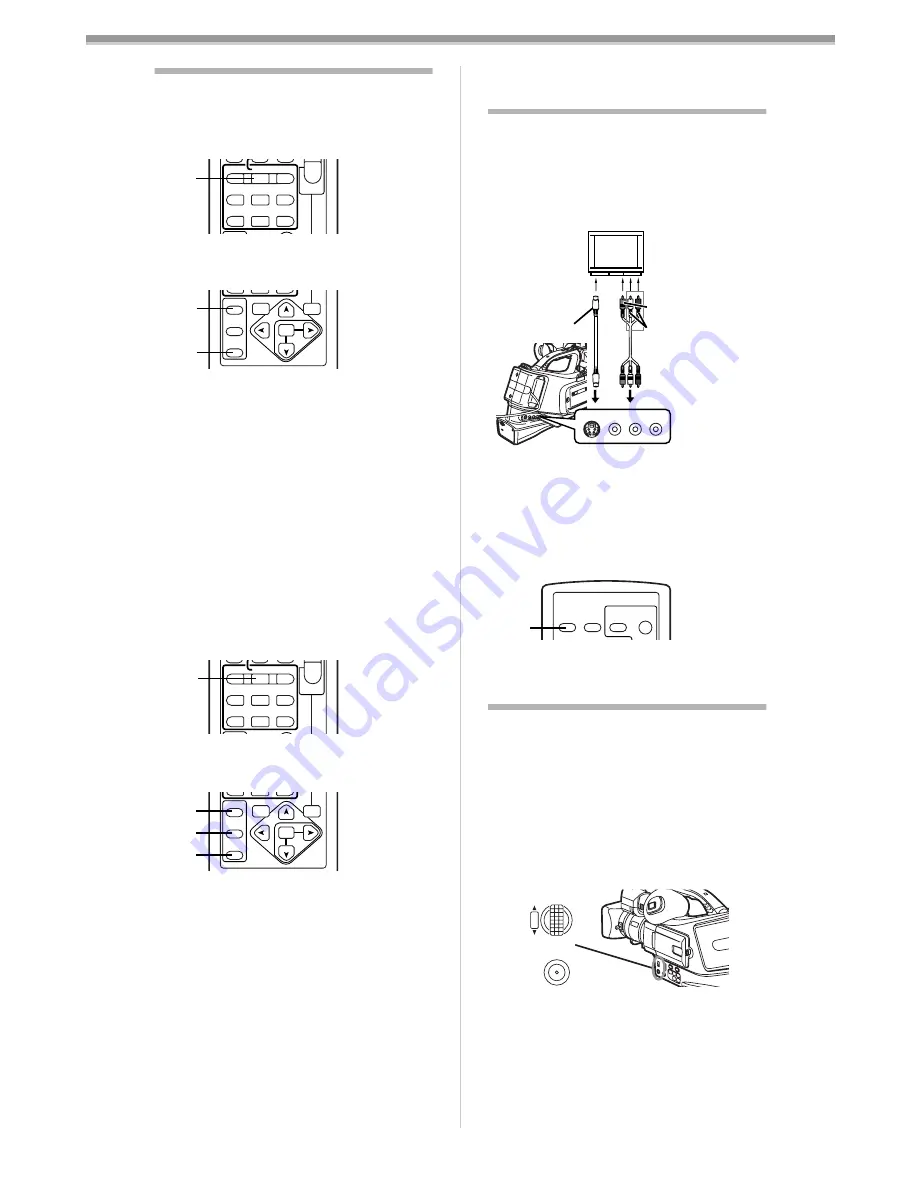
Playing Back on Your TV
By connecting your Movie Camera with your TV,
the recorded scenes can be viewed on your TV
screen.
≥
Before connecting them, turn off the power of
both the Movie Camera and TV.
After connecting the Movie Camera and the
TV as illustrated, start playback.
≥
Using the AV Cable
1
, make a connection
with the TV. If the TV has an S-Video
Socket, connect the S-Video Cable
2
, too.
To Make the Indications Appear on the TV
Screen
Press the [OSD] Button
(60)
on the Remote
Controller.
≥
For other notes concerning this item, see
-66-
.
Audio Dubbing
You can add music or narration to the recorded
Cassette.
≥
If the tape recorded in the [16bit] Mode is
dubbed with the Audio Dubbing function, the
original sound is erased. (If you wish to
preserve the original sound, use the [12bit]
Mode when recording.)
≥
Audio Dubbing cannot be performed on a
recording done in LP Mode. (
-47-
)
1
Set [VCR FUNCTIONS] >> [AV IN/
OUT SETUP] >> [AV JACK] >> [IN/OUT].
2
Continuing the aforesaid setup, select
[A.DUB INPUT] >> [MIC] or [AV IN].
≥
Set to [AV IN] when external device is used,
and to [MIC] when an external or built-in
microphone is used.
3
Switch the Movie Camera over to the Still
Playback Mode where you want to add
new sound.
[VIDEO IN]
[AUDIO IN]
[S-VIDEO IN]
VIDEO
IN/OUT
AUDIO
L–
–R
IN/OUT
S-VIDEO
IN/OUT
1
2
OSD
DATE/
TIME
T
W
PHOTO
SHOT
START/
STOP
(60)
MENU
W.B/SHUTTER/IRIS
PUSH
VOL/JOG
(14)
(18)


