41
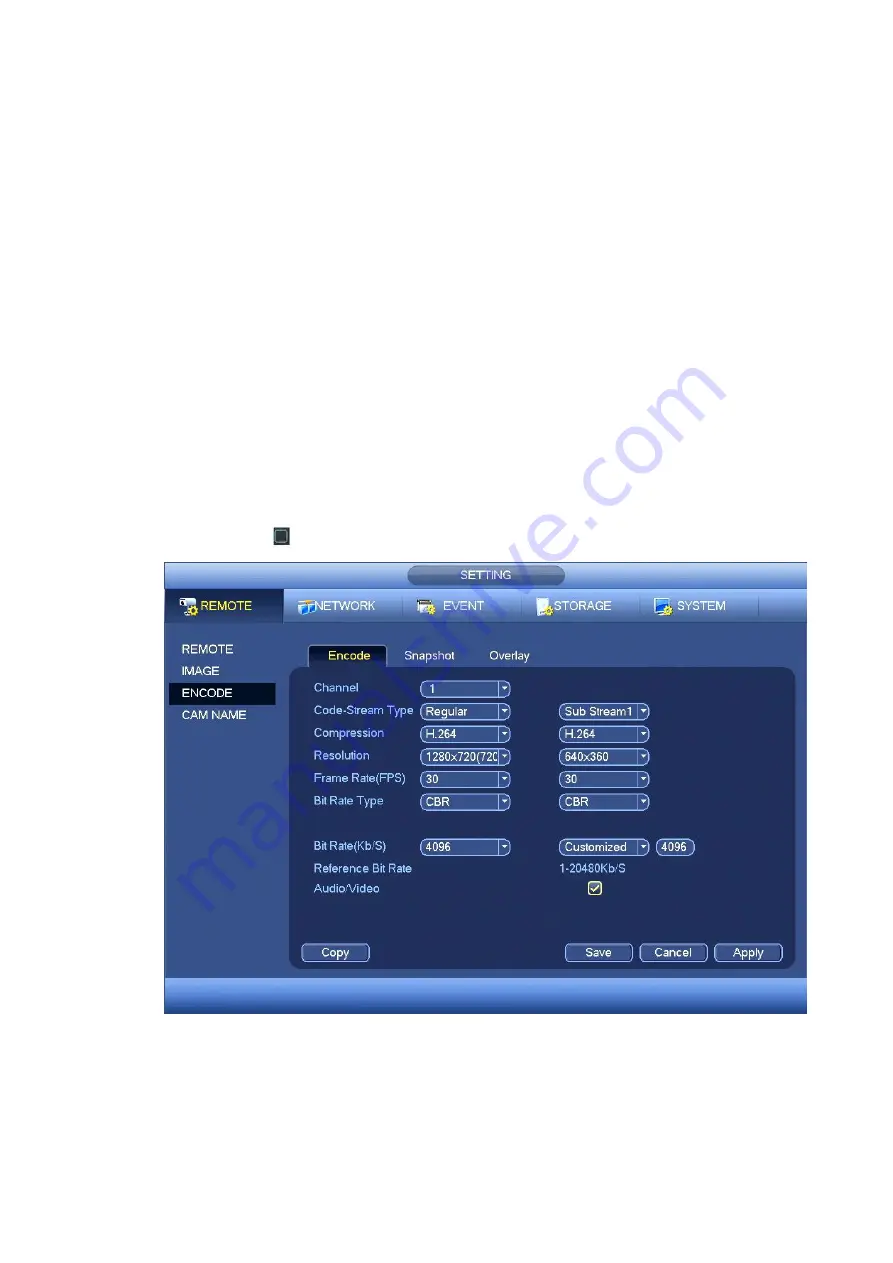
Channel: Select the channel you want.
Code-Stream Type: Please select from the dropdown list. There are some options: regular/motion
detect/alarm. You can set the various encode parameters for different record types.
Compression: System supports H.264, MPEG4, MJPEG and etc.
Resolution: The mainstream resolution type is IPC
’s encoding config. Generally there is
D1/720P/1080P.
Frame rate: It ranges from 1fps to 25fps in NTSC mode and 1fps to 30fps in PAL mode.
Bit rate type: System supports two types: CBR and VBR. In VBR mode, you can set video quality.
Quality: There are six levels ranging from 1 to 6. The sixth level has the highest image quality.
Bit Rate
:
You can select bitrate value in the combo box.
Video/audio: You can enable or disable the video/audio. Please note, once you enable audio
function for one channel, system may enable audio function of the rest channels by default.
Copy
:
After you complete the setup, you can click Copy button to copy current setup to other
channel(s). You can see an interface is shown as in Figure 4-39. You can see current channel
number is grey. Please check the number to select the channel or you can che ck the box ALL.
Please click the OK button in Figure 4-39 and Figure 4-38 respectively to complete the setup. Please
note, once you check the All box, you set same encode setup for all channels. Audio/video enable
box, overlay button and the copy button is shield.
Please highlight icon
to select the corresponding function.
Figure 4-37
4.7.1.2 Snapshot
Here you can set snapshot mode, picture size, quality and frequency. See Figure 4-38.
Mode: There are two modes: timing and trigger. If you set timing mode, you need to set snapshot
frequency. If you set trigger snapshot, you need to set snapshot activation operation.
Содержание k-nl304g
Страница 1: ...Network Video Recorder User s Manual Model No K NL304K G K NL308K G Version 1 0 2 ...
Страница 41: ...33 Figure 4 24 Tips On the navigation bar click to enable disable tour Click Save button to save current setup ...
Страница 58: ...50 Figure 4 51 Figure 4 52 ...
Страница 78: ...70 Figure 4 70 Figure 4 71 ...
Страница 79: ...71 Figure 4 72 Figure 4 73 ...
Страница 86: ...78 Figure 4 80 Figure 4 81 ...
Страница 87: ...79 Figure 4 82 Figure 4 83 ...
Страница 90: ...82 Figure 4 86 Figure 4 87 4 11 Network 4 11 1 Basic Setup ...
Страница 113: ...105 Figure 4 110 In Figure 4 110 click one HDD item the S M A R T interface is shown as in Figure 4 111 Figure 4 111 ...
Страница 116: ...108 Figure 4 114 Figure 4 115 ...
Страница 127: ...119 Figure 4 128 Figure 4 129 ...
Страница 162: ...154 Figure 5 40 Figure 5 41 ...
Страница 163: ...155 Figure 5 42 Figure 5 43 Figure 5 44 ...
Страница 171: ...163 Figure 5 56 Figure 5 57 Figure 5 58 Figure 5 59 Please refer to the following sheet for detailed information ...
Страница 173: ...165 Figure 5 60 Figure 5 61 ...


