


15
EN
BEFORE USE
PREP
ARA
TION
OPERA
TION
OTHERS
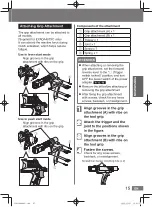
Attaching Grip Attachment
The grip attachment can be attached to
all models.
(Supplied for EYADA407XC only)
It can absorb the reactive force during
clutch activation, which helps reduce
fatigue.
Use in lever start mode
Align grooves in the grip
attachment with ribs on the grip.
①
②
③
⑤
④
⑥
Use in push start mode
Align grooves in the grip
attachment with ribs on the grip.
③
⑤
②
①
④
⑥
Components of the attachment
①
Grip attachment (A) x 1
②
Grip attachment (B) x 1
③
Trigger x 1
④
Joint x 1
⑤
Screw x 7
⑥
Spring x 1
ATTENTION
When attaching or removing the
grip attachment, set the forward/
reverse lever to the “
○
(Trigger
switch locked)” position, and turn
OFF the power switch of the power
adapter.
P. 13, 16
Remove the bit before attaching or
removing the grip attachment.
After fixing the grip attachment
with screws, check for any loose
screws, backlash, or misalignment.
Align grooves in the grip
attachment (A) with ribs on
the tool grip.
Attach the trigger and the
joint to the positions shown
in the figure.
Align grooves in the grip
attachment (B) with ribs on
the tool grip.
Fasten the screws.
Check for any loose screws,
backlash, or misalignment.
Screwdriver hanger mounting hole (x 2)
EY9310ADA202.indb 15
EY9310ADA202.indb 15
2023/12/07 19:01:55
2023/12/07 19:01:55
Содержание EYADA Series
Страница 4: ...CN 4 EY9310ADA202 indb 4 EY9310ADA202 indb 4 2023 12 07 19 01 39 2023 12 07 19 01 39...
Страница 5: ...CN 5 Panasonic EY9310ADA202 indb 5 EY9310ADA202 indb 5 2023 12 07 19 01 39 2023 12 07 19 01 39...
Страница 6: ...CN 6 EY9310ADA202 indb 6 EY9310ADA202 indb 6 2023 12 07 19 01 39 2023 12 07 19 01 39...
Страница 7: ...CN 7 EY9310ADA202 indb 7 EY9310ADA202 indb 7 2023 12 07 19 01 39 2023 12 07 19 01 39...
Страница 8: ...CN 8 50 EY9310ADA202 indb 8 EY9310ADA202 indb 8 2023 12 07 19 01 39 2023 12 07 19 01 39...
Страница 9: ...CN 9 EY9310ADA202 indb 9 EY9310ADA202 indb 9 2023 12 07 19 01 39 2023 12 07 19 01 39...
Страница 10: ...CN 10 6 35 mm EY9310ADA202 indb 10 EY9310ADA202 indb 10 2023 12 07 19 01 40 2023 12 07 19 01 40...
Страница 11: ...CN 11 OK EY9310ADA202 indb 11 EY9310ADA202 indb 11 2023 12 07 19 01 40 2023 12 07 19 01 40...
Страница 13: ...CN 13 R F R F EY9310ADA202 indb 13 EY9310ADA202 indb 13 2023 12 07 19 01 41 2023 12 07 19 01 41...
Страница 16: ...CN 16 P 13 OFF EY9310ADA202 indb 16 EY9310ADA202 indb 16 2023 12 07 19 01 42 2023 12 07 19 01 42...
Страница 17: ...CN 17 2 P 13 5 1 3 P 13 5 1 3 EY9310ADA202 indb 17 EY9310ADA202 indb 17 2023 12 07 19 01 43 2023 12 07 19 01 43...
Страница 18: ...CN 18 P 19 96 EY9310ADA202 indb 18 EY9310ADA202 indb 18 2023 12 07 19 01 43 2023 12 07 19 01 43...
Страница 22: ...CN 22 1 2 OK OK OK 2 OK 3 F R EY9310ADA202 indb 22 EY9310ADA202 indb 22 2023 12 07 19 01 44 2023 12 07 19 01 44...
Страница 24: ...CN 24 b4 1 P 43 OK P 22 OK OK EY9310ADA202 indb 24 EY9310ADA202 indb 24 2023 12 07 19 01 44 2023 12 07 19 01 44...
Страница 44: ...CN 44 PLC OFF EY9310ADA202 indb 44 EY9310ADA202 indb 44 2023 12 07 19 01 49 2023 12 07 19 01 49...
Страница 51: ...CN 51 EY9310ADA202 indb 51 EY9310ADA202 indb 51 2023 12 07 19 01 49 2023 12 07 19 01 49...
Страница 53: ...CN 53 P 35 EY9310ADA202 indb 53 EY9310ADA202 indb 53 2023 12 07 19 01 50 2023 12 07 19 01 50...
Страница 116: ...58 MEMO EY9310ADA202 indb 58 EY9310ADA202 indb 58 2023 12 07 19 02 04 2023 12 07 19 02 04...
Страница 117: ...59 MEMO EY9310ADA202 indb 59 EY9310ADA202 indb 59 2023 12 07 19 02 04 2023 12 07 19 02 04...
Страница 118: ...60 MEMO EY9310ADA202 indb 60 EY9310ADA202 indb 60 2023 12 07 19 02 04 2023 12 07 19 02 04...