


电动螺丝刀
使用说明书
型号
EYADA
系列
EYADA212XC
EYADA218XC
EYADA407XC
目次
产品特点
.......................................2
安全注意事项
................................4
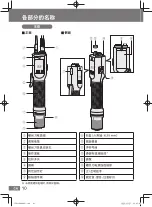
各部分的名称
..............................10
使用前
使用前的准备
..............................13
准备
使用方法
.....................................17
设置主体的功能
(设置模式)
.................................22
计数菜单
(
c
+数字)
..................................25
实用程序菜单
(
u
+数字)
..................................32
通知菜单
(
n
+数字)
..................................39
基本设置菜单
(
b
+数字)
..................................41
通信电缆的使用方法
....................44
操作
性能、规格
...................................49
维护、保管
...................................51
错误显示
.....................................52
设置模式一览表
...........................54
索引
............................................56
其他
重要信息
使用本产品之前,请先详细阅读说明书,并妥加保
管,以便日后使用。
所在地区不供货的型号,请参阅最新总目录。
CN
原版说明书:英文
原版说明书译本:其他语言
EY9310ADA202.indb 1
EY9310ADA202.indb 1
2023/12/07 19:01:38
2023/12/07 19:01:38
Содержание EYADA Series
Страница 4: ...CN 4 EY9310ADA202 indb 4 EY9310ADA202 indb 4 2023 12 07 19 01 39 2023 12 07 19 01 39...
Страница 5: ...CN 5 Panasonic EY9310ADA202 indb 5 EY9310ADA202 indb 5 2023 12 07 19 01 39 2023 12 07 19 01 39...
Страница 6: ...CN 6 EY9310ADA202 indb 6 EY9310ADA202 indb 6 2023 12 07 19 01 39 2023 12 07 19 01 39...
Страница 7: ...CN 7 EY9310ADA202 indb 7 EY9310ADA202 indb 7 2023 12 07 19 01 39 2023 12 07 19 01 39...
Страница 8: ...CN 8 50 EY9310ADA202 indb 8 EY9310ADA202 indb 8 2023 12 07 19 01 39 2023 12 07 19 01 39...
Страница 9: ...CN 9 EY9310ADA202 indb 9 EY9310ADA202 indb 9 2023 12 07 19 01 39 2023 12 07 19 01 39...
Страница 10: ...CN 10 6 35 mm EY9310ADA202 indb 10 EY9310ADA202 indb 10 2023 12 07 19 01 40 2023 12 07 19 01 40...
Страница 11: ...CN 11 OK EY9310ADA202 indb 11 EY9310ADA202 indb 11 2023 12 07 19 01 40 2023 12 07 19 01 40...
Страница 13: ...CN 13 R F R F EY9310ADA202 indb 13 EY9310ADA202 indb 13 2023 12 07 19 01 41 2023 12 07 19 01 41...
Страница 16: ...CN 16 P 13 OFF EY9310ADA202 indb 16 EY9310ADA202 indb 16 2023 12 07 19 01 42 2023 12 07 19 01 42...
Страница 17: ...CN 17 2 P 13 5 1 3 P 13 5 1 3 EY9310ADA202 indb 17 EY9310ADA202 indb 17 2023 12 07 19 01 43 2023 12 07 19 01 43...
Страница 18: ...CN 18 P 19 96 EY9310ADA202 indb 18 EY9310ADA202 indb 18 2023 12 07 19 01 43 2023 12 07 19 01 43...
Страница 22: ...CN 22 1 2 OK OK OK 2 OK 3 F R EY9310ADA202 indb 22 EY9310ADA202 indb 22 2023 12 07 19 01 44 2023 12 07 19 01 44...
Страница 24: ...CN 24 b4 1 P 43 OK P 22 OK OK EY9310ADA202 indb 24 EY9310ADA202 indb 24 2023 12 07 19 01 44 2023 12 07 19 01 44...
Страница 44: ...CN 44 PLC OFF EY9310ADA202 indb 44 EY9310ADA202 indb 44 2023 12 07 19 01 49 2023 12 07 19 01 49...
Страница 51: ...CN 51 EY9310ADA202 indb 51 EY9310ADA202 indb 51 2023 12 07 19 01 49 2023 12 07 19 01 49...
Страница 53: ...CN 53 P 35 EY9310ADA202 indb 53 EY9310ADA202 indb 53 2023 12 07 19 01 50 2023 12 07 19 01 50...
Страница 116: ...58 MEMO EY9310ADA202 indb 58 EY9310ADA202 indb 58 2023 12 07 19 02 04 2023 12 07 19 02 04...
Страница 117: ...59 MEMO EY9310ADA202 indb 59 EY9310ADA202 indb 59 2023 12 07 19 02 04 2023 12 07 19 02 04...
Страница 118: ...60 MEMO EY9310ADA202 indb 60 EY9310ADA202 indb 60 2023 12 07 19 02 04 2023 12 07 19 02 04...