DISASSEMBLY / REASSEMBLY INSTRUCTIONS
Issue 1
Section 4
MCUK010801C8
Revision 0
– 22 –
Service Manual
2.
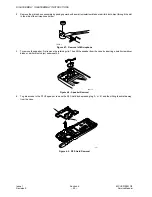
Remove the microphone assembly by prising upward with a small screwdriver blade or similar blunt object through the slot
in the side of the microphone holder.
Figure 4.7: Removal of Microphone
3.
To remove the speaker, first remove the retaining clip. Then lift the speaker from the case by inserting a small screwdriver
blade or similar blunt object underneath it.
Figure 4.8: Speaker Removal
4.
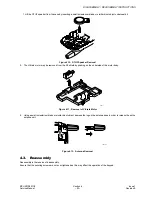
To gain access to the DTHF speaker, remove the RF Shield by depressing lug ‘A’ or ‘B’, and then lifting the shield away
from the case.
Figure 4.9: RF Shield Removal
10474-1
10471-1
A
B
10460-1
Содержание EB-GD95
Страница 4: ...Issue 1 Section MCUK010801C8 Revision 0 iv Service Manual This page is left intentionally blank ...
Страница 64: ...LAYOUT DIAGRAMS MCUK010801C8 Section 9 Issue 1 Service Manual 60 Revision 0 D C E A B F 3 4 ...
Страница 65: ...MCUK010801C8 Section 9 Service Manual 57 9 CIRCUIT DIAGRAMS Figure 9 1 GD95 C A4 A4 EB GD95 EB GD95C ...
Страница 66: ...CIRCUIT DIAGRAMS on 9 Issue 1 Revision 0 GD95 Circuit Diagram Logic A4 A4 ...
Страница 67: ...CIRCUIT DIAGRAMS Issue 1 Section 9 Revision 0 58 Figure 9 2 GD95 Cir A4 A4 ...
Страница 68: ...9 MCUK010801C8 Service Manual GD95 Circuit Diagram RF A4 A4 EB GD95 EBGD95C ...


