


28
RQT7303
Pla
y
ing ba
c
k
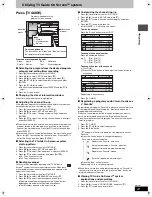
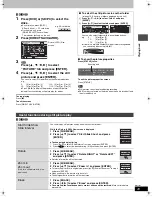
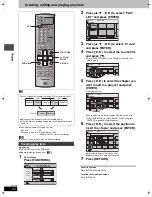
Playing still pictures
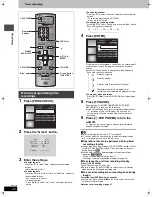
Only insert or remove the SD/PC card after turning the unit off.
When the card indicator (“SD” or “PC”) on the unit’s display is
flashing, the card is being read from or written to. Do not turn off the
unit or remove the card. Such action may result in malfunction or
loss of the card’s contents.
∫
SD card slot
∫
PC card slot
Regarding still pictures (JPEG, TIFF)
≥
Compatible formats:DCF
§
compliant (Content recorded on a
digital camera etc.)
§
Design rule for Camera File system: unified standard
established by Japan Electronics and Information Technology
Industries Association (JEITA).
≥
File format: JPEG, TIFF (non-compressed RGB chunky format)
≥
Number of pixels: 34
k
34 to 6144
k
4096
(Sub sampling is 4:2:2 or 4:2:0)
≥
This unit can handle a maximum of 3000 files and 300 folders
(including higher folders).
≥
Operation may take time to complete when playing TIFF format
still pictures, or when there are many files and/or folders, some
files may not display or be playable.
≥
MOTION JPEG is not supported.
REC
TIME SLIP
SD
PC
DVD
OPEN/CLOSE
DRIVE SELECT
POWER
CH
TIME SLIP
SD CARD
PC CARD
EJECT
/x1.3
POWER
VOLUME
CH
INPUT SELECT
DVD POWER
TV
TV/VIDEO
1
DVD
SD/PC
2
3
4
5
6
7
8
0
9
CM SKIP
AUDIO
PAGE
CH
CANCEL
VCR Plus+
SKIP
STOP
PAUSE
PLAY/x1.3
SLOW/SEARCH
FUNCTIONS
ENTER
DIRECT NAVIGATOR
TOP MENU
RETURN
SUB MENU
CHAPTER
SETUP
Info
PROG/CHECK
TV GUIDE
REC MODE
ERASE
REC
STATUS
TIME SLIP
DISPLAY
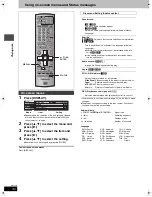
DRIVE SELECT
ERASE
SUB MENU
DIRECT
NAVIGATOR
DVD, SD/PC
3
4
2
1
ENTER
STATUS
DIRECT
NAVIGATOR
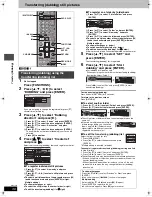
∫
DRIVE SELECT
∫
Numbered
buttons
DVD, SD, PC indicator
SD card slot
PC card slot
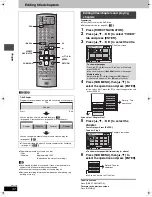
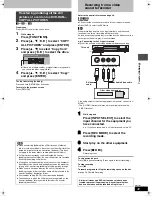
Inserting/Removing the SD/PC card
Inserting the card
Removing the card
Inserting the card
There are cards requiring adaptors (
➡
page 15).
Removing the card
≥
If using the adaptor, remove the adaptor and card together.
POWER
SD CARD
PC CARD
EJECT
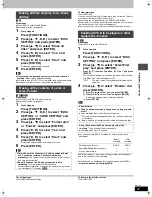
Insert straight-in until it fits
into space.
Insert label up with cut-off corner at the right.
SD CARD
PC CARD
EJECT
POWER
1
2
Press on the center of the card.
Draw straight out.
SD CARD
PC CARD
EJECT
POWER
1
2
Hold the edge of the card and insert until it fits
into place.
≥
If using the adaptor, do not press directly on
the card.
Terminal connections facing into the unit
2
align to match
the mark
The labeled side facing upwards
SD CARD
PC CARD
EJECT
POWER
1
2
PC CARD
EJECT
PC CARD
EJECT
PC CARD
EJECT
Push
Eject button
comes out
Push again
7303en.book 28 ページ 2004年5月31日 月曜日 午前9時32分


