20
RQT7303
Re
cor
d
ing
Timer recording
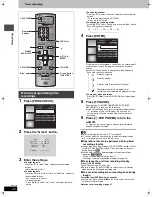
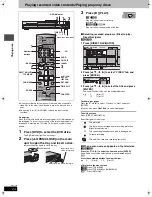
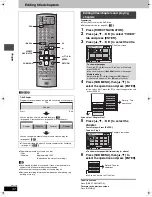
1
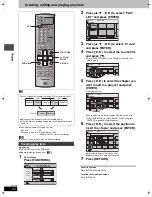
Press [PROG/CHECK].
2
Press the “Green” button.
3
Enter the settings.
≥
To enter the date
Press [
3
,
4
] to select “Date” and press the numbered
buttons.
(Date: Month/Day/Year)
≥
To enter the time
Press [
3
,
4
] to select “Start Time” or “End Time” and press
the numbered buttons.
–You can set up to 8 hours.
–To change am/pm
Press [
2
,
1
] to select “am” or “pm” and press the “Blue”
button.
≥
To enter the channel
Press [
3
,
4
] to select “Channel” and press the numbered
buttons.
–To select the input channel (L1/L2/L3)
Press the “Blue” button.
≥
To change the recording mode
Press [
3
,
4
] to select “Quality” and press the “Blue” button.
Each time you press the button:
4
Press [ENTER].
If the program to be recorded is currently on air, recording will
commence as soon as the program information has been
entered.
≥
Press the “Green” button to change recording frequency.
Each time you press the button:
≥
To program other recordings
Press [
3
,
4
,
2
,
1
] to select “RECORD” and repeat steps
2–4.
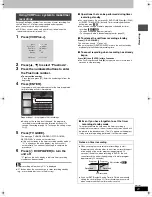
5
Press [TV GUIDE].
The message “TURN RECORDER OFF FOR TIMER
RECORDING.” is shown on the television.
≥
If the unit is already in the timer recording standby mode (if
“
F
” is already on the unit's display), the unit turns off
automatically. You need not take step 6 to complete the
procedure.
6
Press [
Í
DVD POWER] to turn the
unit off.
“
F
” lights on the unit’s display to indicate timer recording
standby has been activated.
\Note\
≥
Timer recording will work only if “
F
” is displayed.
≥
“
F
” flashes when the unit cannot go to timer recording standby
(e.g., a recordable disc is not in the disc tray).
∫
Operations that can be performed during timer
recording standby
≥
You can play discs. Do not press [
Í
DVD POWER] but [
1
] (PLAY)
or [DIRECT NAVIGATOR] instead. Timer recording works even
during disc play.
[RAM]
≥
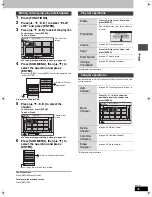
You can add, change or delete programs scheduled for timer
recording.
[RAM]
[DVD-R]
–To add a scheduled program (
➡
step 1)
–To change or delete a scheduled program (
➡
page 22)
∫
To release the unit from recording standby
Press [
Í
DVD POWER].
The unit turns on and “
F
” goes out.
≥
Be sure to press [
Í
DVD POWER] to return the unit to standby
mode before the scheduled recording time.
∫
To cancel recording when recording has already
begun
Press [
∫
], then [ENTER] within 5 seconds.
≥
You can also press and hold [
∫
] on the main unit for more than 3
seconds to stop recording.
Notes on timer recording
➡
page 21
Manually programming timer
recordings
POWER
VOLUME
CH
INPUT SELECT
DVD POWER
TV
TV/VIDEO
1
DVD
SD/PC
2
3
4
5
6
7
8
0
9
CM SKIP
AUDIO
PAGE
CH
CANCEL
VCR Plus+
SKIP
STOP
PAUSE
PLAY/x1.3
SLOW/SEARCH
FUNCTIONS
ENTER
DIRECT NAVIGATOR
TOP MENU
RETURN
SUB MENU
CHAPTER
SETUP
Info
PROG/CHECK
TV GUIDE
REC MODE
ERASE
REC
STATUS
TIME SLIP
DISPLAY
DRIVE SELECT
PROG/CHECK
∫
Í
DVD POWER
3
4
2
1
ENTER
TV GUIDE
VCR Plus
r
“Green” button
(CHAPTER)
“Blue” button
1
DIRECT
NAVIGATOR
Numbered
buttons
FAVORITES
Sat 2:00pm Dodzilla Once
Sat 3:00pm Bull house Weekly
Sat 3:30pm Be switched Weekly
4/3 4:00pm Baseball Once
LISTINGS
MESSAGES SCHEDULE
SET TIMER
R
R
W
R
W
R
RECORD
Date :
Start Time :
End Time :
Channel :
Quality :
PlusCode :
4 / 1 / 04
8 : 00 pm
10 : 00 pm
56
SP
=========
LP
#
EP
#
FR
#
XP
#
SP
^==============}
[.
l
l
l
l
l
l
{
Records only once.
;
Records weekly.
;
Records daily (From Monday to Friday).
;
Temporarily cancels the program timer
recording without deleting the program setting.
FAVORITES
Sat 2:00pm Dodzilla Once
Sat 1:00pm NWBG Once
Sat 3:00pm Bull house Weekly
Sat 3:30pm Be switched Weekly
4/3 4:00pm Baseball Once
LISTINGS
MESSAGES SCHEDULE
RECORD
REMOVE
FREQUENCY
INFO.
87
NWBG
SP
R
R
R
W
R
W
R
1:00
1:55
R
R
W
R
D
R
7303en.book 20 ページ 2004年5月31日 月曜日 午前9時32分


