background image

- 8 -

Connections and Settings

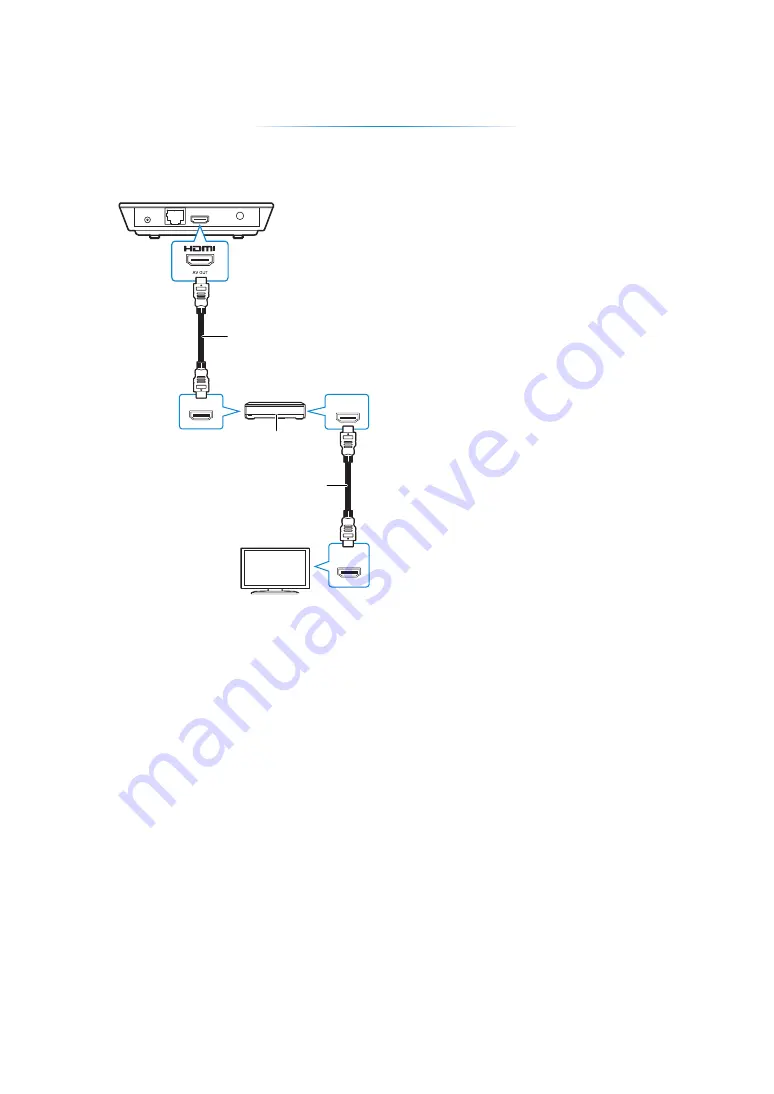
Connecting to an 

amplifier/receiver

A

HDMI cable (supplied)

B

Amplifier/receiver

C

HDMI cable

Set “Digital Audio Output” (

>

25).

When using the TV or amplifier/receiver that 
does not have the indication of “(ARC)” 
(non-ARC-compatible) on the HDMI terminal, 
the amplifier/receiver and TV must also be 
connected using an optical digital cable in order 
to enjoy the TV’s sound through the amplifier/
receiver.

[MST60]

 When connecting to a non-3D 

compatible amplifier/receiver, connect this unit 
to a TV, then connect the TV and the amplifier/
receiver.

Connecting to the 

network

The following services can be used when this unit 
is connected to broadband.

Firmware can be updated


(

>

12)

You can enjoy Network Service (

>

14)

You can access other devices (Home Network) 
(

>

16)

This unit supports Wi-Fi Direct™ and can make 
a wireless connection to wireless devices 
without router. You can use this function when 
enjoying Home Network feature, etc. Internet 
access is not available while connected via 
Wi-Fi Direct™. (

>

16, 25)

For details about connection method, refer to the 
instructions supplied with the connected 
equipment.

HDMI IN

(ARC)

HDMI OUT

(ARC)

HDMI IN

Содержание DMP-MST60

Страница 1: ...Detailed Information Streaming Player Model No DMP MST60 DMP MS10 Unless otherwise indicated illustrations in these operating instructions are of DMP MST60 Model number suffix EB denotes UK model VQT...

Страница 2: ...plifier receiver 8 Connecting to the network 8 Settings 10 Playback HOME menu 13 Enjoying Network Service 14 Using Miracast 15 Home Network feature 16 Playing back USB devices 18 Operations during pla...

Страница 3: ...the supplied one 1 HDMI cable K1HY19YY0012 Unit and media care Clean this unit with a soft dry cloth Never use alcohol paint thinner or benzine to clean this unit Before using chemically treated clot...

Страница 4: ...ons 19 7 Show Top menu 19 8 Show Miracast screen 15 9 Show Option menu 22 10 Coloured buttons red green yellow blue Used for various purposes depending on the display 11 Transmit the remote control si...

Страница 5: ...w Top menu 19 8 Show Miracast screen 15 9 Show Option menu 22 10 Coloured buttons red green yellow blue Used for various purposes depending on the display 11 Transmit the remote control signal 12 Show...

Страница 6: ...r the LED to turn solid green before using this unit 3 INFO LED 28 LED indicators Displays the various states of this unit 4 USB port 18 5 DC IN terminal 7 6 LAN port 9 7 HDMI AV OUT terminal 7 8 Stan...

Страница 7: ...is unit It is recommended that you use Panasonic s HDMI cable When outputting 1080p signal please use HDMI cables 5 0 meters or less A HDMI cable supplied Connecting to the AC adaptor Connect the AC a...

Страница 8: ...ifier receiver connect this unit to a TV then connect the TV and the amplifier receiver Connecting to the network The following services can be used when this unit is connected to broadband Firmware c...

Страница 9: ...upport global cs This site is in English only The unit is not compatible with public wireless LAN services Hotspot etc provided in airports stations cafes etc See Operating Instructions Essential Info...

Страница 10: ...llow the on screen instructions to establish your connection settings Wireless connection Before beginning wireless connection setup Obtain your network name SSID 1 If your wireless connection is encr...

Страница 11: ...ating instructions of the hub or router You can perform this setup anytime by selecting Easy Network Setting in the Setup menu 25 You can redo these settings individually using Network Settings 25 Do...

Страница 12: ...ect Update Now and press OK DO NOT DISCONNECT the unit from the AC power or perform any operation while the update takes place After the firmware is installed INFO LED and POWER LED flash for 3 times...

Страница 13: ...lect the item If there are any other items repeat this step Miracast Starting Miracast 15 Home Network USB Contents Network Service Displays the Home screen of Network Service 14 Setup To show the HOM...

Страница 14: ...possible using the Setup menu items When restricting the use of Network Service 26 Network Service Lock When correcting the displayed time 26 Time Zone Summer Time If using slow Internet connection th...

Страница 15: ...phone etc supports Miracast contact the manufacturer of the device A Player B Miracast compatible device 1 Press MIRACAST 2 Operate the Miracast compatible device On the device enable Miracast and sel...

Страница 16: ...nt 3 Add the contents and folder to the libraries of the Windows Media Player or the smartphone etc Playlist of Windows Media Player can play back only the contents that are stored in the libraries Wh...

Страница 17: ...creen 4 Operate the DMC compatible devices To exit from Media Renderer screen Press HOME Wi Fi Direct connection while using Home Network feature is only temporary and the network connection method re...

Страница 18: ...k Select an item and press the green button The following items can be set It may not be possible to play the contents in some cases due to the type of media the condition of the recording the recordi...

Страница 19: ...channel number etc Press TOP MENU Select the item and press OK While playing press STATUS The status messages give you information about what is currently being played Each time you press STATUS the...

Страница 20: ...not displayed press the red button to switch the view of playback contents HDMI CEC This unit supports HDMI CEC Consumer Electronics Control function See the operating instructions for connected equip...

Страница 21: ...ngs according to the indications The following items can be set 4 Select Confirm and press OK To change the personalized user information Select Edit User Information from Setup menu 27 Press the colo...

Страница 22: ...t an item and change the settings To exit the screen Press OPTION Regarding Language 33 Soundtrack Show or change the soundtrack Audio channel Select the audio channel number Subtitle Change the subti...

Страница 23: ...o is disrupted when Auto is selected select either Video or Film depending on the material to be played back Reset to Default Picture Settings Return picture settings to the factory preset Signal Form...

Страница 24: ...ems supported by the connected devices are indicated on the screen as When any item without is selected the images may be distorted If Automatic is selected the best suited output resolution to the co...

Страница 25: ...twork Setting 10 Network Settings Perform network related settings individually Press OK to show the following settings LAN Connection Mode Select the LAN connection method Select Wireless Master when...

Страница 26: ...site http panasonic jp support global cs This site is in English only Remote Device Settings 17 Press OK to show the following settings Remote Device Operation Enable to operate by DMC If On is select...

Страница 27: ...sed When set to On the internal control unit will be powered and the idle power consumption will increase so compared to when set to Off About the power consumption 32 Remote Control Change the remote...

Страница 28: ...Address DNS Settings is Set the IP Address Subnet Mask and Gateway Address Select the automatic address acquisition if necessary The wireless access point currently has a low network security setting...

Страница 29: ...FIN is displayed on the screen 4 Press and hold OK for more than 5 seconds The remote control does not work properly Change the batteries in the remote control Refer to Accessories in Operating Instru...

Страница 30: ...yellow button and the blue button on the remote control at the same time for more than 5 seconds INFO LED and POWER LED start to flash 3 Press and hold 8 and the blue button on the remote control at...

Страница 31: ...using wireless LAN connection video from the DLNA Certified media server is not played back or video frames are dropped during playback Higher transfer rate router such as 802 11n 2 4 GHz or 5 GHz wi...

Страница 32: ...100 V to 240 V 50 60 Hz 0 6 A DC output DC 12 V 2 A Dimensions WkHkD 126 mmk29 mmk126 mm Mass MST60 Approx 200 g MS10 Approx 190 g File format File format Extension Reference MP3 MP3 mp3 This unit sup...

Страница 33: ...Video codec Audio codec Example of file extension AVCHD H 264 Dolby Digital mts MP4 H 264 AAC mp4 PS MPEG2 Dolby Digital Linear PCM mpg mpeg TS MPEG2 H 264 AAC Dolby Digital m2ts ts Format Example of...

Страница 34: ...c Corporation 2013 Panasonic Corporation Web Site http panasonic net p Manufactured by Panasonic Corporation Kadoma Osaka Japan Importer Panasonic Marketing Europe GmbH Panasonic Testing Centre Winsbe...

Отзывы: