12
CZ-RWSC2
Accessories
Installing the Receiver
When using a separately installed receiver as a built-in model, install it to the switch box (fi eld
supply) shown in the diagram on the right, which has been built into the wall on site in advance.
No.
Accessories
Quantity
1
Receiver
(Enclosed 200 mm wiring)
1
2
Remote Control
1
3
Remote Control Holder
1
4
Dry-cell Batteries
2
No.
Accessories
Quantity
4
Users Manual
1
5
Truss Self-Tapping Screws
4 × 16
2
6
Small screw
2
7
Wood screw
2
8
Cable tie
1
㧝 㧞
㧠
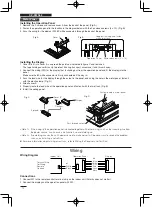
1 Remove the face plate of the receiver by slipping a slotted screwdriver or the like into the cutout on the bottom.
2 Install the receiver with the 2 enclosed small M4 screws.
3 Connect the receiver’s wiring (2 cores) with the wiring from the indoor unit. (Refer to the chapter on wiring the
receiver)
When wiring receivers, be sure to double-check the terminal numbers of the indoor unit before connecting them so
there are no mistakes in the wiring. (Damage will occur if high voltage [e.g. supply voltage] is applied)
4 Attach the face plate.
M4 × 25 Small screws (2)
Receiver Unit
Spacers
Single outlet switch box (no cover)
Face Plate
Cutout


