Optional Controller
Manual of Controller
2
- 42
2. Wireless Remote Controller
( CZ-RWSU2N, CZ-RWSD2, CZ-RWST3N, CZ-RWSL2N )
7
CZ-R
W
ST3N
ENGLISH
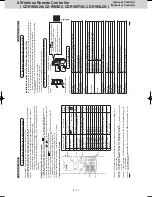
2-5.
Installing the R
eceiv
er
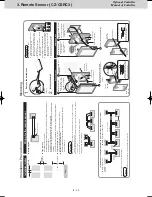
1
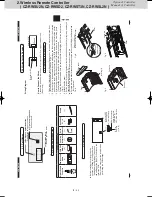
Open the air inlet grill on the side panel.
R
emo
ve the 1 scr
ew and mo
ve it to
war
d the fr
ont
(in the dir
ection of an arr
ow) to r
emo
ve it.
(Fig.
A)
2
W
rap the tip of a slotted scr
ew
driv
er with plastic tape and then inser
t it under the O-mark
ed
sur
face of the co
ver
, wiggling the co
ver fr
ee
. (Fig.
B) (Be car
eful not to scr
atch the panel.)
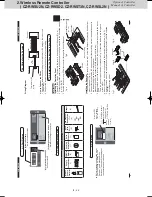
3
After passing the lead wir
e thr
ough the panel, install the r
eceiv
er in the hole in the panel.
(The pr
ojecting par
ts of the r
eceiv
er is held in the hole in the panel.)
4
Fasten the r
eceiv
er’
s lead wir
e to the cable clip that is holding the wir
e fr
om the louv
er motor
.
(Fig.
C)
5
Attach the side panel.
6
Put the r
eceiv
er’
s lead wir
e together with other wir
es such as the louv
er motor wir
e, and f
asten
them with the cable clip
. (Fig.
D)
Use the hole in the upper par
t of the wiring bo
x to lead it in.
F
or mor
e inf
ormation about wiring and test runs
, see the sections on
“Wiring f
or the R
eceiv
er”
and
“T
est Oper
ation”
.
Fig.
A
Fig.
B
Fig.
C
Fig.
D
Panel
Side panel
Plastic tape
Slotted scr
ew
driv
er
(W
rapped with plastic tape)
Co
ver
Inser
t it under the
O-mark
ed sur
face
of the co
ver
.
Cable clip
Receiv
er
Cable clip
Panel
Air inlet grill
2-4.
Wiring f
or the R
eceiv
er
Wiring Diagr
am
Ho
w to Connect the
Wir
es
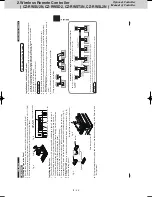
Connect the wir
es fr
om the r
eceiv
er to the terminals f
or R
C wiring on the indoor unit.
(No polarity)
CN001
1
2
Receiv
er PCB
Indoor unit
Terminals f
or R
C
wiring
2P white
270059_all.indb 7
2015-1-20 9:53:39
6
CZ-R
W
ST3N
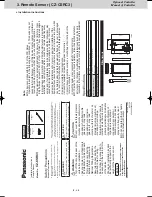
2-1.
P
ar
t Names
2-2.
Supplied accessories
2-3.
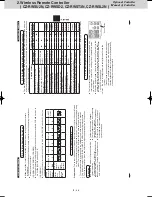
Settings
(2)
Emer
gency oper
ation button
Star
ts/Stops emer
gency oper
ation.
(1)
Light r
eceiving section
Receiv
es signals
.
(3)
Indication lamp
Indicates oper
ation status
.
Be
for
e installing the r
eceiv
er
, see the
sections on
“Wiring f
or the R
eceiv
er”
and
“Setting A
ddr
ess S
witches”.
Then check
the settings of the [S003] DIP s
witch on the
receiv
er’
s PCB
.
* R
emo
ve the co
ver fr
om the r
eceiv
er when
per
forming the PCB settings
.
ON
Main/Sub selector switch f
or r
emote
contr
ollers (4)
OFF:
Main ON:
Sub
Set its addr
ess
(1) to (3)
All set at OFF when shipped from the f
actor
y.
Supplied accessories
Wir
eless R
emote
Contr
oller
(1)
Rem
ote Contr
ol
Holder
(1)
LR03 S
ize
Batter
y
(2)
Oper
ating
Instructions
(1)
Quick
Re
fer
ence
(1)
Wood Scr
ew
M4 × 16
(2)
Clamper
(1)
270059_all.indb 6
2015-1-20 9:53:38
SM830241-00_2WAY SYS.indb 42
2015/03/26 14:55:17
Содержание CZ-CSRC3
Страница 18: ... MEMO 1 16 ...
Страница 68: ...201504 ...


