background image

Quick Start Guide

Introduction

This guide is designed to help you set up and install the iVu Plus Barcode Reader (BCR) Gen2 Series Sensor. For complete information on

programming, performance, troubleshooting, dimensions, and accessories, please refer to the Instruction Manual at 

www.bannerengineering.com

.

Search for p/n 179047 to view the Instruction Manual. Use of this document assumes familiarity with pertinent industry standards and practices.
The iVu BCR includes integrated Help.
Program, modify and view inspections through the integrated touch screen, remote touch screen or Vision Manager PC software. Vision Manager is

not required to configure or run the iVu BCR.
Connect to the iVu BCR using Vision Manager PC Software to control the device remotely. After connecting to the device, the interface displays on

the Sensor tab. Use the interface in the same manner as the iVu BCR display.

WARNING: Not To Be Used for Personnel Protection
Never use this device as a sensing device for personnel protection. Doing so could lead to serious injury or death. This device

does not include the self-checking redundant circuitry necessary to allow its use in personnel safety applications. A sensor

failure or malfunction can cause either an energized or de-energized sensor output condition.

CAUTION: Electrostatic Discharge
Avoid the damage that electrostatic discharge (ESD) can cause to the Sensor.
Always use a proven method for preventing electrostatic discharge when installing a lens or attaching a cable.

Features and Indicators

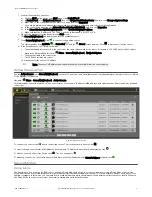
Figure 1. Features

1. Power LED

Green: Ready/Power
Red (blinking or steady): Error

2. Pass/Fail LED

Green (steady): Pass
Green (blinking): Error
Red: Fail

3. Ethernet I/O LED

Green: Connected
Off: Disconnected

4. Focusing Window

5. Focusing Window Locking Clip

6. Integrated Display (integrated display models

only)

Note: Integrated display models: The touchscreen display has a plastic cover to protect the display. Remove this cover when
configuring the device. When the display is not in use, keep the display covered to protect it.

Installation Instructions

Mount the 

iVu BCR

The iVu BCR requires a bracket for mounting. Brackets are available from Banner Engineering. See 

www.bannerengineering.com

. The brackets allow

the iVu BCR to be mounted either perpendicular to the part or at an adjustable angle.

1. Position the iVu BCR on the bracket.

2. Thread three M4 x 4 mm screws (supplied) through the bracket into the mounting holes in the bottom of the iVu BCR.

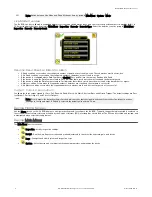
Figure 2. Mounting Bracket Mounting Holes

iVu Plus BCR Gen2 Series Sensor


Original Document

178443 Rev. C

10 October 2018

178443

Содержание iVu Plus BCR Gen2 Series

Страница 1: ...ure or malfunction can cause either an energized or de energized sensor output condition CAUTION Electrostatic Discharge Avoid the damage that electrostatic discharge ESD can cause to the Sensor Alway...

Страница 2: ...7 8 or 101 System Type 32 bit 64 bit Hard Drive Space 80 MB plus up to 280 MB for Microsoft NET 4 5 if not already installed Memory RAM 512 MB minimum 1 GB recommended Processor 1 GHz minimum 2 GHz re...

Страница 3: ...r the sensor s IP address Note The sensor s IP address and subnet mask are also available from the sensor display Active Sensors Tab Use the Active Sensors tab in Sensor Neighborhood to connect to an...

Страница 4: ...Match condition occurs when the required number of barcodes are found but the compare is not successful Output 1 Output 2 and Output 3 Configure the three output signals for Pass Fail Read No Read Ma...

Страница 5: ...xport Image Export Connection Data to Export Output Format Advanced Connection Image Type Industrial Ethernet Connection Status View Logs Advanced Icon Reference Action Icons Icon Description The Main...

Страница 6: ...in the upper left of the display This icon indicates that the sensor is still scanning the captured image and hasn t yet found the number of barcodes specified by the Barcode Count In Continuous Scan...

Страница 7: ...5 Adjust the Focus 3 After the best image has been acquired lock the focusing window A Lens B Focusing Window C Locking Clip D Locking Screw E Filter Cap F Filter Figure 6 Micro Video Lens Model Comp...

Страница 8: ...read barcode data against reference data To manually enter data go to Main Menu Inspection Barcode Data Compare Set Data Enter data of up to 3200 characters Additionally the data compare feature provi...

Страница 9: ...e Home screen For all subsequent triggers when the sensor reads the barcode data it compares it against this reference data Trigger Modes The iVu BCR has five trigger modes that determine how the sens...

Страница 10: ...ead To access the Serial Output screen go to Main Menu System Communications Serial I O When RS 232 serial output is enabled configure the following Serial Port Settings listed below Type of Data to E...

Страница 11: ...u Inspection Stored Inspections and click Add New 2 Select Rename to type a new name for the new inspection 3 Click Done The new inspection with automatically begin running Changing Running Inspection...

Страница 12: ...QUENTIAL OR SPECIAL DAMAGES RESULTING FROM ANY PRODUCT DEFECT OR FROM THE USE OR INABILITY TO USE THE PRODUCT WHETHER ARISING IN CONTRACT OR WARRANTY STATUTE TORT STRICT LIABILITY NEGLIGENCE OR OTHERW...

Отзывы: