34
Play List
Differences between normal playback and
play list playback
Normal playback
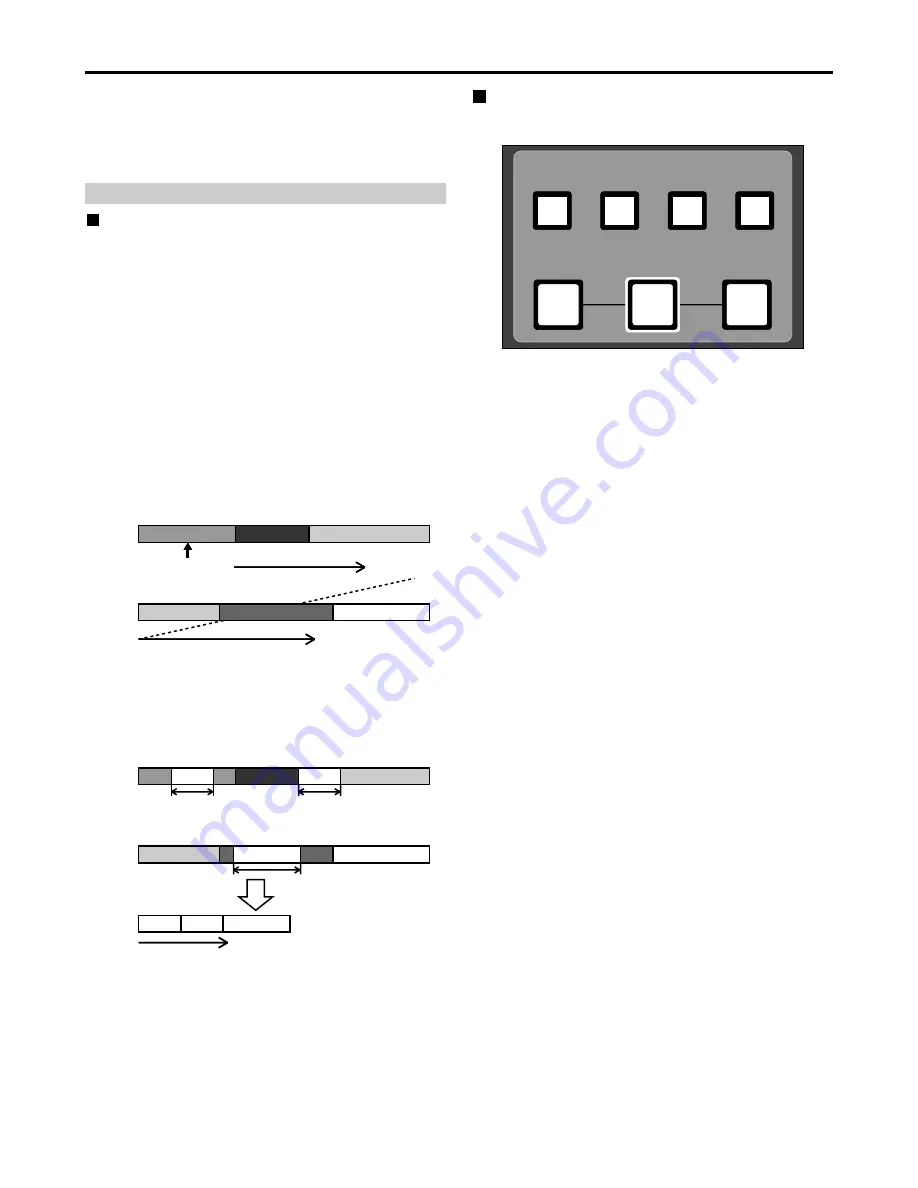
In the example shown below, clips 1-3 are on P2 card 1,
and clips 3-5 are on P2 card 2.
Note:
If a recording is split between two P2 cards, the
segments are labeled as shown below, where clip 3
is split between clip 3-1 and clip3-2. Playback is
continuous from the current position except during
play list playback.
The start of the previous (or next) clip is located
when the REW (or FF) button is pressed while
holding down the SHIFT button, but in the case of a
clip which is split between two cards, the start of
clip3-2 is also located.
Play list playback
Set IN/OUT positions at the locations on the P2 card
which are to be played to create a play list. Next, during
play list playback, just the required segments are played
based on the play list.
P2 Card 1
P2 Card 2
Clip 1
Clip 2
Clip 3-1
Clip 3-2
Clip 4
Clip 5
Current position
Continuous
playback
Continuous playback
P2 Card 1
P2 Card 2
Clip 1
Clip 2
Clip 3-1
Clip 3-2
Clip 4
Clip 5
Continuous playback based on play list
(when executed starting with
event
A)
;;
;;
;;
;;
;;
;;
event A
event B
IN
OUT
IN
OUT
IN
OUT
event C
;;
;;
event A
;;
;;
event B
;;
;;
event C
Play list playback
Using the play list
Switch and submenu selections
Play list buttons
PLAY LIST EVENT
INSERT
DELETE
GO TO
ENTRY
OUT
IN
• PLAYLIST button (self-lighting)
This button is used when creating a play list, and to
play data based on a created play list. When the button
is pressed in the stop mode, a play list is displayed.
The button light remains on while a play list is being
created or played.
• EVENT button (self-lighting)
When the button is pressed while the PLAYLIST button
light is on, the mode changes to play list event
(IN/OUT) setting mode. In this mode, the screen shows
video output, and the IN/OUT point TC and event
number are shown in captions.
• INSERT button
This button is used to add a new event while the play
list summary is displayed. Move the pointer to the
event you want to insert in the play list display
(PLAYLIST button light is on), then press the INSERT
button to add the new event.
• DELETE [SHIFT + INSERT] button
This button is used to delete an event while the play list
summary is displayed. Move the pointer to the event
you want to delete from the play list display (PLAYLIST
button light is on), highlight it using the SET button, and
delete it by pressing this button.
• GO TO button
This button is used to find the IN and OUT points of
individual events registered in the play list. While the
play list is displayed (PLAYLIST button light is on),
select an event and press the GO TO button while
holding down the IN button (or OUT button) to move
the IN point (or OUT point). A still image is shown on
the screen. Further, when the GO TO button is pressed
while holding down the SHIFT button, the selected
event can be moved.
• ENTRY button
This button is used to create a play list event. When
this button and the IN (or OUT) button are pressed at
the same time in play list creation mode (both the
PLAYLIST button and EVENT button lights are on), an
event IN point (or OUT point) can be set.
• IN (OUT) button
This button is used to create a play list event. When
this button and the ENTRY button are pressed at the
same time in play list creation mode (both the
PLAYLIST button and EVENT button lights are on), an
event IN point (or OUT point) can be set. When this
button and the RESET button are pressed at the same
time, the IN point (or OUT point) of the selected event
can be deleted.
The play list function enables only particular parts of the
images and sound recorded on five P2 cards to be selected
and the selected parts to be played in any order using only
the unit by operating the IN, OUT and ENTRY buttons on
the front panel.
Note:
The maximum number of events which can be
registered using this unit is 100.


