background image

Sentinel LNG User’s Manual

23

Chapter 2. Installation

2.4.3 Wiring the Line Power (cont.)

Note:

All wires shall have a temperature/type rating 10K above the maximum service temperature of 85°C, be 

stripped back 5/16 in. (8 mm) and torqued to a minumum of 4.4 in. lb. (0.5 Nm).

3.

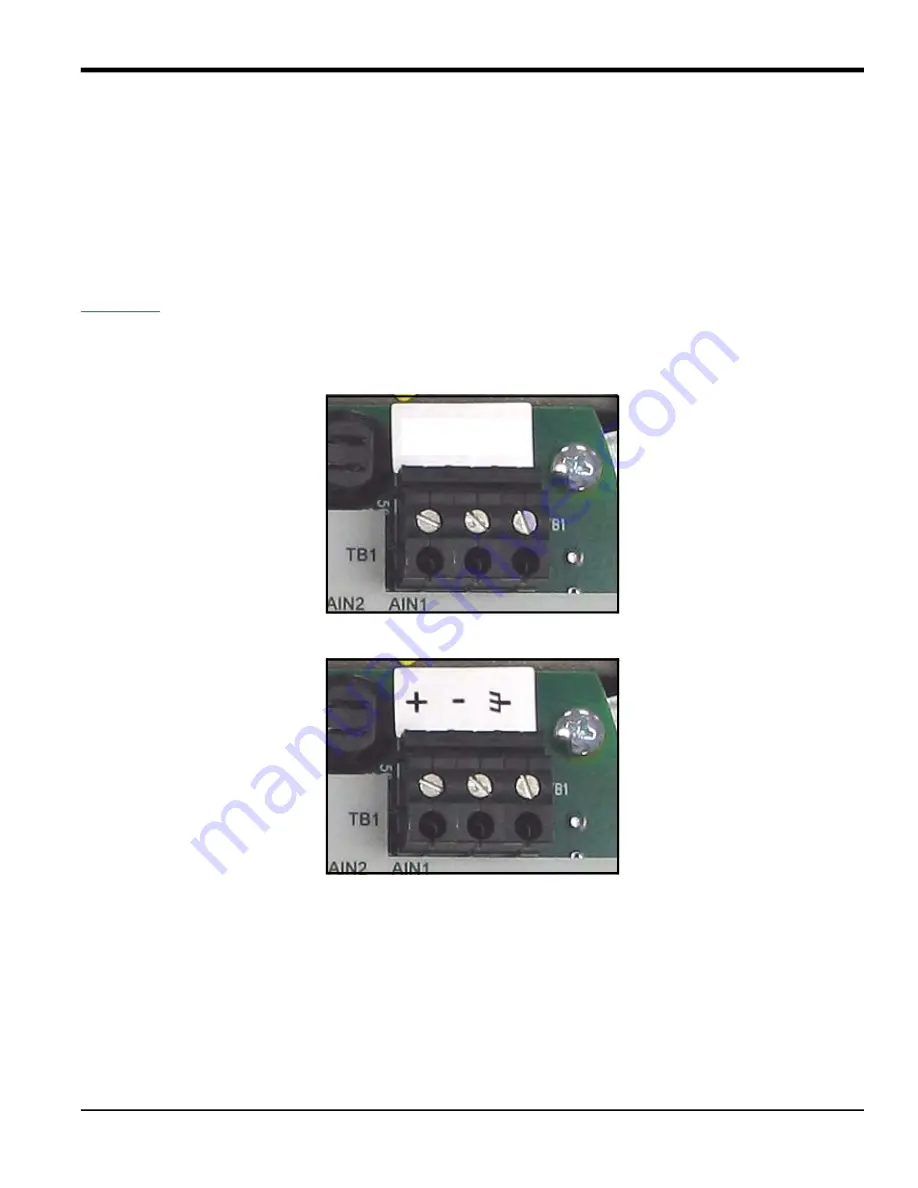
Run the AC power connections to the Power Terminal Block shown in Figure 13 below. It is recommended to use 

12-18 AWG (3.3 - 0.82 mm

2

) power wiring.

4.

Strip 1/4-in. of insulation from the end of each of the three line power leads.

5.

Route the cable through one of three conduit inlet ports (see Figure 12 above) and connect the line power leads 

to terminal block TB1, using the pin assignments shown in Figure 27 on page 34 and Figure 13 oFigure 14 below.

6.

Leaving a bit of slack, secure the power line with the cable clamp.

WARNING!

Make sure the front and side covers, along with their O-ring seals, are installed on the transmitter, 

and the set screws tightened before applying power in a hazardous environment.

7.

Once the line power has been connected to the flow transmitter, replace the side cover, tighten the set screw 

using a 2.5 mm hex wrench, and proceed to the next section.

Figure 13: Wiring the AC Line Power

Figure 14: Wiring the DC Line Power

L1   L2/N   G

Содержание Sentinel LCT

Страница 1: ...panametrics com Flow 910 286 B August 2021 Sentinel LNG Ultrasonic Flowmeter for Liquefied Natural Gas User s Manual...

Страница 2: ......

Страница 3: ...e or more registered trademarks of Baker Hughes Company and its subsidiaries in one or more countries All third party product and company names are trademarks of their respective holders Sentinel LNG...

Страница 4: ...ii no content intended for this page...

Страница 5: ...each installation Auxiliary Equipment Local Safety Standards The user must make sure that he operates all auxiliary equipment in accordance with local codes standards regulations or laws applicable to...

Страница 6: ...Preface iv Sentinel LNG User s Manual...

Страница 7: ...ystem 17 2 3 4 Guidelines for Installing Pipe Insulation 18 2 4 Making Electrical Connections 19 2 4 1 Removing the Covers 20 2 4 2 Cable Tie Down Posts 20 2 4 3 Wiring the Line Power 22 2 4 4 Wiring...

Страница 8: ...y Timeout 56 3 12 3 Set Security 56 3 13 Factory Status 56 Chapter 4 Advanced Programming 4 1 Entering Transducer Parameters 57 4 1 1 Clamp On Transducers 57 4 1 2 Other Transducers 57 4 1 3 Wetted Tr...

Страница 9: ...Passcodes 160 5 12 2 Set Security 161 5 13 Factory Menu 162 5 13 1 Checking Versions 162 5 13 2 Confirming Meters 164 Chapter 6 MODBUS Communications 6 1 Introduction 167 6 2 Setting Up MODBUS Communi...

Страница 10: ...E0 No Error 197 9 2 2 E1 Low Signal 197 9 2 3 E2 Soundspeed Error 197 9 2 4 E3 Velocity Range Error 197 9 2 5 E4 Signal Quality Error 198 9 2 6 E5 Amplitude Error 198 9 2 7 E6 Cycle Skip Acceleration...

Страница 11: ...x A Menu Maps Appendix B CE Mark Compliance and High Noise Areas B 1 Introduction 219 B 2 EMC Compliance 219 Appendix C Data Records C 1 Site Data 221 Appendix C Service Record C 1 Introduction 225 C...

Страница 12: ...Contents x Sentinel LNG User s Manual...

Страница 13: ...3 6 psi by cooling it to approximately 162 C 260 F 1 1 2 Advantages The Sentinel LNG features numerous unique advantages 0 25 Accuracy Capable of handling cryogenic LNG temperatures typically at 162 C...

Страница 14: ...ions 1 8 External Conduits Connection Location for power and communications connections Cable glands are 3 4 NPT 4 9 Nuts and Bolts Hardware to hold flanges together AR Component Materials ASTM Pipe F...

Страница 15: ...es ultrasonic transit time technology A brief description of transit time theory follows For more information about the the theory and the use of Panametrics Sensing ultrasonic flowmeters for measurin...

Страница 16: ...times is proportional to the flow velocity The Sentinel LNG measures this very small time difference and using various digital signal processing techniques combined with programmed pipe parameters det...

Страница 17: ...r itself 1 3 Specifications The system specifications for the Sentinel LNG Ultrasonic Liquid Flow Transmitter are divided into the following categories 1 3 1 Operation and Performance 1 3 1 1 Fluid Ty...

Страница 18: ...Ambient Temperature 40 to 60 C 1 3 1 7 Storage Temperature 40 to 80 C 1 3 2 Meter Body 1 3 2 1 Path Configuration 4 path Robust Path Configuration 1 3 2 2 Meter Body Materials Stainless steel A182 Gr...

Страница 19: ...6 660 701 122 8 300 28 28 34 343 8 112 711 720 156 600 30 29 0 9 452 224 762 739 205 150 28 29 8 4 367 56 711 758 166 10 300 30 30 5 9 487 10 112 762 777 221 600 32 31 84 739 224 813 809 335 150 30 32...

Страница 20: ...could disturb the flow profile 1 3 3 Electronics 1 3 3 1 Electronics Enclosure Material Epoxy coated aluminum 1 3 3 2 Weight 25 lb 11 5 kg 1 3 3 3 Dimensions Size lxhxd 13 x 11 x 9 33 x 27 x 23 cm 1 3...

Страница 21: ...IIB H2 T6 IP66 II 2 D Ex tD A21 IP66 T85C Ta 40 to 60 C 1 3 3 13 CE Marking Compliance 2006 95 EC Low Voltage Directive 97 23 EC Pressure Equipment Directive 1 3 4 Ordering Information 1 3 4 1 Sentin...

Страница 22: ...ser s Manual Electronics Mounting L Local mounting on SEN LNG Flowcell G R Remote mounting from SEN LNG Flowcell S Stand alone unit w remote mounting cable length selectable max 300 ft 91 4 m Z Specia...

Страница 23: ...g D Material 304 Stainless Steel A182 Grade 304 304L 316 Stainless Steel A182 Grade 316 316L 10S Schedule size 10S E Schedule 40S Schedule size 40S STD Standard S Special F Design Criteria A ASME B31...

Страница 24: ...ty personnel or local safety authorities to verify the safety of any procedure or practice WARNING To meet CE Mark requirements all cables must be installed as described in Appendix B CE Mark Complian...

Страница 25: ...UP2 442 1248 04 ITEM 393 UP4 SINGLE B BNC PLUG DUAL B BNC JACK B MCX CABLE UP4 442 1248 05 ITEM 394 DN1 C MCX CABLE DN1 442 1248 07 ITEM 396 DN3 SINGLE C BNC PLUG DUAL C BNC JACK C MCX CABLE DN3 442 1...

Страница 26: ...Chapter 1 Features and Capabilities Sentinel LNG User s Manual 14...

Страница 27: ...ansmitter measures the flow rate of hazardous fluids The importance of proper safety practices cannot be overemphasized So be sure to follow all applicable local safety codes and regulations for insta...

Страница 28: ...ances or pipe bends An additional length of straight pipe will help produce a more symmetrical flow profile thus reducing the measurement uncertainty Figure 5 Typical Sentinel LNG Installation Uni Dir...

Страница 29: ...of the pipe and that of the Sentinel LNG spoolpiece does not exceed 1 Changes in internal diameters will cause flow profile disturbances Make sure any non symmetrical offset does not exceed 1 Misalign...

Страница 30: ...d proper installation will serve its intended purpose 2 Install the insulation material in layers with smooth and even surfaces Allow adequate space air pockets around all extended transducer buffer r...

Страница 31: ...s must be installed as described in Appendix B CE Mark Compliance IMPORTANT The meter spoolpiece is grounded to the electronics This configuration must be considered when applying cathodic protection...

Страница 32: ...s free from the enclosure 4 Note the text imprinted on the terminal board see Figure 10 below to assist in wiring the power and option card connections Proceed to the appropriate section of this chapt...

Страница 33: ...hapter 2 Installation Optional I O Cable Tie Down Post Use this optional tie down post to secure any other instrument I O securely Figure 11 Cable Tie Down Posts Locations Power Cable Tie Down Post Op...

Страница 34: ...ports should be sealed with suitable blanking elements See Figure 13 on page 23 to locate terminal block TB1 and to connect the line power as outlined below WARNING Improper connection of the line pow...

Страница 35: ...through one of three conduit inlet ports see Figure 12 above and connect the line power leads to terminal block TB1 using the pin assignments shown in Figure 27 on page 34 and Figure 13 or Figure 14 b...

Страница 36: ...closure 3 Feed one end of the cable through the cable gland wire it to terminal block TB2 and secure Figure 15 Serial Connections WARNING To meet CE Mark requirements all cables must be installed as d...

Страница 37: ...occurs See Figure 16 below for the operation of a normally open alarm relay in fail safe mode Connect the alarm relay in accordance with the wiring instructions see Figure 10 on page 20 and Figure 27...

Страница 38: ...n2 Ain3 and RTD1 Each of the 4 20 inputs includes a 24 VDC power supply for loop powered transmitters The inputs may be used to process temperature density and pressure signals Note To enter programmi...

Страница 39: ...ont Figure 17 Analog Input Wiring Diagram Figure 18 4 Wire RTD Input Wiring Diagram 24V Ain Ain RTN Ain 24V Ain RTN IN OUT IN OUT 24 VDC POWER SUPPLY With External Power Supply With Internal Power Sup...

Страница 40: ...24V1 AIN3 AIN2 AIN1 Analog Input 1 RTN3 RTN3 RTN2 RTN2 RTN1 RTN1 AIN3 24V3 AIN2 24V2 AIN1 24V1 AIN3 AIN2 AIN1 Analog Input 2 RTN3 RTN3 RTN2 RTN2 RTN1 RTN1 AIN3 24V3 AIN2 24V2 AIN1 24V1 AIN3 AIN2 AIN1...

Страница 41: ...AIN2 24V2 AIN1 24V1 RTD1 AIN2 AIN1 Analog Input 1 RTN2 RTN2 RTN1 RTN1 AIN2 24V2 AIN1 24V1 AIN2 AIN1 Analog Input 2 RTN2 RTN2 RTN1 RTN1 AIN2 24V2 AIN1 24V1 AIN2 AIN1 RTD Input 3 RTN S S CUR RTN S S CUR...

Страница 42: ...4 AWG 1 5 0 2 mm2 for two conductors per terminal Figure 23 Totalizer and Frequency Output Wiring I O Pin Function F T1 Freq 1 Totalizer 1 OUT F T1 Freq 1 Totalizer 1 RTN F T2 Freq 2 Totalizer 2 OUT F...

Страница 43: ...steps 1 Disconnect the main power to the flowmeter and remove the enclosure side cover 2 Install the required cable clamp in the chosen conduit hole on the side of the electronics enclosure 3 Locate t...

Страница 44: ...dix B CE Mark Compliance 5 If wiring of the unit has been completed reinstall the wiring access cover on the enclosure and tighten the set screw After the Sentinel LNG has been completely installed an...

Страница 45: ...Chapter 2 Installation Sentinel LNG User s Manual 33 Front Display Wiring Access Cover Figure 26 Sentinel LNG Enclosure Front Display and Wiring Access...

Страница 46: ...nstallation Sentinel LNG User s Manual 34 ALM1 ALM2 TB3 TB1 USB J1 J2 RJ45 Ain3 Ain2 Ain1 I O TB2 in R2 in R2 in R2 Tx Rx Com Aout Aout F T1 F T1 COM NC NO Figure 27 Sentinel LNG Enclosure Terminal Bl...

Страница 47: ...1 AIN1 ANALOG IN 24V1 24VDC RTN1 24VDC RETURN RTN1 ANALOG RETURN ANALOG INPUT 2 AIN2 ANALOG IN 24V2 24VDC RTN2 24VDC RETURN RTN2 ANALOG RETURN ANALOG INPUT 3 AIN3 ANALOG IN 24V3 24VDC RTN3 24VDC RETUR...

Страница 48: ...N BOX JUNCTION BOX CABLE SINGLE CABLE SINGLE CABLE SINGLE CABLE SINGLE CABLE DUAL CABLE DUAL CABLE DUAL CABLE DUAL FLOWCELL FRONT VIEW FLOWCELL REAR VIEW XDCR XDCR XDCR XDCR PORT B PORT A PORT C PORT...

Страница 49: ...keys a Clear Totals key four arrow keys an Escape key and an Enter key Use the Escape key to open the main menu on the display If locked see Unlocking and Locking on page 40 Use the arrow keys to nav...

Страница 50: ...tch internal to the instrument has been engaged Note If the Keypad Lock Indicator is lit the keypad will not be functional The Total Lock Indicator will be lit if the Totals Lock Out Switch internal t...

Страница 51: ...ditional option Inputs enter the temperature pressure and density parameters API Setup additional option enter the table type and conditions 3 3 3 Advanced Program Note The Advanced Program is accessi...

Страница 52: ...play and or the user program 1 Press ESC ENT ESC A Security Check window similar to Figure 32 below appears Figure 32 Security Check Window 2 Using the arrow keys change the code number to the value d...

Страница 53: ...the diaplay parameters Any other changeable parameter is denied access User 1 User 2 User 3 User 4 The User has to enter a Valid Passcode to have access to the menu attached to this role The User wit...

Страница 54: ...and the Security Level descriptions on page 41 On selection the Passcodes for User 1 to User 4 and User Admin can be modified The Passcodes for Field Service Factory Engineering Full Lock and Program...

Страница 55: ...bracketed in the top left corner and press ENT 3 Use the p and q keys to scroll to the desired channel and press ENT The screen appears similar to Figure 34 below Figure 34 The PROG Menu 4 Press ENT...

Страница 56: ...ed the screen displays four options Units Rows Used Edit Table and Reset Table a Select Units and press ENT and the screen displays two more options Soundspeed and Diagnostic Select Soundspeed and pre...

Страница 57: ...the Zero Cutoff Near zero flow the Sentinel LNG may have fluctuating readings due to small offsets caused by factors such as thermal drift in the fluid The zero cutoff causes velocity measurements le...

Страница 58: ...hange the Max Velocity limit The E3 VELOCITY RANGE error message appears if the velocity falls outside the minimum and maximum limits 9 The meter now requests the Min Amplitude the lower limit for the...

Страница 59: ...ndow the meter enables the selection of Water up to 100 or 260 C or Oil Scroll to the desired listing and press ENT 4 The menu now varies depending on the selections in steps 6 and 7 If Preprogrammed...

Страница 60: ...ress ENT use the arrow keys to enter the new value and press ENT to confirm the entry 6 If Dimensional Compensation is an included option at the next parameter Compensation Status the screen shows the...

Страница 61: ...asure At 2 Select Base Condition and press ENT The next screen displays four options 60 20 15 and User Defined Select a given temperature or define a new one 3 To establish a new base temperature sele...

Страница 62: ...om each list of options 5 To reset the totals from the CONFIG menu select Reset Totals and press ENT Note If the totalizer lock is enabled the previous totals will not be cleared a Select a Channel th...

Страница 63: ...e Channel of the data source you want to output 4 Select the Publisher you want to output 5 Select the Units for the Publisher output 6 Enter a value for the Base low end of the chosen output range th...

Страница 64: ...rror condition Choose Force LO Force HI Hold Last or Force Value When the meter goes into Error the choosen Error level will be output through the Frequency Output 3 9 2 2 Totalizer 1 Units Choose the...

Страница 65: ...ndition Reset would be such that NO would be NO unless configured for failsafe Trip Trip would force the alarm to Trip direction on error or fault condition Hold Last Hold Last would hold the current...

Страница 66: ...as one of those inputs a Choose the Units for the input b Enter the Base low end of the input c Enter the Span high end of the input 5 Select Cal to Trim the inputs If a Calibration is not going to b...

Страница 67: ...ed with the value 0 g The Setpoint is the actual temperature that you are trying to read h The Offset is the temperature the meter is reading from the probe minus the reference reading i Run all point...

Страница 68: ...e the appropriate digits and press ENT 3 12 3 Set Security The User is allowed to set a security level below the current level To set or change the security level select Set Security and press ENT The...

Страница 69: ...alls for the Wedge Temperature Scroll to the Wedge TMP option and press ENT Then use the and keys to enter the temperature and press ENT Note The wedge temperature of the transducer can be approximate...

Страница 70: ...reprogrammed for the standard transducers or Other for special transducers and press ENT 3 For preprogrammed transducers scroll to the desired Transducer Number BWT 500kHz 51 1 MHz or 52 2MHz and pres...

Страница 71: ...ng Signal Parameters In the Signal submenu set parameters that affect the transducer signal CAUTION The SIGNAL default settings are suitable for most applications Consult the factory before changing a...

Страница 72: ...ompt requests Batch Size Press ENT and use the and keys to scroll to the new number from 1 to 32 Press ENT to confirm the entry 11 The next parameter is the Max Samples Cycle Press ENT and use the and...

Страница 73: ...ble and the table opens with a series of rows Scroll to the desired row and press ENT d For each row the screen displays the X velocity value and the K Factor To change either value scroll to the valu...

Страница 74: ...m the Unit Menu select Reset Table and press Enter To reset the table select Yes and press Enter To not reset the table select No and press Enter 4 5 Entering Pipe Parameters In the Pipe submenu prepr...

Страница 75: ...rbon or stainless steel cast iron PVC and CPVC have been selected the Sentinel LNG offers the option of entering the pipe dimensions by a standardized schedule This option does not appear unless one o...

Страница 76: ...arrow keys to enter the known soundspeed and press ENT Note If your pipe lining is not on the drop down list consult the factory for further information Entering data in the Pipe submenu is complete...

Страница 77: ...he document EIA RS Serial Communications 916 054 5 3 Establishing Communications with Panaview After your hardware and software have been installed as described in Chapter 2 of this manual and in Chap...

Страница 78: ...shows the default properties for the meter The communication settings can be modified at any time by selecting the port on the network tree with the right mouse button and choosing Properties Note Re...

Страница 79: ...node ID is known select I know the node ID of the meter I am adding to the network then click the OK button see Figure 39 below If the node ID is not known proceed to page 69 Note The default node ID...

Страница 80: ...s Manual 5 3 2 Adding the Sentinel LNG to the Communications Port cont Enter the ID number in the ID entry a meter name in the Name entry and then click on the OK button Note Do not enter any data in...

Страница 81: ...K button see Figure 41 below Note The network referred to in Figure 41 below is the network over which the new meter and the computer are communicating Note The new meter must be the only powered mete...

Страница 82: ...es Figure 43 Selecting the Node ID Once communication has been established the Node ID can be set to any master Node ID A master Node ID is an integer which is a multiple of 16 Note A slave Node ID is...

Страница 83: ...es a SECURITY button which enables the user to set security for individual meter parameters From a property menu window press the SECURITY button and the following screen appears To restrict other peo...

Страница 84: ...User s Manual 5 6 Program Menu 1 To set up a channel click twice on Program Menu and the following screen appears Figure 46 Program Channels 2 Click twice on the appropriate Channel and the following...

Страница 85: ...e channel is on or off click on Status and the following screen appears Click On or Off twice and the screen returns to the PROGRAM menu Figure 48 Channel Status 5 6 2 Transducer Setup 1 To select the...

Страница 86: ...he following screen appears Figure 50 Clamp On Transducer Options 3 To change the wedge temperature enter the appropriate numbers into the text box the box turns yellow and click on BACK The Wedge TMP...

Страница 87: ...reprogrammed or Other If Preprogrammed is selected the following screen appears Figure 52 Preprogrammed Transducer Options 5 Click twice on the appropriate transducer number and the screen returns to...

Страница 88: ...ics enter the appropriate numbers into the text box the box turns yellow and click on BACK The Verification screen appears Click Yes to save the change or No to return to the previous value Figure 54...

Страница 89: ...nd return to the PROGRAM menu Note If Wetted was selected under Transducer Type see Figure 49 on page 73 the following screen appears Figure 56 Wetted Transducer Options 10 Click twice on Preprogramme...

Страница 90: ...ears Figure 58 Other Transducer Menu 13 Click on Frequency and the following screen appears Click twice on the appropriate value and the previous screen returns If necessary change the time value in t...

Страница 91: ...User s Manual 79 Chapter 5 Using PanaView Figure 60 Fluid Reynolds Correction 2 To set up the Reynolds correction format click on Reynolds and the following screen appears Figure 61 Fluid Reynolds Cor...

Страница 92: ...on Factor click Off Click Single and the following screen appears Figure 62 Reynolds Correction Single Option 4 Enter the correct text box measurement and click BACK to return to the previous screen I...

Страница 93: ...nits and the following screen appears Figure 64 Reynolds Correction Units 6 Click twice on Soundspeed and the unit option is Meters sec Click twice on Diagnostic and the unit options are Signal Up or...

Страница 94: ...Edit Table and the following screen appears Figure 66 Reynolds Correction Row Options 8 Click twice on the Row to be changed and the following screen appears Read the AutoFormsNumeric message click O...

Страница 95: ...Table to secure the value changes made above The following screen appears Figure 68 Resetting the Table 10 Click twice on Yes to confirm the changes and the screen returns to the Unit Menu To enter m...

Страница 96: ...umber of path traverses click on Traverses and the following screen appears Click twice on the appropriate number and the screen returns to the Path screen Figure 70 Number of Traverses 3 To change th...

Страница 97: ...es click on Signal and the following screen appears Figure 71 Editing Signal Values 2 Click on categories to be set select a type from each list and make changes to the text boxes as needed 5 6 6 K Fa...

Страница 98: ...al 5 6 7 Error Limits Setup To set error limits from the Program Menu click on Error Limits and the following screen appears Figure 72 Setting Error Limits Enter the appropriate values into the text b...

Страница 99: ...Composite Programs 1 From the PROGRAM menu click twice on Composite and the following screen appears Figure 73 Composite Program Menu 5 7 1 Pipe Setup 1 To enter pipe information click on Pipe and th...

Страница 100: ...User s Manual 5 7 1 Pipe Setup cont 2 Click on Material and the following screen appears Figure 75 Pipe Material 3 If the pipe material is standard click on Preprogrammed and the following screen appe...

Страница 101: ...g screen appears Figure 77 Preprogrammed Pipe Material 5 Enter the pipe size into each text box according to the category listed When finished click three times on BACK to return to the Pipe Menu 6 If...

Страница 102: ...ox according to the category listed When finished click three times on BACK to return to the Pipe Menu 8 To enter pipe lining characteristics from the Pipe Menu click on Lining The following screen ap...

Страница 103: ...g is standard material click twice on Preprogrammed The following screen appears Figure 81 Lining Material Types 11 Click twice on the lining material and the screen returns to the previous menu 12 If...

Страница 104: ...Lining Menu 14 Whether the pipe lining is Preprogrammed or Other the Lining Menu screen includes a text box labeled Thickness Enter the lining material thickness in millimeters click on BACK and click...

Страница 105: ...User s Manual 93 Chapter 5 Using PanaView 5 7 2 Fluid Setup 1 Click on Fluid and the following screen appears Figure 84 Fluid Menu 2 Click on Fluid Type and the following screen appears Figure 85 Flu...

Страница 106: ...ype click twice on Normal The following screen appears Figure 86 Normal Fluid Menu 4 If the fluid is standard click twice on Preprogrammed The following screen appears Figure 87 Preprogrammed Fluid Me...

Страница 107: ...8 Other Fluid Screen 7 Enter the fluid soundspeed click on BACK and click Yes to verify or No to reject the change Click on BACK 8 On the Normal screen to change the fluid Temperature enter a new valu...

Страница 108: ...d on the Tracking screen click twice on Other and the following screen appears Figure 90 Other Fluid Menu 11 Enter the fluid Minimum and or Maximum Soundspeed click on BACK and click Yes to verify or...

Страница 109: ...the following screen appears Figure 91 Editing Signal Values 2 Click on the categories that need to be set select the appropriate type from each list and make changes to the text boxes as needed 5 7 4...

Страница 110: ...K Factor and the following screen appears Figure 93 K Factor Options 3 To change a single K Factor click twice on Single The following screen appears Figure 94 K Factor Value Option 4 Enter the K fac...

Страница 111: ...reen appears Figure 95 K Factor Unit Menu 6 Click on Units and the following screen appears Figure 96 Units Publisher Menu 7 To check the velocity unit of measure click twice on Velocity and the scree...

Страница 112: ...ars Figure 97 Rows Menu 9 Click twice on the row to be changed and the following screen appears Figure 98 Row Menu 10 Enter a new Reynolds and or K Factor click on BACK click Yes to verify or No to re...

Страница 113: ...k Yes To reject the reset click No The screen returns to the Unit Menu Click on BACK twice to return to the K Factor Menu 14 Click on Path Ratio and the following screen appears Figure 100 Path Ratio...

Страница 114: ...nu 2 Click twice on the channel to be changed and the following screen appears Enter the new weight into the text box and click on BACK Click Yes to confirm the change or click No to reject the change...

Страница 115: ...Sentinel LNG User s Manual 103 Chapter 5 Using PanaView Figure 103 Inputs Menu 2 To change the input temperature click on Temperature and the following screen appears Figure 104 Temperature Menu...

Страница 116: ...e on Fixed and the following screen appears Figure 105 Fixed Temperature Screen 4 Enter the appropriate fixed temperature value into the text box and click on BACK Click Yes to confirm the change or c...

Страница 117: ...the Temperature menu click twice on Active The following screen appears Figure 107 Active Temperature Menu 6 Click twice on the appropriate temperature and the screen returns to the Temperature menu 7...

Страница 118: ...twice on Fixed and the following screen appears Figure 109 Fixed Pressure Screen 9 Enter the appropriate fixed pressure value into the text box and click on BACK Click Yes to confirm the change or cl...

Страница 119: ...from the Pressure menu click twice on Active The following screen appears Figure 111 Active Pressure Menu 11 Click twice on the appropriate pressure and the screen returns to the Pressure menu 12 Clic...

Страница 120: ...k twice on Fixed and the following screen appears Figure 113 Fixed Density Screen 14 Enter the appropriate fixed density value into the text box and click on BACK Click Yes to confirm the change or cl...

Страница 121: ...15 To select an active density from the Density menu click twice on Active The following screen appears Figure 115 Active Density Menu 16 Click twice on the appropriate density and the screen returns...

Страница 122: ...e Program menu click on API Setup The following screen appears Figure 116 API Setup Menu 17 To select the type of table click on API Table Type The following screen appears Figure 117 Table Type Menu...

Страница 123: ...g PanaView 5 7 7 API Setup cont 19 To set up API conditions click on API Conditions and the following screen appears Figure 118 API Conditions Menu 20 Click on Base Conditions and the following screen...

Страница 124: ...nu If you select User Defined the following screen appears Figure 120 API User Defined Base Condition 22 Enter the appropriate user defined base value into the text box and click on BACK Click Yes to...

Страница 125: ...k on BACK to return to the API Conditions menu To provide Flow Measurement settings click on Flow Measure At and the following screen appears Figure 122 API Flow Measurement Menu 24 Click on Observed...

Страница 126: ...Click Yes to confirm the change or click No to reject it Repeat the process for the other condition if necessary then click on BACK and return to the API Flow Measurement menu Figure 124 Temp alt Ver...

Страница 127: ...ext box and click on BACK Click Yes to confirm the change or click No to reject it Repeat the process for the other conditions if necessary then click on BACK five times and return to the original Pro...

Страница 128: ...tup 1 To set up data configuration click twice on Config Menu and the following screen appears Figure 127 Configuration Menu 2 To select the type of units click on Units The following screen appears F...

Страница 129: ...2 Communication Setup 1 To select a type of communication click on Communication The following screen appears Figure 129 Communication Menu 5 8 2 1 Modbus 1 To set up Modbus communications click on Mo...

Страница 130: ...click on BACK Click Yes to confirm the change or click No to reject it Click on BACK to return to the Communication screen Figure 131 Modbus Address Verification Screen 3 To select the interface to be...

Страница 131: ...WordOrder The following screen appears Figure 133 Word Order Menu 6 Click twice on your selection and the screen returns to the Modbus RTU menu 7 To select a baud rate click on Baud Rate The followin...

Страница 132: ...The following screen appears Figure 135 Parity Menu 10 Click twice on your selection and the screen returns to the Modbus RTU menu 11 To select a volumetric unit click on Volumetric The following scre...

Страница 133: ...Total Units Menu 14 Click twice on your selection and the screen returns to the Modbus RTU menu 15 To select standard volumetric units click on Volumetric The following screen appears Figure 138 Stan...

Страница 134: ...Manual 5 8 2 2 HART 1 To set up HART software click on HART The following screen appears Figure 139 HART Menu 2 To set up HART variable configurations click on Var Config and the following screen appe...

Страница 135: ...ng PanaView 5 8 2 2 HART cont 3 Click on PV Config and the following screen appears Figure 141 HART PV Configuration Menu 4 To select a channel for the HART PV Communication click on Channel The follo...

Страница 136: ...box and click on BACK Click Yes to confirm the change or click No to reject it Click on BACK to return to the HART Variables menu 8 Make whatever changes are necessary to the SV TV and or QV Config me...

Страница 137: ...Reset Totals Menu 2 To set a location for the reset click twice on ALL Channel X or Composite and the following screen appears Figure 144 Reset Direction Options 3 Click twice on the Reset Totals Dire...

Страница 138: ...Totalizer Error Handling 2 Click twice on the appropriate channel and the following screen appears Figure 146 Confirming Totalizer Error Handling 3 Click twice on Yes to confirm the selection above o...

Страница 139: ...To set up the inputs and outputs under the meter name click twice on IO Menu and the following screen appears Figure 147 Input Output Menu 5 9 1 Analog Outputs Setup 1 Click on Analog Outputs and the...

Страница 140: ...op Menu 3 Click on Status and the following screen appears Figure 150 4 20 Loop Status 4 Click On or Off twice and the screen returns to the 4 20 Loop menu 5 Repeat this procedure for each option on t...

Страница 141: ...put Output menu click on Freq Totals The following screen appears Figure 151 Frequency Total Link Mode 2 Click twice on the required Link Mode description and the following screen appears Figure 152 F...

Страница 142: ...Click twice on the appropriate Freq Total and the following screen appears Figure 153 Frequency Total Options 4 Click on Status and the following screen appears Figure 154 Frequency Total Status 5 Cl...

Страница 143: ...5 Using PanaView 5 9 2 Frequency Totals Setup cont 6 Click on Mode and the following screen appears Figure 155 Frequency Total Mode Options 7 Click twice on the Frequency option and the following scr...

Страница 144: ...el LNG User s Manual 5 9 2 Frequency Totals Setup cont 8 Click on Units and the following screen appears Figure 157 Channel Options 9 Click twice on the appropriate Channel and the following screen ap...

Страница 145: ...following screen appears Figure 159 Unit Options 11 Click twice on the appropriate Unit option and click on BACK until the Frequency menu appears Click on Error Level and the following screen appears...

Страница 146: ...User s Manual 5 9 2 Frequency Totals Setup cont 13 Under the Mode menu click twice on Totalizer and the following screen appears Figure 161 Totalizer Menu 14 Click on Units and the following screen ap...

Страница 147: ...on the appropriate Channel and the following screen appears Figure 163 Publisher Options 16 Click twice on the appropriate Publisher option and the following screen appears Figure 164 Unit Options 17...

Страница 148: ...larity Options 19 Click twice on the appropriate Polarity option and the screen returns to the Totalizer menu 20 Change the Unit Pulse and or Pulse Width text box readings if required Confirm the new...

Страница 149: ...ription and the screen returns to the Freq Total menu Click on BACK three times to return to the IO Input Output menu 5 9 3 Alarms Setup 1 Click on Alarms and the following screen appears Figure 167 A...

Страница 150: ...rms Setup cont 3 Click on Status and the following screen appears Figure 169 Alarm Status Options 4 Click twice on the appropriate Status option and the screen returns to the Alarm menu 5 Click on TYP...

Страница 151: ...l 139 Chapter 5 Using PanaView 5 9 3 Alarms Setup cont 6 Click twice on Level and the following screen appears Figure 171 Alarm Fail safe Menu 7 Click on Units and the following screen appears Figure...

Страница 152: ...e following screen appears Figure 173 Alarm Measurement Type Options 9 Click twice on the appropriate measurement type and the following screen appears Figure 174 Alarm Measurement Unit Options 10 Cli...

Страница 153: ...creen appears Figure 175 Alarm Trip Direction Options 12 Click twice on the appropriate Trip Direction and the screen returns to the Alarm FailSafe menu 13 Click on Error Level and the following scree...

Страница 154: ...uired and click on BACK Confirm the new entries by clicking Yes on the Verification screens 16 To set up the alarm direction from the Alarm Type Options menu see Figure 170 on page 138 click twice on...

Страница 155: ...n menu Click on BACK to return to the Alarm Type Options menu 19 From the Alarm Type Options menu click twice on Fault and the following screen appears Figure 179 Alarm Fault Type Options 20 Click on...

Страница 156: ...Custom is selected the following screen appears Figure 181 Alarm Fault Custom Types 23 Wait a few seconds for the window text to clear then click in the white box to the left of the each appropriate f...

Страница 157: ...5 Click twice on Latch or No Latch and the screen returns to the Alarm Menu If a latch already exists and needs to be removed click on Clear Latch and the following screen appears Figure 184 Clear Ala...

Страница 158: ...og Input Card 1 From the IO Input Output menu click on Slot 1 The following screen appears Figure 185 Slot 1 Options 2 Assign an Option Card to Slot 1 by clicking twice on the appropriate item If an a...

Страница 159: ...erification screen to complete the choice 4 Click on Mode and the following screen appears Figure 187 Analog Input Measurement Options 5 Choose the appropriate Measurement option and click on it twice...

Страница 160: ...priate Unit and the screen returns to the Temperature Menu 8 If the BASE and or SPAN temperature needs to be changed enter the measurement into the text box click on BACK and confirm the change by cli...

Страница 161: ...reen appears Figure 190 Analog Input Calibration Options 11 Click twice on Trim Base and the following screen appears Figure 191 Calibration Confirmation 12 Click twice on Yes to confirm the calibrati...

Страница 162: ...en and click twice on another option If an RTD input card was selected the following screen appears Figure 192 RTD Input Menu 2 To change the card label enter the new name into the text box click on B...

Страница 163: ...Off is selected the Measurement is turned off and the screen returns to the RTD Input Card Menu If Temperature is selected the following screen appears Figure 194 Temperature Menu 5 Click on Units an...

Страница 164: ...n Options 8 Enter the Set Pt or Offset temperature into each text box click on BACK and confirm the value by clicking Yes on the Verification screen Click on BACK to return to the RTD Input Menu 9 Cli...

Страница 165: ...1 beginning on page 146 5 10 Display Menu 5 10 1 Views Setup 1 Click twice on Display Menu and the following screen appears Figure 198 Display Menu 2 Click on Views and the following screen appears F...

Страница 166: ...Chapter 5 Using PanaView 154 Sentinel LNG User s Manual Figure 200 View 1 Setup 4 Click on View 1 and the following screen appears Figure 201 View 1 Setup Menu...

Страница 167: ...One View cont 5 Click on Channel and the following screen appears Figure 202 Channel Options 6 Click twice on the appropriate Channel and the screen returns to the View 1 Setup Menu 7 Click on Publish...

Страница 168: ...Publisher Unit Options 9 Click twice on the appropriate Unit and click on BACK to return to the View 1 Setup Menu 10 Click on Format and the following screen appears Figure 205 Format Menu 11 Enter th...

Страница 169: ...Backlight On the Display Menu to adjust the Contrast and or Backlight enter a number into each text box click somewhere outside the boxes and confirm the value by clicking Yes on the Verification scr...

Страница 170: ...l Menu and the following screen appears Figure 207 Calibrate Menu 2 Click twice on 4 20 Loop and the following screen appears Figure 208 4 20 Loop Setup Menu 3 To change Base Trim Scan Trim or Percent...

Страница 171: ...e click on Mode and the following screen appears Figure 209 4 20 Loop Mode Options 5 Click twice on the appropriate option and the screen returns to the previous menu Click on BACK to return to the Ca...

Страница 172: ...Menu The following screen appears Figure 210 User Setup Menu 2 Click on Edit Passcodes to specify those passcodes with access The following screen appears Figure 211 Edit Passcodes Menu 3 To enter a u...

Страница 173: ...xt box click on BACK and confirm the value by clicking Yes on the Verification screen 2 Click on Set Security and the following screen appears Figure 212 Security Level Options Click twice on the appr...

Страница 174: ...al 5 13 Factory Menu 1 Click twice on Factory Menu and the following screen appears Figure 213 Factory Menu 5 13 1 Checking Versions 1 To check the unit s version information click on Versions and the...

Страница 175: ...ck twice on Main and the following screen appears Click on BACK to return to the previous screen Figure 215 Main Version Information 3 Click twice on Option Cards and the following screen appears Figu...

Страница 176: ...n Default Meter and the following screen appears Figure 217 Confirm Default Meter 6 To confirm the Default Meter click twice on Yes To not confirm click twice on No The screen returns to the Factory M...

Страница 177: ...click twice on No The screen returns to the Factory Menu 9 From the Factory Menu to change the Tag name or the Assy Temp value enter the appropriate number into the text box click outside the box and...

Страница 178: ...Chapter 5 Using PanaView 166 Sentinel LNG User s Manual...

Страница 179: ...ct Baud Rate and press ENT Three options appear 4800 9600 and 19200 Use the arrow keys to select the appropriate option and press ENT The screen returns to the CONFIG menu 6 Parity To set the parity f...

Страница 180: ...at 15 0x000E 1039 0x040E 2063 0x080E 3077 0x0C04 4101 0x1004 DeltaT F 2 LSW float 17 0x0010 1041 0x0410 2065 0x0810 3079 0x0C06 4103 0x1006 UP Sig Strength F 2 LSW float 19 0x0012 1043 0x0412 2049 0x0...

Страница 181: ...4A 1099 0x044E 2123 0x084A 3147 0x0C4A 4171 0x104A Special Input 1 F 2 LSW float 77 0x004C 1101 0x044C 2125 0x084C 3149 0x0C4C 4173 0x104C Special Inputs Special Input 2 F 2 LSW float 79 0x004E 1103 0...

Страница 182: ...x0D16 4375 0X1116 FWD Energy Register 0 L 2 LSW double 281 0x0118 1305 0x0518 2329 0x0918 3353 0x0D18 4377 0X1118 FWD Energy Register 1 L 2 LSW double 283 0x011A 1307 0x051A 2331 0x091A 3355 0x0D1A 43...

Страница 183: ...4609 0x1200 Meter Control Reset Batch Total I 1 Unsigned integer 514 0x0201 1538 0x0601 2562 0x0A01 3586 0x0E01 4610 0x1201 Error Code7 I 1 Unsigned integer 515 0x0202 1539 0x0602 2563 0x0A02 3587 0x0...

Страница 184: ...Chapter 6 MODBUS Communications 172 Sentinel LNG User s Manual...

Страница 185: ...communication device 7 2 Wiring the HART Interface 1 Interconnect the HART interface and the HART device as shown in Figure 219 below Figure 219 HART Wiring Ext Supply Passive Mode Figure 220 HART Wir...

Страница 186: ...to the instructions that came with that device Some flowmeter parameters can be read only by the HART device during startup It is recommended that both the flowmeter and the HART device be rebooted af...

Страница 187: ...Hex Device Variable Classification Code Measurement Comp Ch 1 Ch 2 Ch 3 Ch 4 Code Classification Velocity 0 00 48 30 96 60 144 90 192 C0 67 Velocity Volumetric 1 01 49 31 97 61 145 91 193 C1 66 Volume...

Страница 188: ...UP Norm Factor 33 21 81 51 129 81 177 B1 225 E1 0 Not Classified DN Norm Factor 34 22 82 52 130 82 178 B2 226 E2 0 Not Classified Theta 3 35 23 83 53 131 83 179 B3 227 E3 0 Not Classified CEE1 36 24 8...

Страница 189: ...me 4 04 52 34 100 64 148 94 196 C4 70 Time Mass Flow 72 Mass Flow FWD Mass 71 Mass FWD REV Mass 71 Mass REV EnergyRate 79 Power FWD Energy 77 Energy FWD REV Energy 77 Energy REV Reynolds 59 3B 107 6B...

Страница 190: ...orm Factor 0 Not Classified Theta 3 0 Not Classified CEE1 67 Velocity Supply Temp 37 25 85 55 133 85 181 B5 229 E5 64 Temperature Return Temp 64 Temperature Supply Rtn 0 Not Classified Supply Dens 40...

Страница 191: ...Reference source not found to the Sentinel LNG User s Manual and to Common Tables Specification Table 17 Due to the large number of device variables the Non Primary Variable Out of Limits flag bit Tab...

Страница 192: ...y Range Flow error 4 7 0 3 E4 Signal Quality Flow error 4 7 0 4 E5 Amplitude Flow error 4 7 0 5 E6 Cycle Skip Flow error 4 7 0 6 E7 Analog Output IO warning 4 1 0 7 E8 Supply Temperature IO warning 4...

Страница 193: ...g Value 35 Write Primary Variable Range Values 36 Set Primary Variable Upper Range Value 37 Set Primary Variable Lower Range Value 38 Reset Configuration Changed Flag 40 Enter Exit Fixed Current Mode...

Страница 194: ...us should be used to determine the current state of the meter 7 9 1 4 Command 43 Set Primary Variable Zero Only the Totals variable can be set to Zero with this command Any other variable that is not...

Страница 195: ...command is executed The effect of this command is equivalent to Command 52 Set Variable Zero if the command 52 device variable specified is a Totals variable it will clear all totals Note The function...

Страница 196: ...esponding units 7 11 1 1 Velocity 7 11 1 2 Volumetric Flow Class Code Variable Classification Unit Code Unit Description 67 Velocity 20 feet per second 21 meters per second Class Code Variable Classif...

Страница 197: ...andard cubic meters per minute 190 Standard cubic meters per second 178 Standard liters per hour 179 Standard liters per minute 180 Standard liters per second 177 Standard liters per day Class Code Va...

Страница 198: ...ests are processed during initiation The analog output will default to 4mA until the primary variable is available 7 12 3 Device Reset The Sentinel LNG reset performance is identical to Power Up descr...

Страница 199: ...ted 7 12 9 Operating Modes Fixed current mode is implemented using Command 40 This mode is cleared by power loss or reset 7 12 10 Write Protection The meter contains two write protect switches 7 12 11...

Страница 200: ...Sentinel LNG User s Manual Mappable Dynamic Variables Yes Number of common practice commands 22 Number of device specific commands 1 Bits of additional device status 32 Alternative operating modes No...

Страница 201: ...nformation about factory default settings for the Sentinel LNG 7 15 Revision History Parameter Default Value Device variable mapped to PV Average velocity Lower Range Value 0 Upper Range Value 100 PV...

Страница 202: ...Chapter 7 HART Communications 190 Sentinel LNG User s Manual...

Страница 203: ...he other end to Com Port I O on terminal block TB2 on the Sentinel LNG as described in Chapter 2 Installation WARNING Use RS232 connections in Non Hazardous areas only Note The RS232 cable connection...

Страница 204: ...screen should appear as in Figure 221 after approximately one minute or Power on the Sentinel LNG and enter ESC R from the PC keyboard The Sentinel LNG screen should appear as in Figure 221 Figure 221...

Страница 205: ...File The protocol should be Xmodem Use Browse to locate the file which will have a sim extension Double click on this file and click the Send button The screens on the Sentinel LNG Figure 223 and on H...

Страница 206: ...Press the up arrow key and press ENT twice or at power on press and hold the CLR TOT key until the following screen appears after several seconds Release the key Press the up arrow key to default the...

Страница 207: ...sions option and press ENT c Press ENT again to enter Main The display should appear similar to the screen below Figure 226 Software Verification Screen 8 1 2 1 Checking Option Card Version Informatio...

Страница 208: ...arts in this flow metering system without a proper calibration of the entire system at an approved calibration facility Check with local authorities to determine if field replacement of parts is allow...

Страница 209: ...is chapter for instructions on how to proceed You may be asked to consult the factory It would be very helpful to capture all of the diagnostic data and parameter information for each channel on the D...

Страница 210: ...the limits programmed in the Error Limits option of the User Program Cause The peak of the upstream or downstream correlation signals has fallen below the correlation peak limit as set in the Error L...

Страница 211: ...ducer or cable is damaged or a transducer needs to be recoupled Action Ensure that the correct transducer is programmed for the meter If this is not the fault consult the factory 9 2 12 E16 Totalizer...

Страница 212: ...the factory 9 2 19 E30 Channel Disabled Problem The channel is not available Cause The channel has been turned off Action Enter the PROGRAM menu and enable the channel see Activating a Channel Path St...

Страница 213: ...strength for the downstream transducer 50 75 50 or 75 Thresh Up Displays the value at which Sentinel LNG detects signal arrival time for the upstream transducer 100 100 100 or 100 Thresh Dn Displays...

Страница 214: ...d particles will absorb or disperse the ultrasound signals This interference with the ultrasound transmissions through the fluid will cause inaccurate flow rate measurements In addition temperature gr...

Страница 215: ...e tracked to a problem with a transducer or transducers or if one is physically damaged the Panametrics Sensing field service team has the appropriate methods and tools to properly replace the transdu...

Страница 216: ...ecomes full the new record will overwrite the oldest record in the Audit trail This circular log will enable the user to always view the last 1000 records The audit log file is downloadable using Pana...

Страница 217: ...dd yyyy Time hh mm ss Slot Number Event Name Option Card Previous Card Type Current Card Type 9 6 1 6 Default Meter When a user defaults the meter option enabled only for authenticated users For Ex Se...

Страница 218: ...as either a Text file or a Microsoft Excel file In order to get the full benefits of the Audit trail feature we recommend using the Microsoft Excel file This option however is available only if Micros...

Страница 219: ...below indicates that the errors increase as the temperature difference between the fluid and the ambient for both insulated and non insulated meters For non insulated meters at large temperature diff...

Страница 220: ...Chapter 9 Troubleshooting 208 Sentinel LNG User s Manual...

Страница 221: ...appendix includes the following Sentinel LNG procedure formats Figure 230 MFG and DEV Menu Map Figure 231 PROG Menu Map Figure 232 PROG Composite Menu Map Figure 233 CONFIG Menu Map Figure 234 IO Menu...

Страница 222: ...Appendix A Menu Maps 210 Sentinel LNG User s Manual...

Страница 223: ...rent display tests will be performed DAC Count Tx Relay Rx Relay CH2 Flow Info CH3 Flow Info CH4 Flow Info Flow Cal Info API Flow Info Freq Tot Test Alarm Test Alarm 1 Alarm 2 Alarm State Trip Reset F...

Страница 224: ...KV Row No Yes Batch Size Off Single Table Edit Table Units X KFactor Row Reynolds Velocity units Reynolds Channel 3 Channel 2 Channel 1 Channel 4 Composite See PROG Composite Menu Map Engineering Men...

Страница 225: ...d Active Fixed Temp Fixed Pressure Fixed Density Menu appears only when Slot 1 2 is occupied Appears only if one of the following materials is selected Carbon Steel all Stainless all Iron Cast Iron Du...

Страница 226: ...HART Interface Parity Address RS232 RS485 4800 19200 9600 None Odd Even Panalink Interface Parity Units Units Units Units RS232 RS485 4800 19200 9600 38400 115200 57600 None Odd Even Node ID Stop Bit...

Страница 227: ...sive Active Freq Totals Status Drive Ctl Mode On Off Fspan Fbase METER Pressure Density Liter hr Liter min Liter sec Fine D T Dac Up Dac Dn Amp Up Amp Dn T Up s T Dn s kRe K Factor K C MMHG BAR KPA AP...

Страница 228: ...el Mode Cal Off Temp Yes No Set Pt1 Offset 1 Set Pt5 Offset 5 Label Mode Cal Temp Density Off Units Base Span Yes No Yes No Yes No To Analog Outputs and Freq Totals E1 Low Signal E2 Soundspeed E3 Velo...

Страница 229: ...A Normal Percent mA Test 4 20 Loop USER Display Set Security Admin Full Locked Locked User1 User4 User Admin Field Service Factory Engineering Upgrade Versions Default Meter Tag System Info Main Yes N...

Страница 230: ...Appendix A Menu Maps Sentinel LNG User s Manual 218...

Страница 231: ...made seal any unused cable entry holes Note If the instructions in this appendix are followed the unit will comply with the EMC Directive 2004 108 EC Note Make sure to connect the Sentinel LNG case t...

Страница 232: ...Appendix B CE Mark Compliance and High Noise Areas 220 Sentinel LNG User s Manual...

Страница 233: ...ther Transducers Other Transducers Wedge Temp Wedge Temp Frequency Hz Frequency Hz Tw s Tw s Wedge Angle Wedge Angle Wedge Sndspd Wedge Sndspd Pipe Material Pipe Material All Clamp On Transducers All...

Страница 234: ...etection Peak Threshold Detection Peak Threshold Min Thresh N A Min Thresh N A Max Thresh N A Max Thresh N A Xmit Sam Size N A Xmit Sam Size N A Vel Averaging Vel Averaging Global CONFIG System Units...

Страница 235: ...1 12 12 13 13 14 14 15 15 16 16 17 17 18 18 19 19 20 20 Channelx Reynolds Number Table Channel 1 Channel 2 if applicable Reynolds Row Units kRe K Factor Row Units kRe 1 1 2 2 3 3 4 4 5 5 6 6 7 7 8 8 9...

Страница 236: ...Appendix C Data Records 224 Sentinel LNG User s Manual...

Страница 237: ...low transmitter the details of the service should be recorded in this appendix An accurate service history of the meter can prove very helpful in troubleshooting any future problems C 2 Data Entry Rec...

Страница 238: ...Appendix C Service Record 226 Sentinel LNG User s Manual C 3 Diagnostic Parameters Date Description of Service Performed By...

Страница 239: ...he DEV Menu Modbus or by using Panaview Channel 1 Channel 2 Channel 3 Channel 4 Parameter Value Parameter Value Parameter Value Parameter Value Velocity Velocity Velocity Velocity Delta T Delta T Delt...

Страница 240: ...Appendix C Service Record 228 Sentinel LNG User s Manual...

Страница 241: ...locking 40 E Electrical Connections CE Mark Compliance 219 See Wiring Error Limits Entering 46 Error Code E0 No Error 197 E1 Low Signal 197 E13 Settle Tracking AGC 199 E14 Tracking Seek Mode 199 E15 A...

Страница 242: ...oblems 203 Submenu 62 Wall Thickness 63 Power Connecting 12 22 Terminal Block 12 22 Precautions 17 Pressure Input Error E18 199 Principal of Operation 3 Flow Profile 5 Multipath Design 5 Transducers 4...

Страница 243: ...nt 203 Principal of Operation 4 Problems 203 Replacement 203 Submenu 57 Transit Time Method 4 Transmit Sample Size 60 Trimming 4 20 mA 196 Tw Option 57 U USER Menu Map 218 User Program Data Record 221...

Страница 244: ...Index 232 Sentinel LNG User s Manual...

Страница 245: ...pose and warranties arising from course of dealing or usage or trade Return Policy If a Panametrics Sensing instrument malfunctions within the warranty period the following procedure must be completed...

Страница 246: ...Warranty 234 Sentinel LNG User s Manual no content intended for this page...

Страница 247: ......

Страница 248: ...uct and company names are trademarks of their respective holders 910 286 B Customer Support Centers U S A The Boston Center 1100 Technology Park Drive Billerica MA 01821 U S A Tel 800 833 9438 toll fr...

Отзывы: