


33
7.2. Attachment of the lifting mechanism to the vehicle
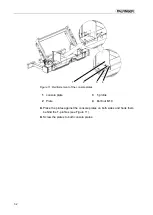
To assist in the installation of the lifting mechanism of your
PALFINGER Tail
Lifts
tail lift, you can on request obtain special installation aids (see
Figure 12, page 33). This installation aids support you in mounting the lifting
mechanism.
The installation aids each have four lugs with holes of different sizes. When
the lifting mechanism is positioned under the vehicle and the torsion frame
is raised, the control rods of the torsion frame can be bolted to the respective
matching lugs. The installation aids attached to the loading area then hold
the torsion frame in position.
Figure 12: Installation aids
The following steps are required when installing with installation aids:
•
positioning the lifting mechanism under the vehicle (see chapter 7.2.1,
page 34)
•
position and fix the installation aids on the vehicle chassis (see
•
bolting the lifting mechanism to installation aids (see chapter 7.2.3,
page 36)
•
positioning the stand tube (see chapter 7.2.4, page 39)
•
fix lifting mechanism with console plates to vehicle chassis (see
•
mounting the hydraulic unit (see chapter 7.3, page 45)
•