48
Fig. 8.2
Fig. 8.1
USE AND & MAINTENANCE
8 PRELIMINARY
OPERATIONS
8.1 LOADING THE PELLETS
7KH¿UVWRSHUDWLRQWREHSHUIRUPHGEHIRUHVWDUWLQJ
WKHDSSOLDQFHLVWR¿OOWKHKRSSHUZLWKIXHOSHOOHWV
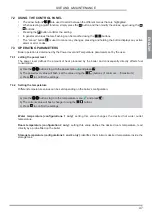
opening the two upper hatches (Fig. 8.1).
The pellets are loaded into in the hopper using a
scoop.
Do not empty the sack directly into the hopper so
as to avoid loading sawdust or other foreign bodies
that may affect proper boiler operation and avoid
spilling pellets outside of the hopper.
Make sure the hopper lid is well closed
again after having loaded the pellets.
At this point, to take advantage of the ‘Autonomy’
function, use the arrow buttons
to move to
the combustible icon
DQGFRQ¿UPE\SUHVVLQJ
. Select “Full” by pressing
and press
the button
WRFRQ¿UP
In order to disable this function, select “Off” instead
of “Full”.
8.2 POWER
SUPPLY
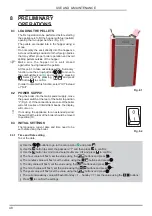
Plug the boiler into the mains power supply, move
the power switch at the rear of the boiler to position
“I” (Fig. 8.2). If the connections are correct the boiler
will emit a series of intermittent beeps, the display
will come on.
If not using the appliance for an extended period,
the switch at the rear of the boiler should be moved
to position (O).
8.3 INITIAL
SETTINGS
The language, current date and time need to be
set before using the boiler.
8.3.1 Time and Date setting
To set the date:
a) Use the
buttons to go to the setup menu
and press
;
b) Use the
button to select the password “7” and then press
WRFRQ¿UP
c) Use the
button to scroll to and select submenu
[3]
and press
WRFRQ¿UP
d)
7KHKRXUYDOXHZLOOÀDVKVHWWKHYDOXHXVLQJWKH
buttons and press
;
e)
7KHPLQXWHVYDOXHZLOOÀDVKVHWWKHYDOXHXVLQJWKH
buttons and press
;
f)
7KHGD\YDOXHZLOOÀDVKVHWWKHYDOXHXVLQJWKH
buttons and press
;
g)
7KHPRQWKYDOXHZLOOÀDVKVHWWKHYDOXHXVLQJWKH
buttons and press
;
h)
7KH\HDUYDOXHZLOOÀDVKVHWWKHYDOXHXVLQJWKH
buttons and press
;
i)
7KHFXUUHQWZHHNGD\YDOXHZLOOÀDVK0RQGD\ 6XQGD\ VHWWKHYDOXHXVLQJWKH
buttons;
M
Press
WRFRQ¿UPWKHVHWWLQJV


