background image

NP36 

User Manual V. 1.2


53


3.


If there are any IP conflicts detected on the network, they will be listed under IP Conflicts.  


4.


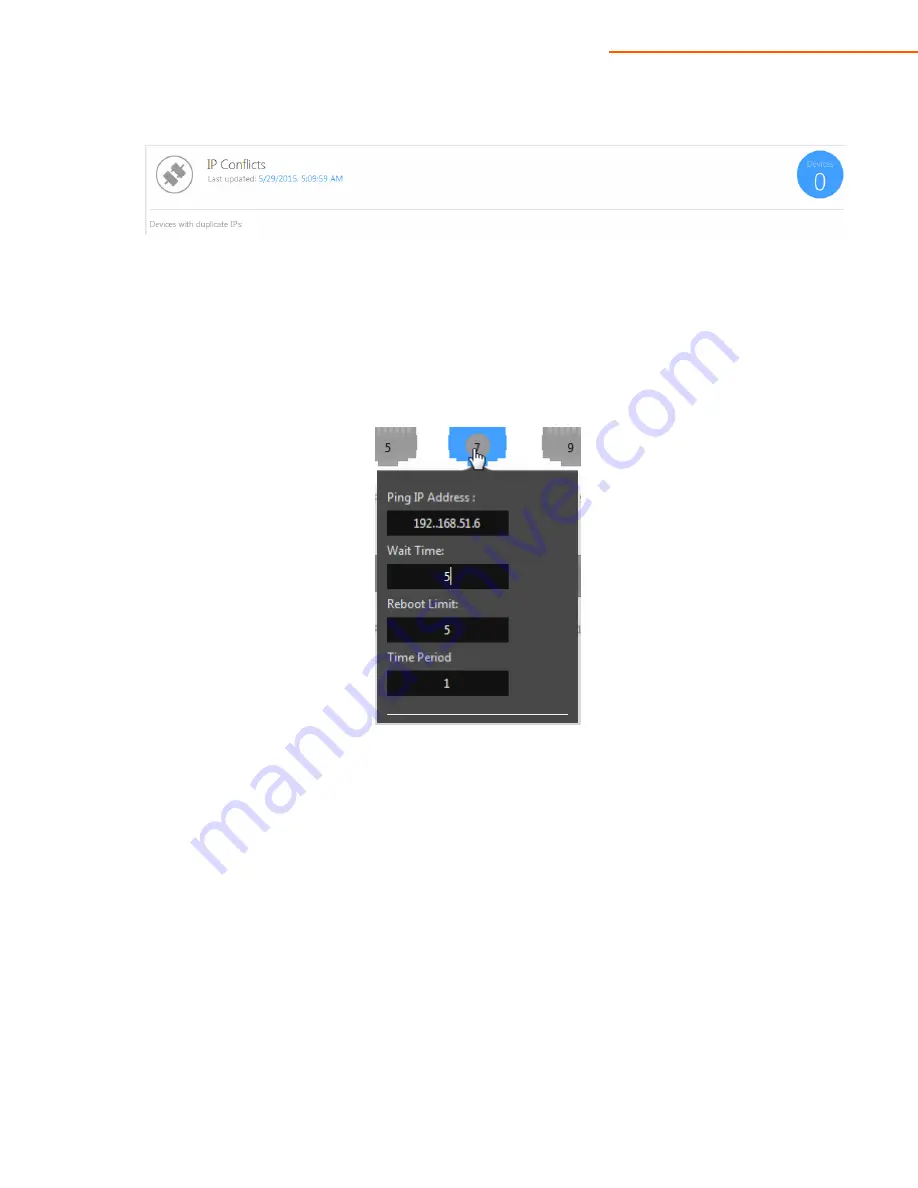
Self Healing also allows you to set up an auto-ping to a device. If the pings fail, the port on the 
switch will be rebooted. Hover your mouse over the port you would like to configure. In this 
example, we set up auto-ping on an IP camera connected to port number 7. We will enter the IP 
address of the camera under 

Ping IP Address

. The 

Wait Time

 field shows long BakPak will wait (in 

minutes) before power cycling that device after it has stopped responding. 

Reboot Limit

 and 

Time 

Period

 go together: here is where you input the maximum number of reboots in a given time field 

(in hours). Your settings will automatically be saved when entered in the fields.    


Содержание NP36

Страница 1: ...pakedgedevice software inc NP36 BakPak Cloud Management System User Manual V 1 2...

Страница 2: ...atroller 12 Accessing MyBakPak 14 Editing User Information 14 Profiles 17 Removing a Profile 19 Scan for Devices and Device Priority 20 Creating a Network Map 24 Scanning Across VLANs 30 Device Inform...

Страница 3: ...2 Device Priorities 54 Patroller 54 Bakpak DDNS 55 Administration 55 Permissions 57 Account Settings 60 Subscription Management More information will be available under this section once subscription...

Страница 4: ...remotely These features save you both time and money that would otherwise be spent on service calls The front panel of the NP36 displays a pair of blue LEDs See Table 1 below for more information Lab...

Страница 5: ...ble 2 describes each port and its function Name Description AC Connector 110 260V AC Power Switch powers the NP36 on or off USB 1 2 optional LAN MDI MDIX RJ45 interface for connection to the LAN HDMI...

Страница 6: ...ou have installed a managed switch before the process of installing the NP36 will seem very familiar Tools required Phillips screwdriver if using rack mount brackets PC or laptop with Ethernet interfa...

Страница 7: ...s of 192 168 1 99 you can connect the NP36 to an available port on your router and proceed to the section titled First Time BakPak Users If your router is using an IP scheme of 192 168 1 X but has an...

Страница 8: ...s You are now ready to create a Cloud Account and register your Patroller Proceed to the section titled First Time BakPak Users 10 Connect an Ethernet cable from your computer to the Patroller directl...

Страница 9: ...address of 192 168 1 237 into the address bar and press ENTER 13 A web page will appear prompting you for a username and password Enter pakedge for the username and pakedgep for the password Then cli...

Страница 10: ...register your NP36 and create accounts for your technicians To do this please follow the steps below If you have already created an Admin account skip to Registering Your Patroller 1 Contact our Sales...

Страница 11: ...equired information to register for your bakpak account Be sure to enter the dealer code you received from our Sales department Click Register 5 You have now created your Admin BakPak account You can...

Страница 12: ...s ENTER The default IP address is 192 168 1 237 2 A web page will appear prompting you for a username and password Enter pakedge for the username and pakedgep for the password Then click Login to log...

Страница 13: ...Click Accept to continue 5 Enter the email address and password to the Admin account for your company Enter a name for the Patroller and select your timezone Click Register 6 You will be redirected to...

Страница 14: ...your web browser and login with your credentials Once you have logged in you will be redirected to the Dashboard To log out of BakPak simply click Logout towards the upper right hand side Editing Use...

Страница 15: ...NP36 User Manual V 1 2 15 Once you click on the you will see the following screen on the left...

Страница 16: ...u also have the option to change update your password You can also select the plug type based off the country you live in This will change the style of the PDU outlets shown in device view discussed i...

Страница 17: ...lsius C and Fahrenheit F Profiles Take the following steps to add a registered NP36 1 Log in to MyBakPak 2 Click Profiles 3 Click the icon to add a patroller 4 Select your NP36 from the Pakedge Patrol...

Страница 18: ...dress would be 192 168 51 1 Enter the VLAN ID as well 5 If you are using multiple VLANs you can click the icon to add another VLAN This will be necessary in order for the patroller to scan devices on...

Страница 19: ...rom your MyBakPak account 1 Log in to MyBakPak 2 Hover your mouse over the left side of the profile you wish to remove and click the checkbox Then click the icon 3 You will be asked to confirm that yo...

Страница 20: ...ance Please take the following steps to scan your network and build a network map 1 Navigate to the Profile page 2 Click on your profile to edit it 3 Click the icon to begin the device discovery locat...

Страница 21: ...ly be able to add the amount of third party devices that you have licenses for Please refer to the Licenses Section for more information 7 BakPak will ask you if you would like to setup priorities for...

Страница 22: ...e greater attention BakPak will pay to it By default any Pakedge devices will be classified as High Priority and all other devices are classified as Unmonitored Devices 9 To set additional devices to...

Страница 23: ...add Click Save and Exit 13 Devices classified as Internet of Things Wireless Devices will be monitored but will be reported offline only after an extended amount of time This will keep wireless device...

Страница 24: ...your priorities navigate back to the Profile page You will see all of your devices 16 BakPak will also display which VLAN the device is on In the following example a Trendnet IP camera is on VLAN2 whi...

Страница 25: ...2 You will see a list of the devices you have added to your profile Click the icon towards the top to have BakPak attempt to automap your network 3 Once the Auto map is complete your network map will...

Страница 26: ...map you can manually complete it In the following example we have an SX 24P that is connected to an RE 1 To illustrate that on the network map we will drag the SX 24P over into the RE 1 5 When the tw...

Страница 27: ...e port number used on the SX 24P to connect to the RE 1 and vice versa Click Save Port Information to continue 7 The switch is now connected to the RE 1 We will perform the same task on the S24P8 swit...

Страница 28: ...NP36 User Manual V 1 2 28 8 We will drag the switch over to the RE 1 9 Enter the required port information Click Save Port Information...

Страница 29: ...10 Our network map is now complete 11 A green ring around a device indicates that the device is online A red ring indicates the device is offline and a yellow ring indicates that one or more devices...

Страница 30: ...r the VLAN information for your network In the example below 192 168 51 1 is the first IP address of VLAN 1 so we enter 1 as the VLAN ID Note If your network has a different IP scheme than the Pakedge...

Страница 31: ...VLANs onto the NP36 Once finished your VLAN information may resemble the following 6 Click OK to finalize the settings 7 The NP36 will now find devices across VLANs To scan for devices please follow...

Страница 32: ...you have added 1 Navigate to the Profiles page 2 Click on your profile to view it 3 Click on a device to expand it The following image shows an RE 1 The uptime is displayed towards the top 4 You may...

Страница 33: ...On a managed switch Bakpak will display information about the VLAN port configuration The following image illustrates this Lava Tunnel You can use the Lava tunnel feature to access a device monitored...

Страница 34: ...the protocol and 80 as the port The number in the Choose Timer field indicates how long the tunnel will be open for in minutes Click Submit 5 Once the tunnel is open you will have a link to click on 6...

Страница 35: ...ccess that computer without needing to perform any additional configurations on the router First we navigate to the profile page again 8 Then we will scroll down until we find the Windows computer Cli...

Страница 36: ...l have a link We need to copy this link into the application that we use the Remote Desktop Application 12 Once we paste this link into the Remote Desktop Application we will click Connect 13 We are t...

Страница 37: ...u to use Telnet or SSH to access your devices The following image is an example of the PuTTY application Notice how the fields for Host Name or IP address and Port are separate In this application we...

Страница 38: ...Click on it 3 Click Lava Tunnel 4 Select Telnet as the service Click Submit 5 Once the tunnel is open you will have a link The number after the colon is the port number that was opened for your tunne...

Страница 39: ...NP36 User Manual V 1 2 39 8 Step 6 contains the port number opened for this tunnel In this example it is port 23488 so we enter that number in PuTTY and click Open...

Страница 40: ...Portal The Device Portal allows you to log in to the web GUI of your devices without the need for port forwarding or VPN access 1 Navigate to the Profiles page 2 Click on your profile 3 Click on a dev...

Страница 41: ...all at once in other sections of BakPak Take the following steps to create a group 1 Navigate to Virtualization Group Management 2 Click the icon to create a new group 3 Select the devices you would l...

Страница 42: ...Firmware Management 2 Click the Management Group with the device you would like to update In this example we will click the group we previously created 3 The devices in the group will be listed If th...

Страница 43: ...o that they may be restored from BakPak In the following example we will back up files from an RE 1 router and a WK 1 access point 1 Navigate to Virtualization Configuration Management 2 We will click...

Страница 44: ...will then create backup configuration files of the devices selected 7 To apply a configuration to a device simply click Selected For example we will click selected for the RE 1 8 Click OK on the pop u...

Страница 45: ...at once 1 Navigate to Virtualization Power Control 2 Click the Management Group that has the device you can Power Control In this example we will edit the previously created group 3 We will select th...

Страница 46: ...ions Create New Port Group or Add to Port Group Click Create New Port Group 6 Enter a name for the port group The port group will be used to identify a certain group of ports on the switch Click OK to...

Страница 47: ...e a schedule for ports to either be power cycled or powered on and off at certain times Click Turn Off On 11 You can choose between Daily or Consecutive A daily schedule will occur every day The follo...

Страница 48: ...cling a group The following image is an example of a schedule that is set to power cycle every day at 6 00 am on every weekday 13 Once the schedule is created you will be redirected to the Schedule ma...

Страница 49: ...Navigate to Troubleshooting and Reporting Alert Settings 2 Click on the Default alert 3 If you would like to receive notifications via SMS enter your phone number and provider Enter a name for the La...

Страница 50: ...n case you wish to have different alert settings for different devices Simply click the icon to create a new alert 6 Fill out the necessary information and click Create when finished Be sure to select...

Страница 51: ...select a Pakedge S24P8 switch We can see the CPU and Memory usage under the Quick View tab 4 Device Events will display important events that have occurred The following image shows the timestamps of...

Страница 52: ...ll as set up ports to power cycle when connectivity issues appear 1 Navigate to Troubleshooting Reporting Troubleshooting Self Healing 2 Click on Connection Issues If there were any outages in connect...

Страница 53: ...ld like to configure In this example we set up auto ping on an IP camera connected to port number 7 We will enter the IP address of the camera under Ping IP Address The Wait Time field shows long BakP...

Страница 54: ...he Patroller page allows you to view all of the patrollers registered under your account at once 1 Click Patroller from the Dashboard You will see your patrollers listed 2 Click Firmware to see if the...

Страница 55: ...ddress into your web browser 6 Once logged in click on Firmware Update and go to the firmware file BakPak DDNS The BakPak DDNS page will display any RE 2 routers you have registered using the BakPak D...

Страница 56: ...count to expire you can set the expiration date hundreds of years into the future 4 Once the technician is created navigate to Administration Accounts Permissions We will need to add the technician to...

Страница 57: ...ermissions on the group you would like to edit 3 There are four different types of permissions Global permissions are the general permissions applied to all profiles Select your desired settings and h...

Страница 58: ...elect the patroller and device that you wish to apply permissions to Then you will be able to choose which permission settings you would like Hit Apply If you want the devices to use the default patro...

Страница 59: ...Port permissions allow you to choose which ports users have access to Select the patroller and device that you wish to apply the port permissions to then choose the port and permission settings Hit A...

Страница 60: ...it a more personalized feel 1 Click the Settings icon at the upper left of the Dashboard 2 You can enter a display name BakPak will use this display name on the dashboard Click Update 3 You may also c...

Страница 61: ...le if your NP36 is licensed for 25 devices you will be able to monitor and manage up to 25 non Pakedge devices and an unlimited number of Pakedge devices If your patroller is licensed for 50 devices y...

Страница 62: ...NP36 User Manual V 1 2 62 Contact Us The Contact Us page contains contact information for the various departments at Pakedge...

Страница 63: ...original warranty period What Is Not Covered Under the Terms of This Warranty This warranty only covers failure due to defects in materials and workmanship that occur during normal use and does not c...

Страница 64: ...ages In this case the above limitations or exclusions may not apply to you This warranty gives you specific legal rights and you may also have other rights that vary from state to state Effective Warr...

Страница 65: ...pakedgedevice software inc 3847 Breakwater Avenue Hayward CA 94545 17011 Beach Blvd Suite 600 Huntington Beach CA 92647 650 385 8702 www pakedge com sales pakedge com...

Отзывы: