background image

25

MAKING USER SETTINGS (cont.)

Auto Pillarbox


YES

>NO

> shows current setting, as does 
a lighted MESSAGE light

Changing the Auto Pillarbox setting

If you have not done so already, put your set-top into “user settings mode”, as described on page 20. 
Press the 

U

 or 

D

 button on your remote control and highlight Auto Pillarbox on the PACE USER 

SETTINGS menu.

1.  Press the 

R

 button. The Auto Pillarbox menu appears on your TV screen.

2.  If you want to change the setting, press 

U

 or 

D

. Press the 

select

 button to confirm the choice 

and change to the new setting.

3.  Press the 

L

 button. The PACE USER SETTINGS menu reappears.

To continue making the settings, see the next section.

NOTE

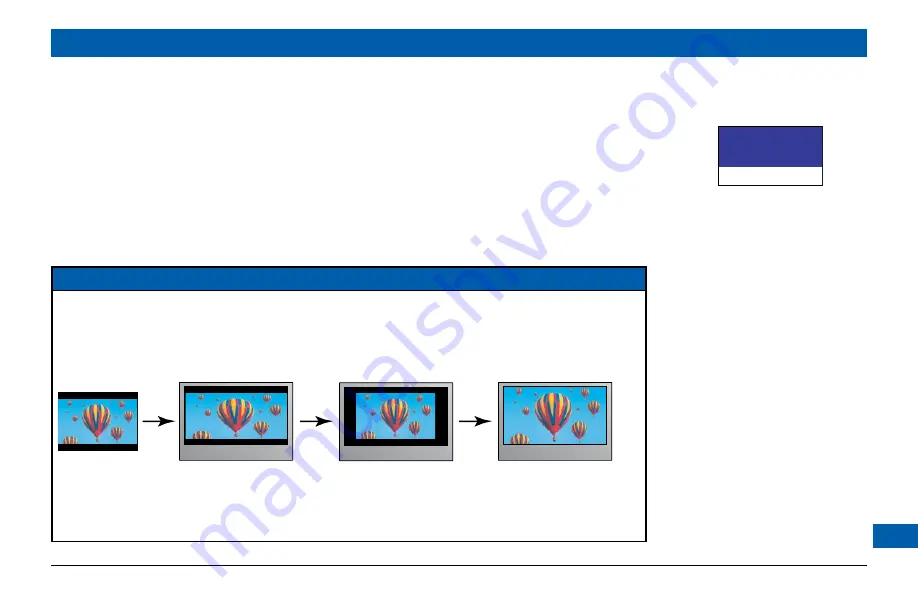
16:9 picture in a 4:3 transmission


Sometimes 4:3 transmissions may contain a 16:9 picture, with black borders at the top and bottom. On a 
16:9 TV this may display with black borders all the way around the picture. To remove these borders, you 
can use the “Zoom function” button on your remote control (could be labeled Zoom or Aspect).  
See the example below. For more information about using “Zoom”, see page 32.

4:3 transmission

16:9 TV with no automatic 

detection of 4:3,

Auto-pillarbox switched off

16:9 TV with no automatic 

detection of 4:3,

Auto-pillarbox switched on

Use 'Zoom' to increase the picture size.

(Note: the picture may lose some

definition due to the expansion)

Содержание DC700X

Страница 1: ...www pace com ...

Страница 2: ......

Страница 3: ... and off 15 Using your remote control 16 Lightning storms 16 Your set top s front panel 17 Adding digital video recorder DVR functionality 18 MAKING USER SETTINGS 20 About User Settings 20 About the TV Aspect Ratio 21 About TV Display Capability resolution settings 22 Setting Auto Pillarbox 24 Making Closed Captions Settings 26 Making Front Panel Settings 27 Setting Hard Disk Sleep Mode 28 Changin...

Страница 4: ...ies that the cable ground shall be connected to the grounding system of the building as close to the point of cable entry as is practical Service address Pace Americas Inc 3701 FAU Boulevard Suite 200 Boca Raton Florida 33431 U S A The lightning flash with arrowhead symbol within a triangle is intended to alert you to the presence of uninsulated dangerous voltages within your set top s enclosure t...

Страница 5: ...ades and a third grounding prong The wide blade or the third prong are provided for your safety If the provided plug does not fit into the outlet consult an electrician for replacement of the obsolete outlet 10 Protect the power cord from being walked on or pinched particularly at plugs convenience receptacles and the point where they exit from the apparatus 11 Only use attachments accessories spe...

Страница 6: ... item 13 in the Important Safety Instructions Placement and mounting Do not place your set top on an unstable or uneven surface Your set top may fall causing serious injury to a child or adult and serious damage to your set top If you mount your set top for example to a wall or ceiling follow the manufacturer s instructions and use a mounting accessory recommended by the manufacturer See also item...

Страница 7: ... falls outside this range you must correct this in order for your set top to work correctly and safely For example if the temperature is too high switch on the air conditioning Overloading Do not overload wall outlets extension cords or other power outlets as this can result in a risk of fire or electric shock Replacement parts When replacement parts are required be sure that the service technicia...

Страница 8: ...d first before inserting the polarized plug into the wall socket outlet Disconnecting Disconnect your set top from the power supply before you disconnect any other equipment from its rear panel The only way to disconnect your set top from the power supply is to remove the power cord from the wall socket outlet Your set top must therefore be installed near to the wall socket outlet which should be ...

Страница 9: ...every hour You should avoid using theWeb if you are tired or have lost some sleep Regulatory information CAUTION Do not attempt to modify your set top without written authorization from the manufacturer Unauthorized modification could void your authority to operate your set top NOTE Your set top has been tested and found to comply with the limits for a Class B digital device pursuant to Part 15 of...

Страница 10: ...d L CABLE IN From cable service provider TOTV RF output to the TV or VCR S VIDEO S video output VIDEO OUT Composite video output SATA For connection to an optional external hard disk SEPARABLE SECURITY MODULE behind cover Removal will interrupt your service POWER INPUT Make this connection last of all DIGITAL AUDIO OUT Optical S PDIF audio output ETHERNET To connect to optional PC HDMITM Video and...

Страница 11: ...o input if present on your VCR orTV IR RECEIVE Connect to an optional remote eye USB Universal Serial Bus Connect to compatible optional equipment that supports a USB 2 0 interface HDMITM High Definition Multimedia Interface If your HDTV has an HDMITM connect it here for a digital audio video connection instead of using the AUDIO and 3 analog COMPONENT VIDEO connectors ETHERNET Connect to an optio...

Страница 12: ...ect them as a back up If you use the RF cables you must tune yourTV andVCR to your set top sVHF output channel 3 or 4 consult your cable service provider to find which channel it is for your location Consult the manuals supplied with yourTV andVCR for information on how to tune You can take advantage of the digital audio output from your set top by connecting a suitable cable between your home the...

Страница 13: ...o connect to the HDTV This displays a high definition picture on yourTV NOTE Copy protection via an HDMITM secure link The HDMITM link between your set top and your HDTV should be a secure link When your set top is attached via an HDMITM cable to an HDCP compliant High bandwidth Digital Content Protection HDTV the HDTV and set top negotiate a secure link which allows your set top to transmit full ...

Страница 14: ... PR CR Y COMPONENT VIDEO OUT HOMETHEATER RECEIVER OPTICAL AUDIO IN COAXIAL AUDIO IN DIGITAL AUDIO OUT DIGITAL AUDIO IN OPTICAL COAXIAL PB CB IN PR CR IN Y IN COMPONENT VIDEO IN POWER POWER POWER HDMI WALL AC OUTLET WALL AC OUTLET WALL AC OUTLETS Set up A NOTE This diagram shows a video path from the set top to aVCR to allow recording to theVCR It shows a video path from theVCR to theTV to allow pl...

Страница 15: ...IO IN COAXIAL AUDIO IN DIGITAL AUDIO OUT DIGITAL AUDIO IN OPTICAL COAXIAL POWER POWER POWER WALL AC OUTLETS WALL AC OUTLET WALL AC OUTLET PB CB IN PR CR IN Y IN COMPONENT VIDEO IN S VIDEO OUT S VIDEO IN Set up B CONNECTING THE EQUIPMENT cont NOTE This diagram shows a video path from the set top to aVCR to allow recording to theVCR It shows a video path from theVCR to theTV to allow playback of vid...

Страница 16: ...let in only one way match the wide blade of the plug to the wide slot of the outlet Connecting the power cord to your set top Before you connect your set top to a wall outlet connect the polarized socket on the power cord into the plug labeled POWER INPUT on your set top s rear panel Connecting equipment to the wall AC outlets Connect the polarized plugs on the power cords from your set top VCR an...

Страница 17: ...onnecting it from the power supply If you need to disconnect your set top first stop any recording to an external hard disk if there is one connected Then turn off your set top by pressing the POWER button on its front panel or on your remote control so that the light around the POWER button goes red Then wait 60 seconds before disconnecting your set top at the wall AC outlet Power Saving To save ...

Страница 18: ...he digital cable services Also read the operating instructions that are supplied with your remote control Lightning storms Disconnect your set top s power cord during lightning storms A lightning storm may affect your set top if it is on during the storm It may appear that it has stopped working but you can easily restore its operation as follows Unplug your set top s power cord at the wall AC out...

Страница 19: ...nnected from the power supply REMOTE light Lights when your set top is receiving a signal from your remote control Resolution lights Relevant one lights up to show the resolution of the picture for live program or play back program MESSAGE light Lights when there is an unread message and when you make User Settings RECORD light Lights red to show recording is taking place PLAY light Lights green t...

Страница 20: ...ay them back or delete them with a different set top Connecting an external hard disk 1 Turn off your set top with the POWER button and then wait 60 seconds before disconnecting it from the wall AC socket You must not hot plug an external hard disk 2 Connect the external hard disk using an appropriate cable to the SATA connector on your set top 3 Apply power to the external hard disk 4 Reconnect y...

Страница 21: ...e regular standard definition Record a program while watching a previously recorded program Schedule your set top to record a program or a whole series Fully manage your stored recordings Back up your digital recordings to aVCR or DVD recorder Retain full control over any parental viewing restrictions you have set up Consult the information supplied by your cable service provider for more details ...

Страница 22: ...ver please note that until your set top has been set up to match the display capability of your HDTV these menus may not be visible If this is the case refer to page 23 Putting your set top into user settings mode 1 Make sure that your set top is turned on POWER light is green 2 Press the POWER button on your remote control then within 1 second press the MENU button You should see the PACE USER SE...

Страница 23: ...Ratio on the PACE USER SETTINGS menu 1 To change the TV Aspect Ratio press the R button TheTV Aspect Ratio menu appears on yourTV screen On the menu the current setting 4 3 or 16 9 has in front of it Also whenever the current setting is displayed the MESSAGE light will be lighted on your set top s front panel 2 Press the U or D button to highlight theTV Aspect Ratio you want 3 Press the select but...

Страница 24: ...et top is currently handling a live program or one you are playing back TV Display Capability settings 480i is standard definition NTSC and is transmitted in a 4 3 aspect ratio see right 480p is enhanced digitalTV and can be transmitted in either a 4 3 or 16 9 aspect ratio 720p and 1080i are HDTV and are transmitted in a 16 9 aspect ratio see right 480i transmission The aspect ratio is 4 3 1080i t...

Страница 25: ...tions are 1080i 720p 480p and 480i See pages 22 and 24 for more information about these 1 To change the TV Display Capability press the R button TheTV Display Capability menu appears on yourTV screen 2 Press the U or D button to highlight each resolution in turn and for each one press the select button if you wish to change the setting the setting changes between YES and NO each time you press sel...

Страница 26: ...nd S VIDEO jacks because the output at these jacks will always be the standard definition 480i Setting Auto Pillarbox If yourTV is a 16 9TV that does not automatically detect 4 3 transmissions and therefore does not add black bars to the sides of the picture then 4 3 transmissions may display stretched to fit the 16 9 screen If you do not want this effect you can set your set top to add black bars...

Страница 27: ...tton The PACE USER SETTINGS menu reappears To continue making the settings see the next section NOTE 16 9 picture in a 4 3 transmission Sometimes 4 3 transmissions may contain a 16 9 picture with black borders at the top and bottom On a 16 9 TV this may display with black borders all the way around the picture To remove these borders you can use the Zoom function button on your remote control coul...

Страница 28: ...e setting press the select button the setting changes 4 Press the L button The PACE USER SETTINGS menu reappears To continue making the settings see the next section Changing the closed captions appearance If you want to change the closed captions appearance you can see the effect of your settings by looking at the example below the menu 1 In the Closed Captions menu see above press the D button t...

Страница 29: ...done so already put your set top into user settings mode as described on page 20 Press the U or D button on your remote control and highlight Front Panel Settings on the PACE USER SETTINGS menu 2 Press the R button The Front Panel Settings menu shown right appears on yourTV screen 3 Press the U or D button to highlight Standby Level or ViewingTV Level as required 4 Use the select button to choose ...

Страница 30: ...time to do so compared with having Standby Sleep Mode off set to NO 1 If you have not done so already put your set top into user settings mode as described on page 20 Press the U or D button on your remote control and highlight Hard Disk Sleep Mode on the PACE USER SETTINGS menu 2 Press the R button The Standby Sleep Mode menu shown right appears on yourTV screen 3 If you want to change the settin...

Страница 31: ...tect as required 4 Use the select button to choose the setting you want the setting changes each time you press select Audio Output Mode has three possible settings Auto provides the audio format best suited to the connected equipment LPCn provides PCM audio only PASS maintains the original incoming audio format Disable Auto Detect is either YES or NO 5 When you have made all the changes you want ...

Страница 32: ...fault setting TV Aspect Ratio 16 9 TV Display Capability 1080i 720p 480p 480i Yes No Yes Yes Auto Pillarbox No Closed Captions Off Configure Captions Various All Auto except Hi Def CC which is Service 1 Front Panel Settings Standby Level Viewing TV Level IR Receiver Std High NA setting not available Hard Disk Sleep Mode Standby Sleep Mode Yes HDMI Settings Audio Output Mode Disable Auto Detect Aut...

Страница 33: ...nwards If you have finished changing the settings press the POWER button Your set top will switch on with the restored settings NOTES If your set top and HDTV are connected via a standard HDMITM cable your HDTV may pass information about the required settings back to your set top see page 22 If you wish to restore your set top s settings to those created by your HDTV you should disconnect your set...

Страница 34: ...t ratio of your HDTV or because the transmitted programme includes black borders as part of the transmission see right Your remote control should have a zoom function button could be labeled ZOOM or ASPECT which you can use to change theTV picture until it appears as you want it to 1 Press the zoom function button once to change the display 2 Press it again to change the display again Continue to ...

Страница 35: ...h various other languages Sets the language track that your set top first attempts to use when tuning to a channel Channel Default means your set top will use the default audio track for the program Selecting a language means it will use the corresponding language track if available Optimal Stereo Selecting this option enables your set top to regulate the volume to minimize sudden changes in volum...

Страница 36: ...at the wall AC power outlet is working for example by plugging in a lamp Does your remote control operate your set top YES D Please see the next page NO R Your set top may not be turned on Check if the light around the POWER button on the front panel is green If it is red press the POWER button on the front panel to turn on your set top Check that nothing is blocking the path from your remote cont...

Страница 37: ...u are using a component video YPbPr connection make sure the set top s TV Display Capability settings are appropriate for your TV see pages 22 to 24 If the video path between your set top and your TV loops through other equipment such as aVCR you may need to turn off this equipment for the loopthrough to work If you are using the HDMITM connection make sure the connection goes directly from your s...

Страница 38: ...then you will see menus and guides only if the screen resolution 480i is set to Yes and 480p 720p and 1080i are set to No Change the TV Display Capability resolution settings if necessary see page 23 Is there any sound YES D NO R Check that the audio cables are securely and correctly connected Check that you have not muted the sound on your set top and or TV Adjust the volume control on your set t...

Страница 39: ...ver that you may be using to enhance the sound Is the picture low quality or fuzzy when you are expecting to see an HDTV quality picture YES R Some programmes may include copy protection which means if your set top is connected to your HDTV via the component video jacks the picture is downgraded to standard TV quality To prevent this from happening use an HDMITM high definition multimedia interfac...

Страница 40: ... any ownership rights in the Software to you 7 All title and intellectual property rights in and to the Software and all modifications updates enhancements and derivative works of the Software are owned exclusively by Pace or its licensors and you agree to execute any document reasonably requested by Pace to evidence such ownership rights 8 Certain third party software used in connection with the ...

Страница 41: ... BE LIABLE FOR ANY DIRECT INDIRECT CONSEQUENTIAL SPECIAL PUNITIVE OR INCIDENTAL DAMAGE INCLUDING LOSS OF PROFITS BUSINESS INTERRUPTION LOSS OF DATA ORTHE COST OF PROCUREMENT OF SUBSTITUTE GOODS TECHNOLOGY OR SERVICES ARISING OUT OFTHE USE ORTHE INABILITYTO USETHE SOFTWARE F General TheseTerms are governed by the laws of the State of NewYork and you may only bring claims exclusively in NewYork cour...

Страница 42: ...40 Notes ...

Страница 43: ...41 Notes ...

Страница 44: ...502 1015200 Pace and are trademarks and or registered trademarks of Pace plc www pace com ...

Отзывы: