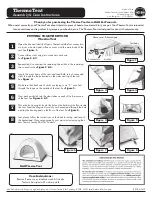
background image

7

Step 1

On the fly close windows, awnings and doors, 

release guy ropes and Posibrace™ Velcro™ points 

that attach the fly to the poles and unhook all base 

hooks.  You can now remove fly from tent. Lay fly flat 

on ground and fold fly in half, third or quarters.  The 

width of the folded fly should be the length of the 

pole bag, as indicated in Figure 10.

Step 2 

Unzip windows, then collapse the tent by 

removing and disassembling the poles in the 

reverse order of the assembly instructions. Place 

the poles in the pole carry bag and tie shut.

Step 3 

Remove pegs with a claw hammer or peg puller. 

Do not remove pegs from the ground by pulling 

on tent base as this may cause damage to the tent.

Step 4 

Spread the tent out flat with all loose fabric folded 

within the edges of the tent base. Try to flatten the 

tent as much as possible.

Step 5 

Fold the tent in half, third or quarters. The width of 

the folded tent should be the length of the pole 

bag, as indicated in Figure 10.

Step 6 

Lay the folded fly over the folded inner tent. 

Beginning at the back portion of the Fly and inner 

tent bundle roll forward firmly allowing trapped air 

to escape. It may help to use the bag of tent poles 

as a rolling pin ensuring the tent edges are kept 

straight as you roll.

Step 7

Once the tent bundle is rolled up, tie straps around 

it and place into tent carry bag with peg bag, 

instruction booklet and other miscellaneous parts. 

If the tent won’t fit into carry bag, unroll and reroll 

more tightly.

Disassembly Instructions

Figure 10

HELPFUL HINT
Never store your tent damp or dirty. If you 

have no choice to return home from your 

camping trip with a damp or dirty tent, 

make sure you lay it out to air in a cool, dry 

and shaded place as soon as possible and 

only pack it away when it is completely dry 

and clean.

Fold tent into a


rectangular shape

Front of tent 

(door


unzipped)

The width of the tent


should not exceed the


length of the pole bag

Содержание Bungalow 9

Страница 1: ...Owners Manual Highlander DTC HIG D www oztrail com au...

Страница 2: ...ctive safety webbing to attach guy ropes Total insect protection with ultra fine No See Um mesh Oversize easy step D doors for convenient access Protective front side and rear awnings Large side bedro...

Страница 3: ...x steel wall poles 2 x steel awning poles 30 x pegs 8 x guy ropes PLEASE NOTE Due to our policy of continual product development specifications parts and features of the product may vary from details...

Страница 4: ...of the inner tent These peg points are indicated in Figure 1 Anchor the tent to the ground by inserting the pegs through the loops around the base of the tent at an angle of 45 degrees as indicated i...

Страница 5: ...ructions cont Figure5 Figure6 Figure7 Step 6 Standing up the tent Step 7 Attaching the Fly Sheet Lay the fly sheet out along the side of your tent Ensure that you have the front and the back aligned c...

Страница 6: ...and peg points of the fly and tent are utilised Make a loop about 30 50cm long with a slider on the end of the rope and peg out as far as possible from the tent as indicated in Figure 8 Ensure all guy...

Страница 7: ...d or quarters The width of the folded tent should be the length of the pole bag as indicated in Figure 10 Step 6 Lay the folded fly over the folded inner tent Beginning at the back portion of the Fly...

Страница 8: ...aired or replaced if the goods fail to be of acceptable quality and the failure does not amount to a major failure For more detailed information and an explanation of these terms see www oztrail com a...

Страница 9: ...tape for simple repairs to small rips cuts and ash burns This not only blocks the hole it will prevent further tearing Heavy Duty tape is also helpful for emergency pole repairs and many other uses a...

Страница 10: ...Even on the coldest night do not close every vent window and door A well ventilated tent not only maintains healthy Oxygen levels but also reduces condensation build up inside the tent Do not use fue...

Страница 11: ...helter near cliffs in case of collapse or rock fall Do not leave your tent shelter erected in strong winds collapse the tent onto the ground and seek refuge in your vehicle Do not pitch your tent shel...

Страница 12: ...Measure and Cut Measure the length of the Tent Pole You should use a length of Shock Cord roughly two thirds the length of the Tent Pole This will ensure that the Shock Cord has the appropriate amount...

Страница 13: ...d overall length of the Pole Section Once you have these measurements you will be able to organise a Pole Replacement kit from your local Camping Goods retailer You may have to cut the replacement pol...

Страница 14: ...ter is well ventilated ZIPS All care is taken in the design to cover zips At times wind driven rain could force water under the flaps and through the zips To minimise this make sure all doors and wind...

Страница 15: ...the jaws of the zip slider can open ever so slightly When this occurs the slider does not compress the zip teeth or coil together tightly enough and the zip bursts open or does not close Undo the zip...

Страница 16: ...Designed Imported by OZtrail Leisure Products 71 Charles Ulm Place Eagle Farm QLD 4009 AUSTRALIA Made in China See our website for the full OZtrail range or facebook com OZtrailAustralia...

Отзывы: