2
3
G
F
E
D
H
C
B
A
ASSEMBLING YOUR OSTER™
ODOUR REMOVING LITTER
BOX
Congratulations! You’ve just purchased the finest
Odour Removing litter box on the planet. Before
you begin, make sure that your unit contains the
following pieces.
Be sure to fully unwrap the entire contents of the
package to ensure all of the below parts are
included.
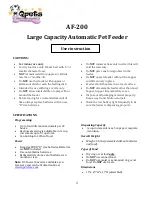
Pieces: (See Fig.1)
A. Base
B. Bottom Housing with Roll-Top Lid
C. Top Housing
D. Scoop Holster
E. Scoop
F. Pre-Filter
G. Odour Filter
H. Fan Housing
I. Power Cord and adaptor (not shown)
SAFETY PRECAUTION
Basic safety precautions should always be
followed to reduce the risk of fire, electric shock
and injury to persons. Please follow these
guidelines:
WARNING:
Pregnant women (or those who may
become pregnant) and individuals with
compromised immune systems should avoid
contact with cat waste at all times.
• Read all instructions before using the
appliance.
• Plug the AC power adapter directly into a
220V AC electrical outlet to avoid fire or
shock hazard.
• Remove plastic bag before using the filters.
• NEVER leave a power cord easily accessible
to pets or children. Keep the cord out of heavy
traffic areas. Never put the cord under rugs,
near heat registers, radiators, stoves or heaters.
• DO NOT immerse the fan system in water or
other liquids or use near water.
• Keep unit away from heated surfaces and
open flames.
• Closely supervise appliance use by or near
children or disabled persons. NEVER allow
young children to play in or around the litter
box. It is not a toy.
• Always unplug the system before moving it,
changing the filters, cleaning or whenever
the appliance is not in use. NEVER pull the
plug out by the cord.
• Never drop or insert any object into the fan
housing.
• DO NOT operate the appliance with a
damaged cord or plug, a malfunctioning
motor fan/machine or if it has been dropped
or damaged in any manner. Immediately
return appliance to manufacturer or its
service agent or a similarly qualified person.
• DO NOT attempt to repair or adjust any
electrical or mechanical functions on this unit
or use any other type of filtration. Doing so
will void the warranty. Service with qualified
personnel only.
• Use appliance only for intended household
use as described in this manual. Not
recommended use may cause fire, electric
shock or injury to persons. The use of
attachments not recommended by the
manufacturer may cause hazards.
WARNING:
DO NOT use this appliance with
any solid-state speed control device.
• DO NOT use outdoors.
• NEVER block the air openings.
• DO NOT place anything on top of the litter box.
• FOR CAT USE ONLY. Litter box is intended
solely for the safe elimination of cat waste.
• Use only the class II transformer provided in
this package.
• This appliance is not intended for use by
persons (including children) with reduced
physical, sensory or mental capabilities,
or lack of experience and knowledge,
unless they have been given supervision or
instruction concerning use of the appliance
by a person responsible for their safety.
Children should be supervised to ensure that
they do not play with the appliance.
If the unit fails to operate, it may need to be
reset:
• Turn unit OFF and UNPLUG
• Make sure the electrical outlet or circuit
breaker is working.
• Check for obstructions. If you find an
obstruction turn unit OFF and unplug unit.
Carefully remove the obstruction and follow
reset instructions.
• Please DO NOT attempt to open or repair unit.
OPERATING INSTRUCTIONS
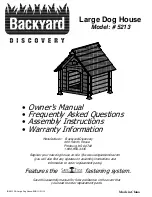
Step 1: Attach (B) to (A).
Gently place part B on top of part A and ensure
a secure fit is achieved between both parts. The
interior walls of part B at the center should sit on
the inside of the lip of part A. A secure fit will
reduce the likelihood of
litter being trapped
between both pieces.
Step 2: Attach (C)
to (B).
Line up the back of the
top housing (part C)
with the bottom housing
(part B) as shown.
Slowly rotate part C
downward onto part B
while firmly inserting the
engagement tabs from
back to front. Be sure
the walls are aligned on
both sides and the parts
are locked securely into place.
NOTE:
This is a one-time assembly. Once
correctly attached, the top housing is not
designed to be removed from the bottom housing.
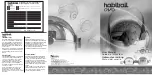
Step 3: Attach (D) and (E).
Insert the tabs of the
scoop holster into the
slots of part B and press
the holster down until it
is firmly attached. Place
scoop into the holster.
The roll-top lid should
move up and down
freely.
Step 4: Install the filters (F) and (G).
Open the filters. Place the pre-filter directly over
the vent. Then place the
odour filter directly on
top of the pre-filter.
Step 5: Attach (H).
Insert the bottom hinge
of the fan housing into
the slot at the back
of part C. Rotate the
housing downward and
over the filters until it
clicks into place. Be
sure all edges are flush
to reduce the chance of
air escaping.
Step 6: Plug in the
unit.
Plug the power cord into the back of the fan
housing and place the
cord where it is not
easily accessible to the
cat, children or other
pets. Add litter and turn
on the unit if necessary.
Extra large litter pan
liners can be used.
OPERATING YOUR LITTER BOX
• The litter box should
be turned on as
needed to eliminate
litter dust, dander
and odours that flow
through the filters.
The roll-top lid should
remain closed for
optimal performance
but can be kept open if your cat prefers an
open environment.
• The filter indicator lights indicate odour-
fighting power. Over time, the lights will
turn off to indicate that a new filter is
recommended.
• After approximately 8 weeks, the filter
reminder button will illuminate to indicate that
a new filter is recommended.
CHANGING THE FILTER
• When the filter reminder button has
illuminated or odours have returned (actual
time will vary), open the fan housing to
replace the filters.
• Remove and dispose of the pre-filter and
odour filter and then replace them with a new
set.
• After replacing the filters, close the fan
housing and hold down the green filter button
( ) for 5 seconds to reset the system.
TIPS FOR MAXIMIZING FILTER
LIFE
• Actual filter lifetime will vary depending on
litter box location, number of cats, cat dietary
factors and other odour contributors. Pay
close attention to the level of odour while
using the system as it may be necessary to
replace the filters prior to the filter reminder
light illuminating (if included).
• DO NOT open your filters until they are ready
to be used. Open filters begin collecting
odours immediately and will begin to lose
their effectiveness.
• Place the litter box in a well-ventilated
area and establish a regular scooping and
cleaning routine.
• Provide at least one litter box per cat, plus
one extra per household placed in different
areas of the home if possible.
• Avoid using heavily scented cleaning
solutions, deodorizers or fragrances that may
impact filter effectiveness.
ENGLISH
Fig.1
Fig.2
1
078800-100_12MLM1 OSTER.indd 4-6
5/16/12 10:34 AM