


Return the Server to the Normal Rack Position
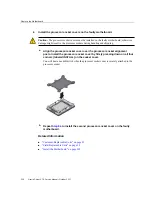
Caution -
Deploy any rack anti-tilt mechanisms before installing the server into the rack.
Caution -
The server weighs approximately 35.0 lbs (15.88 kg). Two people are required to
carry the chassis and install it into the rack.
1.
Lift the server from the antistatic mat, and reinstall the server into the rack.
Refer to
“Installing the Server Into a Rack” in
Oracle Servers X7-2 and X7-2L Installation
for the installation instructions specific to your rackmount kit.
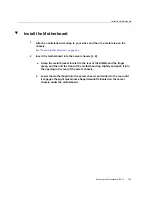
2.
If the cable management arm (CMA) is not installed, that is, you removed it
because you removed the server completely out of the rack, install the CMA.
For installation instructions for the CMA, refer to
“Install the Cable Management Arm
Oracle Servers X7-2 and X7-2L Installation Guide
.
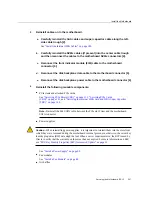
3.
If the cables are disconnected from the back of the server, that is, you
disconnected the cables because you removed the server completely out of the
rack, reconnect the cables.
■
For instructions to reconnect cables to the back of the server, see
“Reconnect Data Cables and Power Cords” on page 214
■
To identify the location of cable connectors on the back of the server, refer
to
“Back Panel Connector Locations” on page 40
Related Information
■
“Remove the Server From the Rack” on page 61
■
“Reconnect Data Cables and Power Cords” on page 214
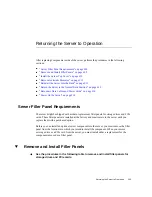
Return the Server to the Normal Rack Position
If the server is in the extended maintenance position, use this procedure to return the server to
the normal rack position.
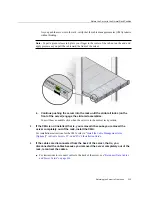
1.
Push the server back into the rack, as described in the following steps.
a.
Simultaneously pull and hold the two green release tabs (one on each side
of the slide rails on the server) toward the front of the server while you push
the server into the rack.
212
Oracle Server X7-2 Service Manual • October 2017
Содержание X7-2
Страница 1: ...Oracle Server X7 2 Service Manual Part No E72445 03 October 2017 ...
Страница 2: ......
Страница 14: ...14 Oracle Server X7 2 Service Manual October 2017 ...
Страница 86: ...86 Oracle Server X7 2 Service Manual October 2017 ...
Страница 92: ...Install a Power Supply Remove a Power Supply on page 88 92 Oracle Server X7 2 Service Manual October 2017 ...
Страница 96: ...96 Oracle Server X7 2 Service Manual October 2017 ...
Страница 110: ...110 Oracle Server X7 2 Service Manual October 2017 ...
Страница 136: ...136 Oracle Server X7 2 Service Manual October 2017 ...
Страница 150: ...150 Oracle Server X7 2 Service Manual October 2017 ...
Страница 162: ...162 Oracle Server X7 2 Service Manual October 2017 ...
Страница 168: ...168 Oracle Server X7 2 Service Manual October 2017 ...
Страница 178: ...178 Oracle Server X7 2 Service Manual October 2017 ...
Страница 184: ...184 Oracle Server X7 2 Service Manual October 2017 ...
Страница 192: ...192 Oracle Server X7 2 Service Manual October 2017 ...
Страница 216: ...216 Oracle Server X7 2 Service Manual October 2017 ...
Страница 252: ...252 Oracle Server X7 2 Service Manual October 2017 ...
Страница 282: ...282 Oracle Server X7 2 Service Manual October 2017 ...
Страница 306: ...306 Oracle Server X7 2 Service Manual October 2017 ...


