


Unpacking and Inspection Checklist
Remove E1000 appliance and accessories from box.
Remove E1000 from plastic wrapping.
Inspect appliance for signs of damage.
Remove foam insert wedged between faceplate and inner front of appliance
by using thumbscrews on front of appliance to
loosen faceplate. (Faceplate is hinged and will swing down. See
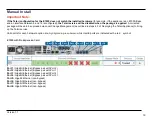
E1000 Front Panel
section for location of thumbscrews.)
Remove warning stickers from top of appliance faceplate and power receptacle.
Re-secure faceplate using thumbscrews.
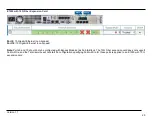
Confirm appliance has expected hardware option. (See
E1000 Back Panel
section to identify.)
Ensure all accessories are included. (See
What’s Included
section for complete list.)
Rack Mounting
The E1000 ships with hardware for a 4-Post Rack mount, or a 2-Post Rack mount. The instructions below will provide the most efficient
rack mounting of the device based upon selected rack type.
Safety Recommendations
Prior to installing the device in a rack, adhere to the following rack installation guidelines:
Ensure that there is adequate airflow in the rack. Restricted airflow can damage the equipment.
Leave at least 1U of vertical space between each device installed in the rack.
The rack width and depth should allow for proper serviceability and cable management.
Ensure the rack is properly secured to the floor or ceiling.
Ensure the rack is properly grounded.
Ensure the installer is properly grounded and wearing appropriate safety equipment.
Always load the rack from the bottom up.
Load the heaviest devices in the rack first.
Make sure the rack is level and stable before pulling a device out of the rack.
Do not move racks by yourself; at least two people are recommended to move a rack.
Cables should be easily identifiable.
4-Post Rack Mounting (Recommended)
The 4-Post Rack Mount of the E1000 is designed to be simple, and can be accomplished without the need for screws or brackets.
Version 1.1
8
Содержание Talari E1000
Страница 24: ...Version 1 1 2 3 ...


