


Figure 3: Self-locking Arm Lock on Back Outer Rail
Figure 4: Self-locking Arm Lock on Front Outer Rail
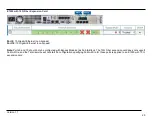
If using the optional Inner Expansion Rails, place the Inner Expansion Rails on the appliance behind the pre-installed inner
rails, aligning the holes in the Inner Expansion Rail with the holes in the side of the chassis (circled in blue below).
Ensure that the arrow on each Inner Expansion Rail points towards the back of the appliance. Each Inner Expansion Rail is attached
with two small flat top screws, included in the mounting hardware.
Note:
See Removal section for important safety information about removing an appliance with Inner Expansion Rails installed.
Installation
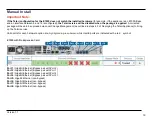
1. Mount the assembled outer rails to the rack by using the self-locking arm locks on each end (circled in Figures 3 and 4 below in
blue).
Make sure the “Front” arrow is pointing towards the front of the rack and the “Back” arrow is pointing to the back of the
rack. The rails will click into place.
Carefully slide the E1000 onto the installed rails on the rack and push the device along the rails until you hear a click from the
Side Rail Locks on both sides. Some slight resistance when sliding the appliance into the rack is expected and intended.
Removal
1. To remove the chassis pull the device forward out of the rack until the Side Rail Locks are visible.
Version 1.1
1 0
Содержание Talari E1000
Страница 24: ...Version 1 1 2 3 ...


