background image

ESD Precautions

Take care to prevent recirculation of exhaust air within a rack or cabinet.

Manage cables to minimize interference with the server exhaust vent.

ESD Precautions

Electronic equipment is susceptible to damage from static electricity. Use the following

precautions when you install or service the server.

Use a grounded antistatic wrist strap, foot strap, or equivalent safety equipment.

Place components on an antistatic surface, such as an static discharge mat, an antistatic bag,

or a disposable antistatic mat.

Caution - 

Equipment damage. Electrostatic damage can permanently disable the system or

require repair by authorized service technicians.

Optional Component Installation

Standard system components are installed at the factory. Optional components that you

purchased independent of the standard configuration are shipped separately, and in most cases

they should be installed before you install the server in a rack.

The following optional components can be ordered and purchased separately:

PCIe cards

DDR3 DIMM memory kits

Storage drives

Software media

To install optional components, refer to the service labels on the top cover of the CPU Module

(CMOD) or the System Module (SMOD) and to the component service procedures in the 

Sun

Server X4-8 Service Manual

.

Supported components and their part numbers are subject to change over time and without

notice. For the most up-to-date list, go to:

https://support.oracle.com/handbook_private/

34

Sun Server X4-8 Installation Guide • December 2015

Содержание SUN X4-8

Страница 1: ...Sun Server X4 8 Installation Guide Part No E40305 07 December 2015 ...

Страница 2: ......

Страница 3: ...ormation management applications It is not developed or intended for use in any inherently dangerous applications including applications that may create a risk of personal injury If you use this software or hardware in dangerous applications then you shall be responsible to take all appropriate fail safe backup redundancy and other measures to ensure its safe use Oracle Corporation and its affilia...

Страница 4: ...n des informations Ce logiciel ou matériel n est pas conçu ni n est destiné à être utilisé dans des applications à risque notamment dans des applications pouvant causer un risque de dommages corporels Si vous utilisez ce logiciel ou ce matériel dans le cadre d applications dangereuses il est de votre responsabilité de prendre toutes les mesures de secours de sauvegarde de redondance et autres mesu...

Страница 5: ...Panel Status Indicators and Buttons 21 Storage Controls and Indicators 22 Server Supported Components 22 Managing Your Server 25 Multiple Server Management Tools 25 Single Server Management Tools 25 Oracle System Assistant 26 Oracle ILOM 26 Oracle Hardware Management Pack 27 UEFI BIOS 27 Preparing to Install the Server 31 Server Specifications 31 Physical Specifications 31 Electrical Specification...

Страница 6: ...n 55 Modify IPv4 Network Settings From the Oracle ILOM CLI 57 Modify IPv6 Network Settings From the Oracle ILOM CLI 60 Modify Network Settings From the Oracle ILOM Web Interface 63 Test IPv4 or IPv6 Network Configuration From the Oracle ILOM CLI 65 Test IPv4 or IPv6 Network Configuration From the Oracle ILOM Web Interface 66 Exit Oracle ILOM 67 Troubleshooting the Service Processor Connection 68 R...

Страница 7: ... an Operating System and Drivers 117 Configuring the Preinstalled Oracle Solaris OS 119 Preparing for the Oracle Solaris Configuration 119 Preinstalled Oracle Solaris Operating System RAID Limitations 120 Oracle Solaris OS Configuration Worksheet 120 Configure the Preinstalled Oracle Solaris 11 Operating System 122 Reinstalling the Oracle Solaris Operating System 124 Oracle Solaris 11 Operating Sy...

Страница 8: ...stalling Firmware 142 Installing Hardware Drivers and OS Tools 143 Controlling System Power 145 Powering the Server On and Off 145 Power Off Host Using the Power Button 146 Power On Host Using the Power Button 146 Power Host On and Off Using Oracle ILOM 147 Troubleshooting Installation Issues 149 Troubleshooting and Diagnostic References 149 Technical Support Information Worksheet 149 Locating the...

Страница 9: ...er X4 8 name identifies the following X identifies an x86 product The first number 4 identifies the generation of the server The second number 8 identifies the number of processors Getting the Latest Firmware and Software Firmware drivers and other hardware related software for each Oracle x86 server server blade and blade chassis are updated periodically You can obtain the latest version in one o...

Страница 10: ...eedback About This Documentation The information in this documentation set is presented in topic based format similar to online help and therefore does not include chapters appendixes or section numbering Contributors Primary Authors Ray Angelo Michael Bechler Cynthia Chin Lee Lisa Kuder Mark McGothigan Ralph Woodley Contributors William Schweickert Anthony Villamor Mick Tabor Richard Masoner Tamr...

Страница 11: ... Management Architecture FMA and added issues to Product Notes December 2014 Added content to Product Notes and made editorial improvements to Installation Guide August 2015 Added content for updated IPv6 configuration in Oracle ILOM December 2015 Technical updates Using This Documentation 11 ...

Страница 12: ...12 Sun Server X4 8 Installation Guide December 2015 ...

Страница 13: ...ling the Server on page 49 8 Set up your system software and firmware using Oracle System Assistant Launching Oracle System Assistant on page 71 9 Connect to Oracle Integrated Lights Out Manager ILOM Connecting to Oracle ILOM on page 53 10 Prepare server drives and configure RAID Configure Storage Drives for OS Installation on page 81 11 If applicable configure a preinstalled operating system Conf...

Страница 14: ...tion Guide for VMware ESXi 13 Review procedures for controlling system power Controlling System Power on page 145 14 Troubleshoot installation issues Troubleshooting Installation Issues on page 149 14 Sun Server X4 8 Installation Guide December 2015 ...
Страница 15: ...rives on the server front and back panels Front Panel Features on page 15 Back Panel Features on page 19 Review server features and components Server Supported Components on page 22 Review server management software Managing Your Server on page 25 Front Panel Features The following figure shows the Sun Server X4 8 front panel and describes its components Server Features and Components 15 ...

Страница 16: ... 2 Power supplies 0 bottom through 3 top 3 Fan modules FM 0 through FM 7 Top row 1 3 5 7 Bottom row 0 2 4 6 Front Indicator Module The following figure shows the controls and indicators on the front indicator module 16 Sun Server X4 8 Installation Guide December 2015 ...
Страница 17: ...ators 0 7 from left to right Note The server contains either four or eight CMODs compute modules located behind the fans and designated from left to right as CMOD 0 through CMOD 7 Each CMOD has a corresponding indicator Note For details on system power and the related controls and indicators see Controlling System Power on page 145 Power Supply Controls and Indicators The following figure shows th...

Страница 18: ...icator 2 PSU OK indicator power to host is OK 3 PSU AC OK indicator AC input power is OK 4 Release latch Fan Module Controls and Indicators The following figure shows the controls and indicators on the fan module 18 Sun Server X4 8 Installation Guide December 2015 ...
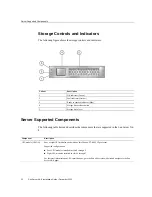
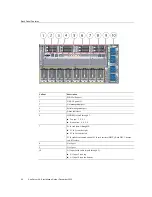
Страница 19: ...tures Callout Description 1 Fault indicator 2 OK indicator 3 Release latch Back Panel Features The following figure shows the Sun Server X4 8 back panel and describes its components Server Features and Components 19 ...

Страница 20: ...h 7 Top row 7 5 3 1 Bottom row 6 4 2 0 7 PCIe card slots 1 through16 PCIe 1 is on the right PCIe 16 is on the left PCIe cards are mounted on dual PCIe card carriers DPCC Each DPCC houses two PCIe slots 8 Net 0 port 9 Net 1 port 10 AC inputs with cable clips 0 through 3 AC input 3 is on top AC input 0 is on the bottom 20 Sun Server X4 8 Installation Guide December 2015 ...

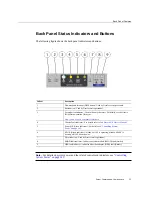
Страница 21: ...LOM docs 4 Chassis Fault indicator For details refer to Sun Server X4 8 Service Manual 5 Power OK Green indicator For details see Controlling System Power on page 145 6 SP OK Green indicator Steady on if SP is operating blinks while SP is booting off if SP has no power 7 SP reset button Used by Oracle service personnel 8 SMOD fault indicator Indicates a system module SMOD fault Amber 9 HBA fault i...

Страница 22: ...he following table lists and describes the components that are supported in the Sun Server X4 8 Component Description CPU module CMOD Four or eight CPU modules each with one Intel Xeon E7 8895 V2 processor Supported configurations Four CPU modules installed in slots 0 through 3 Eight CPU modules installed in slots 0 through 7 For the latest information on CPU specifications go to the Sun x86 serve...

Страница 23: ...t ports Service processor Oracle Integrated Lights Out Manager uses an Emulex Pilot 3 baseboard management controller BMC It provides Remote Keyboard Video Mouse redirection Full remote management through command line IPMI and browser interfaces Remote media capability DVD CD ISO image Advanced power management and monitoring Active Directory LDAP RADIUS support Dual ILOM flash Signed ILOM Power s...

Страница 24: ...24 Sun Server X4 8 Installation Guide December 2015 ...

Страница 25: ... to monitor your enterprise servers you can take advantage of Sun Management Center For more details refer to http www oracle com technetwork systems patches sysmgmt smc jsp 138444 html If you already have third party system management tools the servers can integrate with many third party tools For more details refer to http www oracle com goto system management Single Server Management Tools The ...

Страница 26: ...stem and interrupting the boot process Provides a simple graphical user interface Provides hardware level management of system functionality For more details on about these tools see the Oracle x86 Administration Guide for X4 Series Servers at http www oracle com goto x86AdminDiag docs Oracle System Assistant Oracle System Assistant is a task based server provisioning tool that allows you to perfo...

Страница 27: ...an use SNMP to monitor Oracle servers and server modules from the operating system using a single host IP address This prevents you from having to connect to two management points Oracle ILOM and the host The Hardware Management Agent fetches and pushes information to and from Oracle ILOM The SNMP Plugins provides an industry standard SNMP user interface Use Oracle Linux Fault Management Architect...

Страница 28: ...ppear in the BIOS Setup Utility screens in the Boot Options Priority list Note Once you choose a boot mode and install an operating system if you reboot the server and select a different boot mode the installed image is not accessible and cannot be used UEFI Boot Mode Choose UEFI boot mode to use UEFI drivers when software and adapters have UEFI drivers UEFI boot mode is manually selected during s...

Страница 29: ...ing system if you reboot the server and select a different boot mode the installed image is not accessible and cannot be used For more details on UEFI BIOS see the Oracle x86 Administration Guide for X4 Series Servers at http www oracle com goto x86AdminDiag docs Managing Your Server 29 ...

Страница 30: ...30 Sun Server X4 8 Installation Guide December 2015 ...
Страница 31: ...Guidelines on page 33 Review ESD requirements and take safety precautions ESD Precautions on page 34 Install any optional components into the server Optional Component Installation on page 34 Server Specifications This section includes physical electrical and environmental specifications for the system Physical Specifications The following table lists the physical specifications for the Sun Server...

Страница 32: ...e environmental requirements for the Sun Server X4 8 Parameter Value Operating temperature single non rack system At sea level 5 C to 35 C 41 F to 95 F At altitude 5 C to 31 C 41 F to 88 F Operating temperature 5 C to 35 C 4 F to 95 F Non operating temperature 40 C to 70 C 40 F to 158 F Operating humidity 10 to 90 relative humidity non condensing Non operating humidity Up to 93 relative humidity n...

Страница 33: ...ront of the system and 914 mm 36 inches at the back of the system for ventilation Ensure unobstructed airflow through the chassis The server uses internal fans that can achieve a total airflow of 100 CFM in normal operating conditions Ensure that air temperature rise through the server is no greater than 68 F 20 C Ensure that inlet air enters at the front of the server and exits from the back Ensu...

Страница 34: ...icians Optional Component Installation Standard system components are installed at the factory Optional components that you purchased independent of the standard configuration are shipped separately and in most cases they should be installed before you install the server in a rack The following optional components can be ordered and purchased separately PCIe cards DDR3 DIMM memory kits Storage dri...

Страница 35: ...ecautions on page 35 Review the compatibility requirements for your rack Rack Compatibility on page 36 Unpack the server and inventory the contents Unpack the Server and Inventory the Contents on page 37 Add or remove shipping brackets optional Install Shipping Bracket Optional on page 45 Install the server into a rack Install the Server into the Rack on page 47 Safety Precautions This section des...

Страница 36: ...e circuits might have on over current protection and supply wiring Appropriate consideration of equipment nameplate power ratings should be used when addressing this concern Caution Equipment damage Maintain reliable earthing Pay particular attention to supply connections other than direct connections to the branch circuit for example use of power strips The following table shows images that appea...

Страница 37: ...ral supports and cable troughs is at least 456 mm 18 inches Server dimensions Depth not including PSU handle 732 mm 28 82 inches Width not including ears 436 5 mm 17 19 inches Height 129 85 mm 5 11 inches Unpack the Server and Inventory the Contents Use these instructions to remove the server from its container and inventory the contents The following items should be packaged with the Sun Server X...

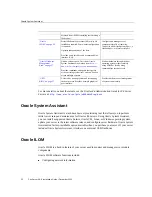
Страница 38: ...pears damaged request that the carrier s agent be present when the carton is opened Keep all contents and packing material for the agent s inspection 2 Open the top of the box a Cut the straps b Cut or remove the tape 38 Sun Server X4 8 Installation Guide December 2015 ...
Страница 39: ...Unpack the Server and Inventory the Contents c Open the flaps Rack Installation Instructions 39 ...

Страница 40: ...ructions on page 35 Callout Description 1 Rack mounting kit 2 Tray 3 Box 4 Foam inserts 5 Server 6 Pallet Install Shelf Rails and Back Mounting Brackets Before You Begin Identify the location in the rack where you plan to place the Sun Server X4 8 It requires five rack units Ensure that your rack meets the requirements in Rack Compatibility on page 36 Caution Equipment damage or personal injury Al...

Страница 41: ...with the bottom of the system s rack space 3 For square hole racks place cage nuts in the locations indicated by the alignment template 2 For round hole racks go to Step 4 a Align the template with the holes where you intend to place the server The template has rack alignment images on either side one for the back rack alignment 1 and one for the front rack alignment 2 Rack Installation Instructio...

Страница 42: ...ck Mounting Brackets The server should sit directly above the rack unit below it 3 without any unfilled rack spaces b Place cage nuts in the locations indicated by the template 42 Sun Server X4 8 Installation Guide December 2015 ...
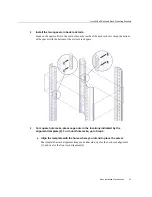
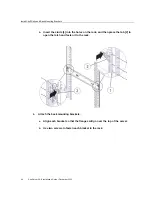
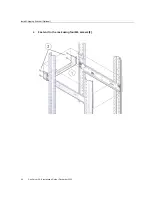
Страница 43: ...re should be two cage nuts in each front rail and three cage nuts in each back rail 4 Install the left and right shelf rails The rails are labeled left and right front and back The rails have studs and a latch at each end For each rail a Expand the shelf rail to fit the rack Rack Installation Instructions 43 ...

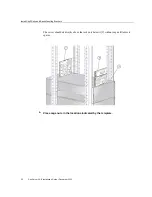
Страница 44: ... rack and then press the tab 2 to open the latch and fasten it to the rack 5 Attach the back mounting brackets a Align each bracket so that the flanges will go over the top of the server b Use two screws to fasten each bracket to the rack 44 Sun Server X4 8 Installation Guide December 2015 ...
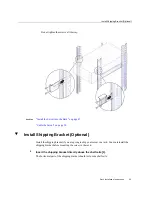
Страница 45: ...stall Shipping Bracket Optional Install the shipping bracket if you are going to ship your server in a rack You must install the shipping bracket before mounting the server in the rack 1 Insert the shipping bracket directly above the shelf rails 1 The horizontal part of the shipping bracket should rest on the shelf rails Rack Installation Instructions 45 ...

Страница 46: ...Install Shipping Bracket Optional 2 Fasten it to the rack using four M6 screws 2 46 Sun Server X4 8 Installation Guide December 2015 ...

Страница 47: ...ge to equipment Be sure the server is firmly supported by the shelf rails before releasing it from the lift 2 Slowly slide the server into position on the shelf rails Do not remove support from the lift until the server is firmly supported by the shelf rails 3 Use eight M6 screws to attach the front of the server to the rack Rack Installation Instructions 47 ...

Страница 48: ...usly The bottom screws attach to threaded holes in the shelf rails 4 Press the back mounting brackets against the server and tighten the screws See Also Install Shelf Rails and Back Mounting Brackets on page 40 Cable the Server on page 50 48 Sun Server X4 8 Installation Guide December 2015 ...

Страница 49: ...ion Links Review connector port locations Back Panel Connectors and Ports on page 49 Connect data cables to the server Cable the Server on page 50 Connect power cords to the server Cable the Server on page 50 Back Panel Connectors and Ports The following figure shows the locations of the server back panel connectors and ports Cabling the Server 49 ...

Страница 50: ...nectors 0 through 3 Connect to 200 240 VAC only Cable the Server Connect external cables to the server in the following order Note The numbers in brackets correspond to callouts in the back panel figure in Back Panel Connectors and Ports on page 49 1 Connect an Ethernet cable to the Gigabit Ethernet NET ports as needed 5 6 50 Sun Server X4 8 Installation Guide December 2015 ...
Страница 51: ... the RJ 45 serial port labeled SER MGT 4 For more information about viewing system output from a serial console see Log In to Oracle ILOM Using a Local Serial Connection on page 55 5 Connect four grounded server power cords to grounded 200 240V electrical outlets on two different circuits 6 Connect the server power cords to the AC connectors on the back panel of the server and secure each cord usi...

Страница 52: ...ing that the SP is ready for use At this time the host is not initialized or powered on yet Callout Description 1 Main Power OK indicator 2 Recessed power button 3 SP OK indicator See Also Controlling System Power on page 145 Log In to Oracle ILOM Using a Local Serial Connection on page 55 52 Sun Server X4 8 Installation Guide December 2015 ...
Страница 53: ...LOM hardware and interfaces Oracle ILOM Hardware and Interfaces on page 54 Learn about network ports and defaults Oracle ILOM Network Defaults on page 54 Log in directly to Oracle ILOM using a terminal connected to the serial port Log In to Oracle ILOM Using a Local Serial Connection on page 55 Log in to Oracle ILOM over the network using an Ethernet connection Log In to Oracle ILOM Using a Remote...

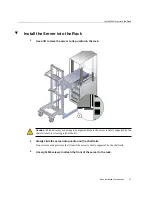
Страница 54: ...erface CLI IPMI v2 0 CLI SNMP v3 interface Oracle ILOM Network Defaults The Sun Server X4 8 supports dual stack IPv4 and IPv6 settings which enable Oracle ILOM to fully operate in an IPv4 and IPv6 network environment For IPv4 configurations DHCP is enabled by default allowing a DHCP server on the network to automatically assign network settings to the server For IPv6 configurations IPv6 stateless ...

Страница 55: ...on through the server s SER MGT port is secure and operational 2 Ensure that the following serial communication settings are configured 8N1 eight data bits no parity one stop bit 9600 baud Disable hardware flow control CTS RTS 3 Press Enter to establish a connection between your serial console and Oracle ILOM A login prompt to Oracle ILOM appears 4 Log in to the Oracle ILOM command line interface ...

Страница 56: ...connection to Oracle ILOM Command line interface CLI Initiate a secure shell session Type ssh username host Where username is the user name of an account with Administrator privileges and host is either the IP address or hostname when using DNS of the server SP The Oracle ILOM password prompt appears Password Web interface Type the IP address of the server in the address field of your web browser ...

Страница 57: ...dicating that you have successfully logged in to Oracle ILOM Web interface At the Oracle ILOM login screen type your user name and password and click Log In The Summary screen appears indicating that you have successfully logged in to Oracle ILOM For example Modify IPv4 Network Settings From the Oracle ILOM CLI Use this procedure to modify the server s IPv4 network settings using the Oracle ILOM C...

Страница 58: ...you set commitpending to true When this happens log back in using the new settings 2 Use the cd command to navigate to the SP network directory cd SP network 3 Do one of the following If you have a DHCP server on the network type the following command to view the settings assigned to the server by the DHCP server show SP network If there is no DHCP server or if you want to assign settings use the ...

Страница 59: ...pv6 only commands On these versions you cannot enable IPv6 if IPv4 is disabled To obtain the options shown here upgrade to SW 1 2 or newer pendingipdiscovery set pendingipdiscovery static To enable a static network configuration set pendingipdiscovery to static By default pendingipdiscovery is set to dhcp pendingipaddress pendingipnetmask pendingipgateway set pendingipaddress ip_address pendingipn...

Страница 60: ...un Server X4 8 Service Manual 1 Log in to the Oracle ILOM CLI See Log In to Oracle ILOM Using a Local Serial Connection on page 55 Log In to Oracle ILOM Using a Remote Ethernet Connection on page 55 Note If you log in to Oracle ILOM using an Ethernet connection your connection is terminated after you modify the network settings You must log back in using the new settings 2 Use the cd command to na...

Страница 61: ...not include the ipv4 only or ipv6 only commands On these versions you cannot enable IPv6 if IPv4 is disabled To obtain the options shown here upgrade to SW 1 2 or newer autoconfig set autoconfig value Specify this command followed by the autoconfig value you want to set Options include stateless default setting Automatically assigns IP address learned from IPv6 network router dhcpv6_stateless Auto...

Страница 62: ...docs Property Set Property Value Description state set state enabled The IPv6 network state is enabled by default To enable a static IP address you must set this state to enabled pendingipaddress set pending_static_ipaddress ipv6_address subnet mask length in bits Type this command followed by the property value for the static IPv6 address and netmask that you want to assign to the device IPv6 add...

Страница 63: ...ing procedure Note You can also change network settings using the BIOS Setup Utility For instructions see the Sun Server X4 8 Service Manual 1 Log in to the Oracle ILOM web interface See Log In to Oracle ILOM Using a Remote Ethernet Connection on page 55 Note When you log in to Oracle ILOM using an Ethernet connection your connection is terminated after you modify the network settings You must log...

Страница 64: ...ions that apply to your network environment Note On systems equipped with SW 1 1 or older there is a single Enabled button in General Settings and it enables both IPv4 and IPv6 Also there is no IPv6 Static Gateway field On these systems you cannot enable IPv6 unless you also enable IPv4 Update to SW 1 2 or newer to obtain the selections shown here 64 Sun Server X4 8 Installation Guide December 201...

Страница 65: ...ess subnet mask length in bits in the Static IP Address field and click Save Note You can enable the Autoconfig Stateless option to run at the same time as the option for DHCPv6 Autoconfig Stateless is enabled or at the same time as the option for DHCPv6 Autoconfig Stateful is enabled 4 Test the IPv4 or IPv6 network configuration from Oracle ILOM using the Network Test Tools Ping and Ping 6 For de...

Страница 66: ...t followed by the IPv4 test destination address For example set ping 192 168 10 106 Ping of 192 168 10 106 succeeded ping6 set ping6 IPv6_address Type the set ping6 command followed by the IPv6 test destination address For example set ping6 2001 db8 5dff febe 5000 Ping of 2001 db8 5dff febe 5000 succeeded Test IPv4 or IPv6 Network Configuration From the Oracle ILOM Web Interface 1 From the ILOM Ad...

Страница 67: ... IPv6 test destination address in the Destination field and click Test If the test was successful a Ping of ip_address succeeded message appears below the Destination field in the Network Configuration Test screen Exit Oracle ILOM To end an Oracle ILOM session From the Oracle ILOM CLI type exit at the CLI prompt From the Oracle ILOM web interface click the Log Out button at the top right corner of...

Страница 68: ...age 69 Reset the Service Processor Using Oracle ILOM If the Oracle ILOM service processor SP is hung use one of the following methods to reset it From the Oracle ILOM command line interface CLI enter the command reset SP From the Oracle ILOM web interface click Administration Maintenance Reset SP Note Resetting the Oracle ILOM SP disconnects your current Oracle ILOM session You must log in again t...

Страница 69: ... account password perform these steps 1 Establish a local serial management connection to Oracle ILOM and log in to Oracle ILOM using the default user account For example SUNSP 000000000 login default Press and release the physical presence button Press return when this is completed 2 Prove physical presence at the server To prove physical presence at the server press the Locator button on the fro...

Страница 70: ...70 Sun Server X4 8 Installation Guide December 2015 ...
Страница 71: ...ng Oracle System Assistant This section describes how to launch Oracle System Assistant Oracle System Assistant is the preferred application for setting up your system software and firmware Oracle System Assistant is an embedded task based server provisioning tool that enables you to perform initial server setup and maintenance for most Oracle x86 servers Using Oracle System Assistant you can inst...

Страница 72: ...1 Ensure that the server is in standby power mode When the server is in standby power mode the Service Processor OK indicator is on and the Power OK indicator blinks slowly See Front Panel Features on page 15 for the location of these indicators 2 Log in to the Oracle ILOM web interface In your browser s address field enter the server s SP IP address If you have not yet set up Oracle ILOM for netw...

Страница 73: ... not in standby power mode but is fully powered on it prompts you to shut down the host first See Power Host On and Off Using Oracle ILOM on page 147 Once the host is powered down continue with this step 4 To continue to launch Oracle System Assistant click Yes The server boots This might take several minutes The server powers on Oracle System Assistant application boots Setting Up Software and Fi...

Страница 74: ...ly Before you launch Oracle System Assistant locally you must be physically present at the server and have access to a VGA monitor a USB keyboard and a USB mouse 1 Ensure that the server is in standby power mode Verify that the Power OK indicator blinks slowly See Front Panel Features on page 15 2 Connect locally to the server 74 Sun Server X4 8 Installation Guide December 2015 ...
Страница 75: ...e 55 3 Press and release the front panel Power button to power on the server to full power mode The server boots and POST messages appear on the monitor 4 After you see the POST message for Oracle System Assistant press the F9 function key Setting Up Software and Firmware Using Oracle System Assistant 75 ...

Страница 76: ... page 78 Prepare Oracle System Assistant This section describes how to set up a network connection so you can use Oracle System Assistant When Oracle System Assistant starts it tries to connect to DHCP on Net 0 If Net 0 is connected to a network that is DHCP enabled it succeeds No more configuration is necessary 76 Sun Server X4 8 Installation Guide December 2015 ...
Страница 77: ...allation This section describes how to prepare your server for operating system installation A number of tasks must be completed before you can install an operating system These include Getting firmware and software updates Installing firmware updates Configuring Oracle ILOM network addresses Configuring RAID Once these things are done you can install the operating system You can do these things u...

Страница 78: ... the embedded help on Oracle System Assistant for more information about Oracle System Assistant Step Task Oracle System Assistant Screen For More Information 1 Set up Oracle System Assistant network connection Network Configuration Prepare Oracle System Assistant on page 76 2 Get latest software and firmware updates that will be used by Oracle System Assistant Get Updates Getting Server Firmware ...

Страница 79: ...Install an operating system using the Oracle System Assistant Install OS wizard Supported operating systems include Oracle Solaris Linux Windows or Oracle VM software Caution Data loss Do not use this option on a disk with a preinstalled OS Install OS Refer to your operating system installation guide for details Setting Up Software and Firmware Using Oracle System Assistant 79 ...

Страница 80: ...80 Sun Server X4 8 Installation Guide December 2015 ...

Страница 81: ...RAID Configuration Utilities on page 101 Learn about the operating system installation and update tasks Set Up an Operating System and Drivers on page 117 See Also Host Bus Adapter HBA Documentation Collection at http www oracle com technetwork documentation oracle storage networking 190061 html Storage Drive Configuration The following paragraphs describe the tools and conditions required for con...

Страница 82: ... new operating system Type of Configuration HBA Type Link RAID Either supported HBA To use Oracle System Assistant see Configuring RAID Using Oracle System Assistant on page 83 To use the BIOS configuration utility see Configuring RAID Using the BIOS RAID Configuration Utilities on page 101 No RAID Configure a single storage drive with a RAID 0 volume also called a virtual disk and make that volum...

Страница 83: ...gure RAID With a Sun Storage 6 Gb SAS PCIe RAID Internal HBA on page 92 If your server does not have Oracle System Assistant you can configure RAID using the BIOS RAID configuration See Configuring RAID Using the BIOS RAID Configuration Utilities on page 101 Configure RAID With a Sun Storage 6 Gb SAS PCIe Internal HBA Use Oracle System Assistant to prepare a server hard drive for an OS installatio...

Страница 84: ... configuration must match the mode that you use when you install the operating system Additionally not all supported operating systems support UEFI boot mode For a list of operating systems that support UEFI boot mode see UEFI BIOS on page 27 To switch between UEFI and legacy boot modes see the Oracle x86 Administration Guide for X4 Series Servers at http www oracle com goto x86AdminDiag docs 3 Cl...

Страница 85: ...GX SAS6 R INT Z HBA This is the Sun Storage 6 Gb SAS PCIe RAID Internal HBA 5 In the Select RAID Level list box select the desired RAID level Choose RAID 0 6 In the Available Disks table select the storage drives that you want to add to the RAID volume and click the Create Volume button Configure Storage Drives for OS Installation 85 ...

Страница 86: ...ume dialog box appears 7 In the Create Volume dialog box a Optional Enter the volume name Entering a volume name is optional If you do not name the volume Oracle System Assistant creates a volume without a name b Click Create 86 Sun Server X4 8 Installation Guide December 2015 ...
Страница 87: ...Configure RAID With a Sun Storage 6 Gb SAS PCIe Internal HBA The Creating RAID Volume information box appears Configure Storage Drives for OS Installation 87 ...

Страница 88: ...e 6 Gb SAS PCIe Internal HBA After the volume is created it appears in the Created Volumes table 8 In the Details Action column of the Created Volumes table click the Details button 88 Sun Server X4 8 Installation Guide December 2015 ...

Страница 89: ...d chance to do so If you entered a volume name earlier you can modify it here however you cannot delete the name entirely Note Naming the volume is optional If you do not name the volume Oracle System Assistant creates a volume without a name Additionally if at any time you want to change the volume name you can do so by clicking on the Details button in the Created Volumes table however once a vo...

Страница 90: ...Configure RAID With a Sun Storage 6 Gb SAS PCIe Internal HBA d Click Save Close The Set Volume For Boot confirmation dialog appears 10 Click OK 90 Sun Server X4 8 Installation Guide December 2015 ...

Страница 91: ...owing To select any other Oracle System Assistant task click the corresponding button in the left panel menu For example after configuring RAID you might want to select the Install OS task and perform an operating system installation To return to the Oracle System Assistant System Overview screen click System Information in the left menu panel To quit Oracle System Assistant click Exit See Also Se...

Страница 92: ... by the Sun Storage 6 Gb SAS PCIe RAID Internal HBA If there is more than a single volume on the drive you intend to use as the boot drive set the volume that you will install the OS on as the boot device 1 Launch Oracle System Assistant See Launching Oracle System Assistant on page 71 The Oracle System Assistant System Overview screen appears 2 In the System Overview screen verify that the BIOS M...

Страница 93: ... To switch between UEFI and legacy boot modes see the Oracle x86 Administration Guide for X4 Series Servers at http www oracle com goto x86AdminDiag docs 3 Click the Configure Hardware button then select the RAID Configuration tab The RAID Configuration screen appears 4 In the HBA list box select the SGX SAS6 R INT Z HBA This is the Sun Storage 6 Gb SAS PCIe RAID Internal HBA 5 In the Select RAID ...

Страница 94: ...me and click the Create Volume button The Create Volume dialog box appears 7 In the Create Volume dialog box a Optional Enter the volume name Entering a volume name is optional If you do not name the volume Oracle System Assistant creates a volume without a name b Select the volume stripe size c Click Create 94 Sun Server X4 8 Installation Guide December 2015 ...

Страница 95: ...Configure RAID With a Sun Storage 6 Gb SAS PCIe RAID Internal HBA The Creating RAID Volume information box appears Configure Storage Drives for OS Installation 95 ...

Страница 96: ...6 Gb SAS PCIe RAID Internal HBA After the volume is created it appears in the Created Volumes table 8 In the Details Action column of the Created Volumes table click the Details button 96 Sun Server X4 8 Installation Guide December 2015 ...

Страница 97: ...cond chance to do so If you entered a volume name earlier you can modify it here however you cannot delete the name entirely Note Naming the volume is optional If you do not name the volume Oracle System Assistant creates a volume without a name Additionally if at any time you want to change the volume name you can do so by clicking on the Details button in the Created Volumes table however once a...

Страница 98: ...Configure RAID With a Sun Storage 6 Gb SAS PCIe RAID Internal HBA d Click Save Close The Set Volume For Boot confirmation dialog appears 10 Click OK 98 Sun Server X4 8 Installation Guide December 2015 ...

Страница 99: ...en appears and lists the RAID volume as the current boot device 11 If you want to designate the created volume as a global hot spare perform the following steps otherwise proceed to Step 12 a Click the Details button in the Details Actions column Configure Storage Drives for OS Installation 99 ...

Страница 100: ...k Details dialog box closes 12 If you want to delete a volume select it and click the Delete Volume button This completes the RAID configuration task 13 Do one of the following To select any other Oracle System Assistant task click the corresponding button in the left panel menu For example after configuring RAID you might want to select the Install OS task and perform an operating system installa...

Страница 101: ...lowing sections Configuring RAID Using the BIOS With the Sun Storage 6 Gb SAS PCIe Internal HBA on page 101 Configuring RAID Using the BIOS With the Sun Storage 6 Gb SAS PCIe RAID Internal HBA on page 104 Configuring RAID Using the BIOS With the Sun Storage 6 Gb SAS PCIe Internal HBA The BIOS RAID configuration utilities support configuring RAID with the server set to UEFI boot mode and legacy boo...

Страница 102: ... Control then select Reset from the Select Action list box From the Oracle ILOM CLI type reset System The BIOS screen appears 2 When prompted in the BIOS screen press F2 access the BIOS Setup Utility After a few moments the BIOS Setup Utility appears 3 Use the right arrow key to navigate to UEFI Driver Control menu The UEFI Driver Control menu appears 4 Use the up and down arrow keys to navigate t...

Страница 103: ... Internal Installation Guide For HBA Models SGX SAS6 INT Z and SG SAS6 INT Z at http docs oracle com cd E19337 01 index html See Also Set Up an Operating System and Drivers on page 117 Configure RAID in Legacy Boot Mode 1 Power on or reset the server host For example do one of the following From the local server press the Power button approximately 1 second on the front panel of the server to powe...

Страница 104: ...ructions on how to use the BIOS configuration utilities to configure RAID in legacy boot mode refer to instructions for creating a bootable drive on x86 64 systems in the Sun Storage 6 Gb SAS PCIe HBA Internal Installation Guide For HBA Models SGX SAS6 INT Z and SG SAS6 INT Z at http docs oracle com cd E19337 01 index html See Also Set Up an Operating System and Drivers on page 117 Configuring RAI...

Страница 105: ...he host For example to reset the host do one of the following From the local server press the Power button approximately 1 second on the front panel of the server to power off the host then press the Power button again to power it back on From the Oracle ILOM web interface select Host Management Power Control then select Reset from the Select Action list box From the Oracle ILOM CLI type reset Sys...

Страница 106: ...UEFI Boot Mode The UEFI Driver Control menu appears 4 Use the up and down arrow keys to navigate to the LSI MegaRAID Configuration Utility menu option and press Enter 106 Sun Server X4 8 Installation Guide December 2015 ...

Страница 107: ...RAID in UEFI Boot Mode The LSI MegaRAID Configuration Utility menu appears 5 Use the Up and Down keys to select the Virtual Drive Management option and press Enter Configure Storage Drives for OS Installation 107 ...

Страница 108: ...ID in UEFI Boot Mode The Virtual Drive Management menu screen appears 6 Use the Up and Down Arrow keys to select the Create Configuration option and press Enter 108 Sun Server X4 8 Installation Guide December 2015 ...

Страница 109: ...ure RAID in UEFI Boot Mode The Create Configuration menu screen appears 7 Use the Up and Down arrow keys to select the Select RAID Level option and press Enter Configure Storage Drives for OS Installation 109 ...

Страница 110: ...figure RAID in UEFI Boot Mode The Select RAID Level dialog box appears 8 Use the Up and Down arrow keys to select the desired RAID level and press Enter 110 Sun Server X4 8 Installation Guide December 2015 ...

Страница 111: ...igure RAID in UEFI Boot Mode The Create Configuration menu screen appears 9 Use the Up and Down arrow keys to select the Select Drives option and press Enter Configure Storage Drives for OS Installation 111 ...

Страница 112: ...n screen appears 10 In the Drive Selection screen select the media type the interface type and the drives to be included in the RAID configuration then select the Apply Changes option and press Enter 112 Sun Server X4 8 Installation Guide December 2015 ...

Страница 113: ...Legacy Boot Mode Before You Begin The BIOS RAID Configuration Utilities reside in the HBA firmware Use this procedure under any of the following conditions You want to configure RAID on the intended OS installation hard drive and the server does not have Oracle System Assistant or you do not want to use it You do not want to create a RAID volume but the intended OS installation hard drive has not ...

Страница 114: ...a virtual drive bootable To make a drive bootable proceed to the next step in this section after you ve created your virtual drive 2 Make a virtual drive bootable first power on or reset the host For example to reset the server do one of the following From the local server press the Power button approximately 1 second on the front panel of the server to power off the host then press the Power butt...

Страница 115: ...Configure RAID in Legacy Boot Mode The Adapter Selection screen appears 4 In the Adapter Selection screen click Start Configure Storage Drives for OS Installation 115 ...

Страница 116: ...Configure RAID in Legacy Boot Mode The LSI MegaRAID BIOS Config Utility Virtual Configuration screen appears 5 Click Virtual Drives 116 Sun Server X4 8 Installation Guide December 2015 ...

Страница 117: ...acle sg_x_sas6 r rem z aspx Set Up an Operating System and Drivers You can configure a preinstalled operating system OS or install a supported OS for your server The following table describes how to access information about installing or configuring an OS What do you want to do Use this tool or documentation Configure a preinstalled OS Configuring the Preinstalled Oracle Solaris OS on page 119 Con...

Страница 118: ...and update drivers Sun Server X4 8 Installation Guide for Oracle Solaris Operating System Sun Server X4 8 Installation Guide for Oracle VM Server Sun Server X4 8 Installation Guide for Linux Operating Systems Sun Server X4 8 Installation Guide for Microsoft Windows Sun Server X4 8 Installation Guide for VMware ESXi 118 Sun Server X4 8 Installation Guide December 2015 ...

Страница 119: ...er environment Preparing for the Oracle Solaris Configuration on page 119 2 Configure the preinstalled Oracle Solaris OS Configure the Preinstalled Oracle Solaris 11 Operating System on page 122 3 Reinstall Oracle Solaris or install a different version of Oracle Solaris Reinstalling the Oracle Solaris Operating System on page 124 4 Find the Oracle Solaris OS documentation Oracle Solaris 11 Operati...

Страница 120: ...t of available languages for the OS English Locale Select your geographic region from the list of available locales Terminal Select the type of terminal that you are using from the list of available terminal types Network connection Is the system connected to a network Networked Non networked DHCP Can the system use Dynamic Host Configuration Protocol DHCP to configure its network interfaces Yes N...

Страница 121: ...hree addresses You can also enter a list of DNS domains to search when a DNS query is made Search domain Search domain Search domain LDAP If you chose LDAP provide information about your LDAP profile Profile name Profile server If you specify a proxy credential level in your LDAP profile gather the following information Proxy bind distinguished name Proxy bind password Default route Do you want to...

Страница 122: ...e Preinstalled Oracle Solaris 11 Operating System After you have completed the Worksheet for Oracle Solaris operating system Configuration in Preparing for the Oracle Solaris Configuration on page 119 use the following procedure to configure the preinstalled Oracle Solaris 11 operating system 1 If you are not already logged in to Oracle ILOM log in either locally from a serial connection or remote...

Страница 123: ...le ILOM web interface select Remote Control Redirection in the navigation tree Then click the Launch Remote Console button to launch video console redirection After the host boots the GRUB menu appears For example your version might be different GNU GRUB Version 0 97 607K lower 2087168K s11_2011 11_a Serial Port ttya s11_2011 11_a Graphics Adapter 4 From the GRUB menu you have 10 seconds to make a...

Страница 124: ...e server completes the boot process and displays the Oracle Solaris login prompt See Also Reinstalling the Oracle Solaris Operating System on page 124 For information on using the Oracle Solaris OS including registration see Oracle Solaris 11 Operating System Documentation on page 125 Reinstalling the Oracle Solaris Operating System If you want to reinstall the Oracle Solaris 11 OS or install a di...

Страница 125: ...chnetwork documentation solaris 11 192991 html For detailed instructions about installing the Oracle Solaris 11 operating system see Installing Oracle Solaris 11 Systems Preparing for the Installation and Installing Oracle Solaris 11 Systems Automated Installations That Boot From Media Refer to the Sun Server X4 8 Product Notes for patch and other late breaking information For patches and patch in...

Страница 126: ...126 Sun Server X4 8 Installation Guide December 2015 ...

Страница 127: ...ng the configuration process Oracle VM Configuration Worksheet on page 128 3 Configure the preinstalled Oracle VM software Configure the Preinstalled Oracle VM Server on page 128 4 Get started using Oracle VM Oracle VM Documentation on page 132 Preinstalled Oracle VM Server Compatiblitiy Requirements If you use the Oracle VM server software that is preinstalled on your system you must ensure that ...

Страница 128: ...sk If the server is part of a subnet supply the netmask of the subnet Example 255 255 0 0 Gateway If the server is accessed via a gateway supply the IP address of the gateway DNS server Supply the IP address for the domain name server DNS One and only one DNS is required Host name Supply the fully qualified domain name for the server Example xxx oracle com Configure the Preinstalled Oracle VM Serv...

Страница 129: ...ILOM CLI type the following command from the prompt reset System When prompted type y to confirm Are you sure you want to reset System y n y Performing hard reset on System The host boots 3 Start the Remote Console From the Oracle ILOM web interface select Remote Control Redirection in the navigation panel Then click the Launch Remote Console button From the Oracle ILOM CLI type the following comm...

Страница 130: ...ices one for normal booting and one for serial console enabled booting 5 Use the up and down arrow keys to select which entry is highlighted Press Enter to boot the selected OS e to edit the commands before booting or c for a command line To display the default option select the first option on the list Oracle VM server ovs xen 4 0 0 2 6 32 32 41ovs To display output to the serial port select the ...

Страница 131: ...you boot the Oracle VM server 7 Follow the prompts to select the onboard network interface controller NIC to configure and enter other required configuration information related to the network 8 If all of the configuration settings are correct type Y and press Enter to save the settings Configuring the Preinstalled Oracle VM 3 X Software 131 ...

Страница 132: ...below This completes the configuration of preinstalled Oracle VM Server to create a virtual operating system Oracle VM Documentation For complete information about using Oracle VM refer to the Oracle VM documentation at http www oracle com technetwork documentation vm 096300 html 132 Sun Server X4 8 Installation Guide December 2015 ...

Страница 133: ...S on page 134 3 Update and register the Oracle Linux OS Register and Update Your Oracle Linux OS on page 137 Oracle Linux Configuration Worksheet Gather the following information and have it ready for when you begin the configuration process You need to collect only the information that applies to your organization and network environment Required Installation Information Description Your Answers ...

Страница 134: ... Configure the Preinstalled Oracle Linux OS These instructions describe how to configure the preinstalled Oracle Linux on your server 1 If you are not already logged in to the server s Oracle ILOM log in either locally from a direct serial connection or remotely from an Ethernet connection See Connecting to Oracle ILOM on page 53 2 Power on or restart the host as follows To power on the host use o...

Страница 135: ...e From the Oracle ILOM CLI type start HOST console When prompted type y to confirm Are you sure you want to start HOST console y n y Serial console started As the host boots the GRUB menu appears see example below Press a key other than Enter to pause or in 5 seconds the highlighted selection is used GNU GRUB version 0 97 612K lower 2082932K upper memory Oracle Linux Server uek 2 6 39 200 24 1 el6...

Страница 136: ...e Linux Server release 6 3 Kernel 2 6 39 200 24 1 el6uek x86_64 on an x86_64 systemname login For the first time login use the root account and factory default password root 5 Once logged in complete the configuration of your server using standard Linux tools Tasks include For security change the factory default password for root Configure your server for the network if DHCP is not used See Oracle...

Страница 137: ...il address and CSI and create a password https linux oracle com register Once your account is configured you can use your email address and password to login to ULN 2 Once you have an account run the command below on the server as the root user in a terminal window or on the command line uln_register The uln_register wizard collects machine information and uploads it to Oracle Executing the above ...

Страница 138: ...138 Sun Server X4 8 Installation Guide December 2015 ...

Страница 139: ...odically These are made available as a software release The software release is a set of downloads patches that includes all available firmware hardware drivers and utilities for the server All these have been tested together The ReadMe document that is included with the download explains what has changed and what has not changed from the prior software release You should update your server firmwa...

Страница 140: ... product family then product then version The version contains one or more downloads patches For servers and blades the pattern is similar The product is the server Each server contains a set of releases These releases are not true software product releases but rather are releases of updates for the server These updates are called software releases and comprise several downloads all tested togethe...

Страница 141: ...cle System Assistant Each of the downloads is a zip file that contains a ReadMe file and a set of subdirectories containing firmware or software files The ReadMe file contains details on the components that have changed since the prior software release and the bugs that have been fixed Accessing Firmware and Software This section covers instructions for downloading or requesting software release f...

Страница 142: ...ownloading click on it you can use the shift key to select more than one patch A pop up action panel appears The pop up panel contains several action options including the Add to Plan and Download options For information about the Add to Plan option click on the associated drop down button and select Why use a plan 9 To download the patch es click Download in the pop up action panel The File Downl...

Страница 143: ...t Pack Documentation Library at http www oracle com goto ohmp docs Oracle ILOM Oracle ILOM and BIOS firmware are the only firmware that can be updated using either the Oracle ILOM web interface or the command line interface For more information refer to the documentation for your supported version of Oracle Lights Out Manager ILOM Documentation Library at http www oracle com goto ILOM docs Install...

Страница 144: ...144 Sun Server X4 8 Installation Guide December 2015 ...

Страница 145: ... damage Do not disconnect power cords when system is in full power mode Standby power When the server is in standby power mode Oracle ILOM is powered on but the host is powered off The power OK indicator blinks The service processor OK indicator is steady on If the server is completely powered off plug in the power cords to apply standby power If the server is in full power mode use Oracle ILOM or...

Страница 146: ...links The service processor indicator is steady on To perform an immediate shutdown press and hold the Power button for at least 5 seconds The power OK indicator blinks The service processor indicator is steady on Caution Data loss An immediate shutdown abruptly closes all applications and files without saving changes To completely power off the server you must disconnect the power cords from the ...

Страница 147: ...le ILOM on page 53 From the Oracle ILOM web interface perform one of the following Note These commands affect power to the host but not to the SP To completely power off the server you must disconnect the power cords from the back panel of the server a Click Host Management Power Control b From the Settings drop down menu select one of the following Reset Reset the operating system without removin...

Страница 148: ...Oracle ILOM stop f SYSTEM Turn off power to the host immediately start SYSTEM Turn on full power See Also Controlling Host Power Oracle ILOM Configuration and Maintenance Guide 148 Sun Server X4 8 Installation Guide December 2015 ...

Страница 149: ...gnostic References The Sun Server X4 8 Service Manual provides product specific troubleshooting information The Oracle x86 Server Diagnostics Guide http www oracle com goto x86AdminDiag docs provides information about a wide variety of tools available for Oracle s x86 servers Knowledge articles white papers and product updates are available through the Oracle Support portal https support oracle co...

Страница 150: ...ystem host name Network or Internet domain name Proxy server configuration Locating the Server Serial Number Use one of the following methods to locate the serial number of your server Record this number for future use Look on the front panel at the bottom left of the bezel Locate the yellow Customer Information Sheet CIS attached to your server Oracle Sun Server X4 8 packaging This sheet includes...

Страница 151: ...protecting from electrostatic damage 34 electrostatic discharge ESD safety measures 34 environmental requirements 32 Ethernet cables connecting 50 Ethernet connection logging in to Oracle ILOM 55 external cables connecting 50 F fan module service action required LED 18 front panel features 15 15 full power mode 145 G Gigabit Ethernet LAN connectors 50 graceful power off 146 147 H hard drives prepa...

Страница 152: ...guration 120 Oracle System Assistant launching locally 74 launching using Oracle ILOM 72 P physical specifications 31 ports SER MGT RJ 45 50 SP NET MGT Ethernet 50 power button 146 full 145 standby 145 state 145 power cables connecting 50 power dissipation numbers meaning of 32 power supply fail indicator location of 19 pre installed OS options Oracle Llinux 133 precautions 34 preinstalled operati...

Страница 153: ...ronmental 32 physical 31 standby power mode 145 system status indicators front panel 15 15 U Unified Extensible Firmware Interface UEFI boot mode description 27 overview 27 V volume creating with Oracle System Assistant 83 153 ...

Страница 154: ...154 Sun Server X4 8 Installation Guide December 2015 ...

Отзывы: