background image

English 33

BASIC OPERATIONS

OSD Menu

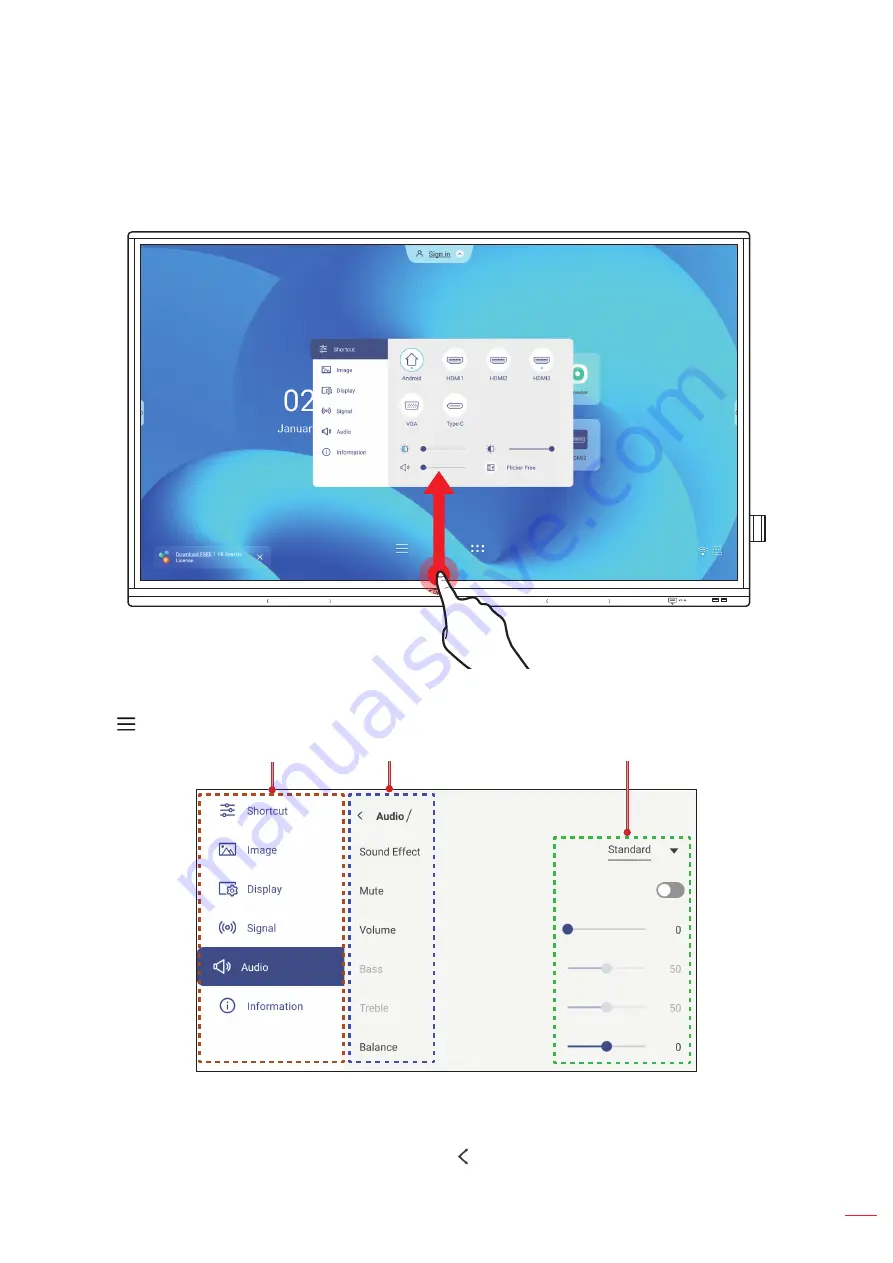
To open the OSD menu, do any of the following:

 ‡ On any screen, drag the bottom of the screen upwards.

 ‡ Press the 

Menu

 or 

Input

 button on the remote control.

 ‡ Tap 

 on the Home screen.

Main menu

Submenu

Settings

Note: 


‡

To configure the OSD menu settings, simply touch the menu item on the screen and use the screen 

controls to adjust its value or set the setting. The selected menu item is highlighted in 

blue

blue

.


‡

To move to the previous item in the menu, tap   or press 

Back

 on the remote control.


‡

To close the OSD menu, touch anywhere on the screen outside the menu or press 

Back

 continuously 

(if necessary) on the remote control.

Содержание 5 Series

Страница 1: ...User manual Interactive Flat Panel ...

Страница 2: ...TRODUCTION 8 Package Contents 8 Standard Accessories 8 Optional Accessories 9 Product Overview 10 Front View 10 Rear View 11 Remote Control 12 SETUP AND INSTALLATION 14 Wall Mounting Installation 14 Wall Mount Specifications 14 Installing an External Mini Computer 17 Stand Mounting Installation Optional 18 Using the Remote Control 21 Installing Replacing the Remote Control Batteries 21 Remote Cont...

Страница 3: ...ettings 45 Configuring System Settings 48 Side Toolbar 53 Viewing Recent Tasks 54 Creative Board App 55 Annotation App 62 Airshare 63 Screen Recorder 68 Screen Capture Tool 68 More Tools 69 Floating Annotation Toolbar 70 USING THE APPS 71 Creative Cast 72 Supported Operating Systems for Casting 72 Proprietary Sharing 72 Mobile Device 73 Computer 75 Creative Cast Settings 79 File Manager 80 Managin...

Страница 4: ...9 Supported Timing List 100 RS232 Protocol Function List 102 RS232 Pin Assignments 102 RS232 RJ45 Control Connection 102 SET Command 103 GET Command 105 LED Indicator 107 Troubleshooting 108 Maintenance 109 Cleaning the Screen 109 Clean the Front Frame 109 Optoma Global Offices 110 ...

Страница 5: ... the device in places where it might be subject to vibration or shock Do not use any hard or sharp object to operate the touch screen Do not use the device if it has been physically damaged or abused Physical damage abuse would be but not limited to The device has been dropped Power supply cord or plug has been damaged Liquid has been spilled on to the device The device has been exposed to rain or...

Страница 6: ...cknowledged FCC Statement This equipment has been tested and found to comply with the limits for a Class B digital device pursuant to part 15 of the FCC Rules These limits are designed to provide reasonable protection against harmful interference in a residential installation This equipment generates uses and can radiate radio frequency energy and if not installed and used in accordance with the i...

Страница 7: ...nergy Star program Low Blue Light and Eye Health What is Low Blue Light Technology Low Blue Light Technology reduces the blue light component emitted by your product The harm of blue light to human eyes is mainly manifested in the pathological harm of eyes and the harm of human body rhythm which lead to myopia cataract and macular disease Low blue light certification it is a certification project ...

Страница 8: ...ns Please consult your dealer for detailed information Standard Accessories USB Touch Cable HDMI Cable Touch Pen x2 Remote Control Touch Pen Holder Quick Start Guide The product images shown are for illustration purposes only and may not be an exact representation of the product Optoma reserves the right to change product images and specifications at any time without notice Interactive Flat BasicU...

Страница 9: ...English 9 INTRODUCTION Optional Accessories Wall Mount with PC Vesa Bracket OWMFP01 Wi Fi Dongle SI07B Region optional Stand Mount Note For WiFi dongle it varies different regions This is for reference ...

Страница 10: ...iew Front View 3 0 3 0 2 2 1 4 5 6 7 8 3 No Item No Item 1 Touch screen 5 IR receiver 2 Touch pen placements x2 6 Light sensor 3 Wi Fi dongle slot for SI07B model only 7 USB 3 0 ports x2 4 Power button with LED indicator 8 Touch pen holder ...

Страница 11: ... speakers x2 7 Touch 2 USB port 17 Mounting holes for wall mount 8 USB Type C port 18 AC In socket 9 SPDIF port 19 Power switch 10 USB 2 0 port Note Side USB 3 0 ports are full channel USB ports USB ports can be used irrespective of the chosen input source Two HDMI in ports support CEC and 1 HDMI in port supports ARC USB type C port supports DisplayPort 1 2 and power delivery 65W USB 2 0 port is f...

Страница 12: ...active flat panel IFP 2 Mute Turn off the sound temporarily 3 Start Perform the same function as the Windows key on a computer keyboard 4 Space Perform the same function as the Space key on a computer keyboard 5 Alt Tab Perform the same function as the Alt and Tab keys on a computer keyboard Pressing both keys you can switch between all open applications windows ...

Страница 13: ...unlock the touch function 16 Blue Freeze the screen 17 Blank Blank the screen 18 Backspace Perform the same function as the Backspace key on a computer keyboard 19 Navigation keys pqtu Select an item or option 20 Enter Confirm the selection 21 Creative Board Launch the Creative Board app 22 Back Return to the previous screen 23 PgUp Perform the same function as the PgUp key on a computer keyboard ...

Страница 14: ...ilable separately Kit will include the following items Screw A x4 Screw B x8 Screw C x2 Dual mounting brackets and wall mount Anchor x8 Washer x8 Wall Mount Specifications Model Name VESA Grid Screw Type Length 65 inch 600 x 400 mm M8 25L 75 inch 800 x 400 mm M8 25L 86 inch 800 x 600 mm M8 25L 65 inch 75 inch 86 inch ...

Страница 15: ...ting brackets on the rear of the IFP Then secure the brackets with four screws A A 2 Drill eight small holes on the mounting location and insert the anchors into the holes 3 Position the wall mount on the wall then secure the wall mount with eight screws B through the washers into the installed anchors on the wall B ...

Страница 16: ...ete wall to ensure installation firmness If concrete wall is not available we recommend to use a stand instead Please refer to page 18 Screws must be tightly secured however to avoid damage to the mounting brackets wall mount or IFP do not overtighten the screws The installation should only be performed by qualified technicians Improper installation may cause the IFP to fall or malfunction Please ...

Страница 17: ...et on the rear side of the wall mount then complete one of the following to install the mini computer Install the screws onto the mini computer then align and hook the mini computer to the mini PC bracket Align and install the mini computer to the mini PC bracket Then secure it with four screws OR ...

Страница 18: ...plit Ring Lock Washer G2 x4 Stand pole x2 Stand base x1 Screw K x4 Washer K1 x4 Nut K2 x4 To mount the IFP on the stand complete the following steps 1 Install the dual mounting brackets on the rear of the IFP Then secure the brackets with four screws A A Note Dual mounting brackets wall mount and screws A are included in the wall mount kit Refer to Wall Mounting Installation on page 14 ...

Страница 19: ...to its slot and secure it with four screws J Repeat the same procedure to install the remaining three wheels J 3 Place the stand base on a stable surface then install the stand pole onto its slot and secure both standoffs with two nuts G through the washers G2 and G1 Repeat the same procedure to install the other stand pole G G2 G1 ...

Страница 20: ... 5 Install the wall mount on the upper part of the poles then insert the screws K through the screw holes from the rear side of the poles 6 Place the washers K1 and the nuts K2 into the screws then tighten the nuts K2 to secure the wall mount in place 7 Align and hook the dual mounting brackets to the installed wall mount on the stand poles H K K1 K2 ...

Страница 21: ...not mix batteries of different types Different types of batteries have different characteristics Do not mix old and new batteries Mixing old and new batteries can shorten the life of new batteries or cause chemical leakage in old batteries Remove batteries as soon as they are depleted Chemicals that leak from batteries that come in contact with skin can cause a rash If you find any chemical leakag...

Страница 22: ...at there are no obstacles between the remote control and the IR sensor window on the IFP that might obstruct the infra red beam Make sure the IR transmitter of the remote control is not being used in sunlight or fluorescent lamps directly If the remote control is closed to Inverter Type fluorescent lamps it might become ineffective from time to time If the remote control and the IFP are within a v...

Страница 23: ...tomatically enter standby mode Connecting External Devices IMPORTANT To use the touch screen function make sure to connect one end of the USB cable to the USB type B TOUCH 1 or TOUCH 2 port on the IFP and the other end of the cable to the USB type A port on your device HDMI input connection Connect your computer to the IFP using an HDMI cable HDMI 1 HDMI 2 HDMI 3 TOUCH 2 TOUCH 1 Connect your video...

Страница 24: ... cable to the audio jack on your computer For touch function connect one end of the USB cable to the TOUCH 2 port on the IFP and the other end to the USB port on your computer AUDIO IN VGA TOUCH 2 USB type C connection Connect your computer to the IFP using a USB type C cable Note USB type C can be used to transmit audio video and touch signals The USB type C port also supports power delivery and ...

Страница 25: ...nection Connect your external speakers to the Audio out port on the IFP AUDIO OUT SPDIF connection Connect your audio equipment to the IFP using a SPDIF cable SPDIF HDMI output connection Connect your projector to the HDMI out port on the IFP HDMI OUT ...

Страница 26: ...e of the available USB ports USB 2 0 port is reserved for firmware upgrades and the USB quick draw pen holder 3 0 3 0 3 0 3 0 2 0 RS232 connection Connect your computer to the IFP using a RS232 cable RS232 LAN connection Connect your router to the IFP using an Ethernet cable LAN LAN Settings Note To configure network settings refer to Configuring Network Settings on page 41 ...

Страница 27: ...an receive the signal in an area where there is a Wi Fi network To install the Wi Fi dongle model SI07B complete the following steps 1 Remove two 2 screws from the Wi Fi slot bracket 2 Remove the Wi Fi slot bracket 3 Insert the Wi Fi dongle to the Wi Fi slot on the IFP Note To configure Wi Fi settings refer to Configuring Network Settings on page 41 WiFi Settings ...

Страница 28: ...er function can be used for multiple sources If the touch pen holder is plugged into the USB3 0 port then it can be used only with Android source 3 0 3 0 HDMI 1 HDMI OUT HDMI 2 HDMI 3 TOUCH 2 TOUCH 1 3 1 2 Insert the touch pen to its holder 3 0 3 0 HDMI 1 HDMI OUT HDMI 2 HDMI 3 TOUCH 2 TOUCH 1 3 1 Note If the IFP screen is on the Home screen then removing the touch pen from its holder launches by ...

Страница 29: ...P Powering off Press the Power button for 3 seconds to turn off the IFP Press OK at the prompt to turn it off immediately or wait for 10 seconds until the IFP turns off automatically When the LED indicator light turns red this indicates that the IFP has entered standby mode Note You can also press the button on the remote control to turn off the IFP The IFP still consumes power when it is in stand...

Страница 30: ...language for the on screen display OSD menu Select Next to continue 2 If you want to connect your IFP to the Internet wirelessly select one of the available networks and tap Connect Otherwise select Skip IMPORTANT To connect to a wireless network make sure the Wi Fi dongle is properly plugged into the Wi Fi dongle slot Refer to page 27 If you are connecting to a secure network you will need to ent...

Страница 31: ...ontinue 4 Read Optoma s legal policies including Terms and conditions of use Privacy policy Cookie policy and Open source Check the I agree to Terms and conditions Privacy policy Cookies policy and Open source radio button and then select Next to complete the setup The IFP is now ready to use ...

Страница 32: ...s menu Apps list Input sources USB flash drive only appears when the USB flash drive is plugged into the USB port Sign in to Creative Board Wireless display verification code from Creative Cast Pro To navigate the Home screen do any of the following Select an option simply tap on the desired item Adjust the setting drag the slider to the left or to the right Open the side toolbar tap or on the lef...

Страница 33: ...bmenu Settings Note To configure the OSD menu settings simply touch the menu item on the screen and use the screen controls to adjust its value or set the setting The selected menu item is highlighted in blue blue To move to the previous item in the menu tap or press Back on the remote control To close the OSD menu touch anywhere on the screen outside the menu or press Back continuously if necessa...

Страница 34: ...r to the left to adjust the low blue light level IMPORTANT Studies have shown that just as the ultra violet rays can cause eye damage the shortwave length blue light rays from displays can cause eyestrain retina damage and affect vision over time Optoma Low Blue Light is an eye protection feature that can reduce the blue light IMPORTANT For protecting your eyes against prolonged display use we hig...

Страница 35: ...color settings based on your preferences Drag the Brightness slider bar to the right or to the left to adjust the screen brightness level Drag the Contrast slider bar to the right or to the left to adjust the screen contrast level Drag the Color slider bar to the right or to the left to adjust the screen color level from black and white to fully saturated color Note Brightness level contrast level...

Страница 36: ...sources except for Android Drag the Backlight slider bar to adjust the backlight level Note Backlight can be adjusted also in the Shortcut menu Refer to page 34 Drag the Low Blue Light slider bar to adjust the blue light level Note Low Blue Light can be adjusted also in the Shortcut menu Refer to page 34 Tap Dynamic Black and select one of the available options Off Based on Content not supported i...

Страница 37: ...s Standard Meeting Class Movie or User Note If the sound effect setting is set to User you can customize audio settings by adjusting the bass and treble level according to your preference Tap Mute to mute or unmute audio Note You can also mute or unmute audio by pressing the button on the remote control Drag the Volume slider bar to adjust the volume level Drag the Bass slider bar to adjust the ba...

Страница 38: ...e OSD menu tap to open the Information menu then complete the following steps Tap Display to view display mode current input source resolution color depth and color format Tap About to view regulatory model name serial number firmware version and Android version ...

Страница 39: ...is highlighted in blue blue To move to the previous item in the menu tap or press Back on the remote control To close the OSD menu touch anywhere on the screen outside the menu or press Back continuously if necessary on the remote control Personalizing the System In the Settings menu tap to open the Personalized menu then complete the following steps Tap Wallpaper and select a pre loaded image as ...

Страница 40: ...allpaper directly from the File Manager gallery For more information on the File Manager refer to page 80 Tap Input Name to rename the input Tap on the input name you wish to change then type a new name and confirm name modification by tapping OK at the prompt Tap Multi Window mode to enable displaying on the screen more than one app at the same time Tap Restart when prompted to make the setting t...

Страница 41: ... if needed IMPORTANT To connect to a Wi Fi network make sure the Wi Fi dongle is properly installed in the Wi Fi dongle slot For more information refer to page 27 Note If your preferred Wi Fi network is not visible in the list tap to refresh the list To enter the Wi Fi network manually tap Enable Portable hotspot feature to share the Wi Fi network to other wireless devices Modify the network name ...

Страница 42: ...lowing Device Name to enter a new device name To confirm the modification tap OK at the prompt In the list of Available device select the device you want to connect to Make sure the pairing codes match on both devices and if they match tap Pair to confirm IFP Portable Device Note If the Bluetooth device is not visible in the list of available devices make sure the device is nearby the IFP and Blue...

Страница 43: ...to enable or disable encrypting HDMI out signal with HDCP Note If the connected monitor does not support HDCP disable HDMI out encryption function Tap HDMI out format and select the format that can be output from the HDMI port Tap Type C format and select the USB type C format Tap Device ID to assign a new ID to the IFP To confirm tap OK Tap Storage to view storage usage ...

Страница 44: ...ystem always launches whiteboard Annotation When the pen is lifted the system always launches the annotation tools Disabled Lifting the pen from the holder does NOT launch the whiteboard or annotation tools pen holder trigger Tap Other Settings to configure side toolbar floating annotation toolbar touch sound and email settings Tap any of the following Side toolbar settings to select when the tool...

Страница 45: ...ear Screen Lock Password visible only if the password is set and enter the current password Then tap OK to confirm Tap Advanced Setting to set or modify the Advanced Setting password and enable or disable installing third party applications Do the following Note The DEBUG MENU advanced settings can be also accessed with the Advanced Setting password set in this menu a Enter the Advanced Setting pa...

Страница 46: ...ware from an unknown source Under Permissions tap Install app from marketplace and enable or disable installing third party software from Optoma Marketplace 3rd party apps installation Tap CA to view and modify trusted CA certificates user stored credentials and more Tap Trusted credentials to view and modify trusted CA certificates Tap User credentials to view and modify user stored credentials T...

Страница 47: ...rol The DEBUG MENU opens b Tap next to the Advanced settings then enter the Advanced Setting password at the prompt and tap Confirm c Tap or next to USB WIFI Enable and select OFF when prompted to disable USB WIFI Select ON to enable USB WIFI Tap Confirm at the prompt After the system restarts the setting takes effect ...

Страница 48: ...ditional Chinese Simplified Chinese Portuguese German Dutch Polish Russian Czech Danish Swedish Italian Turkish Arabic Romanian Hungarian Finnish or Norwegian Tap Keyboard to view and manage keyboards Tap Startup and Shutdown to configure settings related to starting and shutting down the IFP Tap any of the following Startup Input Source item to select one of the available startup input options La...

Страница 49: ...s menu Note Tap to modify or remove the schedule You can set up to 3 schedules Tap Power to configure power settings Tap any of the following Signal Power On to enable or disable starting up the IFP when an input signal is detected Direct Power On to enable or disable starting up the IFP from the power source Note Direct power on feature aids installations that rely on power on timers Auto Power O...

Страница 50: ...he DEBUG MENU opens b Tap HIDE next to Active Standby Select SHOW at the prompt c Tap Exit to exit the DEBUG MENU Active option is available in System Power Mode Standby menu Note OMS and LAN control remote power on functions will only work when Power Mode Standby is set to Active Active Standby mode consumes higher power since system only turns off backlight and mainboard is still working to list...

Страница 51: ...Upgrade to update the system from a USB flash disk Note To proceed with upgrading software save the upgrade file to the USB flash disk first then connect the disk to a USB 2 0 port on the IFP Open Advanced Settings System Update USB Software Upgrade and tap Start at the prompt Note If you upgrade IFP s firmware from a USB storage uncompress the upgrade file first and then copy the uncompressed fil...

Страница 52: ...English 52 BASIC OPERATIONS Tap Legal to view Terms and Conditions of Use Privacy policy Cookie policy and Open Source Library ...

Страница 53: ...n Creative Board tap For more information refer to Creative Board App on page 55 To open the apps screen tap To open the annotation app tap For more information refer to Annotation App on page 62 To open an online classroom tap For more information refer to Airshare on page 63 To open the screen recording tool tap For more information refer to Floating Annotation Toolbar on page 70 To open the scr...

Страница 54: ...ew and manage all opened apps Tap on the app you want to launch To close the app tap in the app window In multi window mode swipe the app window to the left or to the right or tap to close the app To clear the list tap CLEAR ALL In multi window mode tap Clean All ...

Страница 55: ...tive whiteboard platform that can bring teams together to brainstorm sketch and collaborate anytime anywhere Tap to open the Creative Board To start using the app do the following 1 Tap on the Create new session tab Then select a background or template for your content Note To access your cloud sessions login to Creative Board first To open a recent session tap on the Home tab and under Recent cat...

Страница 56: ...o expand the floating board Pen Write or draw a freeform line Tap to select the desired line color and thickness Tap to modify the color palette You can select five palette colors based on the theme or select them individually IMPORTANT Avoid damaging the virtual whiteboard For writing and drawing use ONLY the supplied touch pen or your fingers Note Touch pen is supplied with thin tip and thick ti...

Страница 57: ...ze and drag your fingers over the area you want to remove Note You can also use the palm of your hand to erase the item on the whiteboard Select Select an object on the whiteboard Tap any of the following to alter the selected area boundary point to enlarge or shrink to change the color to duplicate to delete to rotate ...

Страница 58: ... window You can capture screenshots resize relocate duplicate and delete the browser window embed a document camera Add a page Menu Tap any of the following options New to create a new session Open to open a collaboration or non collaboration session Save Save As to save save as the current content to collaboration or non collaboration session Import to import a JPG PNG or PDF file Export to expor...

Страница 59: ...nd the file by email for the first time you are prompted to configure email settings first For more information refer to page 44 Zoom Zoom in or zoom out on the screen Then tap to open the zoom window Move the red box to the area that you want to show on the screen Tap to close the zoom window Background options Select a background or template for your content Tap Select Then select your image fro...

Страница 60: ...e the selected page Session name The default session name is Untitled session To rename the session tap and type in a new name at the prompt Then tap Save Note You can also rename the session on the Creative Board Home tab Select the session and then tap Rename Tap Save at the prompt to save the modifications If the session is marked with the icon then it means it is an active collaboration sessio...

Страница 61: ... options Through the Google Classroom By sending an email invitation with the session password By sending a session code On the Attendees tab you can assign a role to the attendee either viewer or editor delete attendees renew the session code and configure attendee settings Tap to access the Group tab Then tap and enter the group information such as group name and attendees Tap Save To modify gro...

Страница 62: ...change the highlighter color by tapping repeatedly To erase all annotations on the screen tap Note You can also use the palm of your hand to erase the areas of your written texts or drawings To capture a screenshot of the entire screen tap To share the annotation to other wireless devices tap Make sure your wireless device is connected to the same Wi Fi network as the IFP and then scan the QR code...

Страница 63: ... virtual classroom remotely complete the following steps 1 Connect the IFP to an available network 2 On your mobile device enable Wi Fi function IMPORTANT Make sure you have access to the Internet throughout the entire online session 3 Open the classroom URL in a web browser and enter the access code or scan the access QR code Then enter your name and tap Enter to join the class ...

Страница 64: ...wing Launch the Creative Board app Then use the following functions a Voter 1 Tap to enter the Voter interface 2 Select Single choice or Multiple choice to define the answer type 3 Tap Begin to start answering the question 4 The participant can respond by selecting the answer on the mobile device screen and tapping OK ...

Страница 65: ...ish The Answer statistics will be displayed on the screen 6 Tap the right answer s on the statistics screen Tap to save and export the result Tap to close the Answer statistics page b Responder 1 Tap to enter the Responder mode Then tap Start to start the answering mode ...

Страница 66: ...to answer For example if Amy first taps Be fast then she will get the right to answer the question Tap Reset to start the answering mode again c Selector Tap to enter the selector mode Select the number of person s whom will be selected Then tap START The result is displayed on the screen Tap Reset to select again ...

Страница 67: ...ssage screen then enter your message in the comment text box and tap Send The broadcast message will appear on the IFP screen Note Tap to display the class access code URL QR code and allow more participants to join the class Tap to export the result Tap to exit Airshare Confirm Exit at the prompt All classroom users will be logged off ...

Страница 68: ...recording settings enable or disable connected camera recording select the preferred video resolution and select the path where you want the recordings to be saved Note By default all recordings are saved to the Storage Record folder Tap to close the recording tool Screen Capture Tool Tap to open the screen capture tool To capture the screen do the following 1 Tap either or to manually select the ...

Страница 69: ...he screen to its original size tap Finally to exit the tool tap Tap to use the Stopwatch Tap to use the Timer Tap to activate Spotlight Spotlight can be used to direct the audience s focus to a specific part of the board Tap to lock the screen ScreenLock If the screen lock password is not set you are prompted to set the password Follow the onscreen instructions to complete the procedure Tap to use...

Страница 70: ... toolbar Floating Annotation Toolbar Touch and hold the screen with your two fingertips a centimeter apart from each other The floating annotation toolbar opens Tap to return to the previous screen Tap to return to Home screen Tap to open annotation app Tap to open Creative Board Tap to view recent apps Tap the app you want to switch to or tap to close the annotation toolbar Tap and drag the annot...

Страница 71: ...ing system and do not support Google Play Services The operating system may not be compatible with all third party Android apps Third party Android apps can vary in quality and some even contain malicious codes which could compromise system security and may invalidate product warranty Optoma makes no representations regarding the quality security or suitability of any third party apps and their co...

Страница 72: ... network While in use make sure that you have access to the Internet Supported Operating Systems for Casting Collavision Senders Available Version Windows Windows 10 11 and above Mac Mac OS X 10 12 and above iPhone iOS 13 and above Android Android 9 0 and above Chrome Chromebook OS V74 and above Proprietary Sharing Features Operation System Web Sharing Web Sender Chrome Browser AirPlay Support iOS...

Страница 73: ...scan the QR code to download and install the Creative Cast app onto your mobile device To connect to the IFP complete the following steps Note The connection steps are desribed based on an iOS device 1 Launch the Creative Cast app Select the device and then tap Start Broadcast ...

Страница 74: ...English 74 USING THE APPS 2 Enter the Creative Cast verification code from the launcher screen to establish the connection 3 Tap any of the following ...

Страница 75: ...e your mobile device as a remote control to control the IFP Screen Control to mirror the IFP screen to your mobile device You can use your mobile device to operate the IFP Custom Menu to customize the Creative Cast menu in your mobile device 4 To stop the screen broadcast tap Computer You can mirror the screen of your computer via Chrome browser or Creative Cast To use either of these options open...

Страница 76: ...her screen and tap Login Select what you want to share and then click Share Note If you want to share audio during screen casting tap on the launcher screen The user name that you enter for screen casting will be used also in Moderation mode To stop sharing do either of the following Click Stop sharing on your browser or Click on the launcher screen ...

Страница 77: ...ive Cast to your computer 1 Launch the app and click on the device name If the IFP is not visible in the Room List input the IFP s IP address manually to the Input IP address field Press Enter to start searching for the device 2 Enter the login code from the launcher screen and tap Join ...

Страница 78: ...en to the IFP Remote View to mirror the IFP screen to your computer with annotation and image saving feature PRO Moderation Mode to select up to 4 screens to display on the IFP Enter the password default admin and click Start Note To modify the password refer to Creative Cast Settings on page 79 ...

Страница 79: ...llowing icons to configure the Creative Cast launcher screen settings Grouping to share the screen to other devices Settings to manage connection settings view Creative Cast version and ugprade software configure login code settings set the administrator password for the Moderator user and enable or disable floating window feature Minimize the menu bar ...

Страница 80: ...in the selected storage location Videos Display only video files in the selected storage location Document Display only document files in the selected storage location Music Display only audio files in the selected storage location Thumbnail view View files and folders as thumbnails List view View files and folders as a list Sort Sort files and folders by name or by date in ascending or descending...

Страница 81: ...ith QR code Note For file sharing with QR code make sure your mobile device is connected to the same network as the IFP compress item s move copy item s to another location or view item details Share item s Share item s between the IFP and your mobile device over web browser Note By default all items that you upload to the IFP are saved to Download folder For item s upload make sure your mobile de...

Страница 82: ...sign in to your existing account 4 After successful login you are prompted to set a security PIN Tap Setup to set the PIN or Skip to skip this step Note PIN code is used to protect user s cloud storage from being illegally accessed When system status changes for example from standby to normal from backlight off to on a user must key in the PIN code the set up for verification in order to access th...

Страница 83: ...MPEG 4 SP L0 3 ASP L0 5 H 264 MP HP Level 4 1 H263 VP6 MJPEG ts MPEG 2 MP HL MPEG 4 SP L0 3 ASP L0 5 H 264 MP HP Level 4 1 VC1 AP H265 mpg mpeg MPEG 1 MPEG 2 MP HL H 264 MP HP Level 4 1 mp4 MPEG 4 SP L0 3 ASP L0 5 H 264 MP HP Level 4 1 H265 mov MPEG 4 SP L0 3 ASP L0 5 MJPEG H 264 MP HP Level 4 1 H265 mkv VP9 H 265 3gp H 264 MP HP Level 4 1 H263 MPEG 4 SP L0 3 ASP L0 5 Audio Audio support format co...

Страница 84: ...ewind video Previous video Skip to the previous video Pause Play toggle Tap to Pause the playback To resume tap Next video Skip to the next video Fast forward Fast forward video Loop Play once toggle Tap to play all video files in a loop or tap to play the current video file in a loop Tap to play through all videos in the list once Volume control Adjust the volume level Note To stop playback open ...

Страница 85: ...Display track list Rewind Rewind the track Previous track Return to the previous track Pause Play toggle Tap to Pause playback To resume tap Next track Skip to the next track Fast forward Fast forward the track Loop Play once toggle Tap to play all tracks in a loop or tap to play the current track in a loop Tap to play through all tracks in the list once Volume control Adjust the volume level Note...

Страница 86: ...s an alternative touch the screen with your two fingers and move them apart to zoom in or together to zoom out Actual Display the image in its actual size Rotate Rotate the image clockwise Mark Annotate over the image Settings Configure the slideshow settings and tap Play into full screen to start the slideshow Tap to stop the slideshow Tap Set to Wallpaper to set the image as the device wallpaper...

Страница 87: ... pin code you can block the IFP from unauthorized use To set the pin code for the first time launch the Screen Lock app Then tap Set password The Advanced Settings Security menu will open To set the password refer to Configuring Security Settings on page 45 Browser Browser Tap Browser to access web pages ...

Страница 88: ...ndroid operating system so only modules related to display features remain The customized Android operating system may not be compatible with all third party Android apps Third party Android apps can vary in quality and some even contain malicious codes which could compromise system security and functionality and may invalidate your product warranty Optoma makes no representations regarding the qu...

Страница 89: ...eper app and begin cleaning and optimizing the data on the IFP For automatic cleaning of the memory deleting temporary and junk files tap One Key Optimize For manual cleaning of the memory tap Clean Memory For manual deleting temporary and junk files tap Clean Trash ...

Страница 90: ...he Joan Portal To connect the IFP to the Joan Portal complete the following steps 1 Open the web browser on your computer and enter http portal getjoan com into the address bar The Joan Portal login page will open Sign in to the Joan Portal If you have not yet created your Joan account click Sign Up to create your account ...

Страница 91: ... methods For example click PAIR DEVICE to pair with the IFP using the PIN number 4 Enter the PIN number that is displayed on the IFP at the prompt and click PAIR DEVICE 5 Enter the device name and select the calendar Click SAVE to save the information All the meetings in the selected calendar will appear on the screen of the IFP ...

Страница 92: ...English 92 USING THE APPS After successful connection the IFP will display meeting room s schedule meeting reminders and meeting room reminders that are set in Joan Portal ...

Страница 93: ...re screen Capture the screen image Note By default images are saved to VideoPresenter photograph current date folder Normal mode Pinch the screen to zoom in zoom out rotate the video image and move it around on the screen Enhance mode Display the video image in full screen Adjustment Adjust the video image settings Exhibition settings size scaling rotation and type Advanced options brightness cont...

Страница 94: ...sent multiple types of non linear content and seamlessly capture feedback without the extra clicks and micro frustrations of traditional screen sharing tools Even pin your camera and elevate your presence to stand out A one year license for Reactiv SUITE is included with your purchase of the IFP To learn how to claim your one year license tap the Download FREE 1 YR Reactiv License link on the IFP ...

Страница 95: ...ss at anytime cloud solution coming soon Device monitoring alerts control scheduling broadcasting and more Over the air firmware updates cloud solution coming soon To start using OMS over LAN complete the following steps 1 Connect the IFP and your PC to the same LAN Open the browser and download the OMS app to your PC from the Optoma web page https www optomausa com product details optoma manageme...

Страница 96: ... of IP addresses 6 Select the device and click Add 7 Select the device and then use the screen controls to display a message on the screen of the selected IFP power on off the IFP enable disable wake on LAN select an input source enable disable AV mute mode mute or unmute the IFP monitor the device s status usage time mute status temperature and more Note For enhanced device management you can gro...

Страница 97: ...English 97 ADDITIONAL INFORMATION Dimensions 65 inch Unit mm ...

Страница 98: ...English 98 ADDITIONAL INFORMATION 75 inch Unit mm ...

Страница 99: ...English 99 ADDITIONAL INFORMATION 86 inch Unit mm ...

Страница 100: ...B CVTRB 68 25 47 39 59 99 Y Y Y 15 1280x768 60Hz CVT 79 50 47 77 59 87 Y Y Y 16 1280x720 60Hz CEA 861 74 25 44 67 60 00 Y Y 17 1280x800 60Hz CVT 83 50 49 70 59 81 Y Y Y 18 1280x960 60 000Hz VESA 108 00 60 00 60 00 Y Y Y 19 1280x1024 60Hz VESA 108 00 63 98 60 00 Y Y Y 20 1360x768 60Hz VESA 85 50 47 71 60 01 Y Y Y 21 1440x900 60Hz RB CVTRB 88 75 55 46 59 90 Y Y Y 22 1440x900 60Hz CVT 106 50 55 93 59...

Страница 101: ...8 50 56 25 50 00 Y 40 1080p 30Hz CEA 861 74 25 33 75 30 00 Y 41 1080p 29Hz CEA 861 74 17 33 71 29 97 Y 42 1080p 25Hz CEA 861 74 25 28 12 25 00 Y 43 1080p 24Hz CEA 861 74 25 27 00 24 00 Y 44 1080p 23Hz CEA 861 74 17 26 97 23 97 Y 45 3840x2160 60Hz CEA 861 594 00 135 00 60 00 Y Y 46 3840x2160 50Hz CEA 861 594 00 112 50 50 00 Y Y 47 3840x2160 30Hz CEA 861 297 00 67 50 29 97 Y Y 48 3840x2160 25Hz CEA ...

Страница 102: ... 5 6 7 8 9 Pin No Spec from IFP side 1 N A 2 TXD 3 RXD 4 N A 5 GND 6 N A 7 N A 8 N A RS232 RJ45 Control Connection RS232 Settings LAN Control Settings Baud Rate 9600 IP Machine IP Data Bits 8 Port 23 Parity None Stop Bits 1 Flow Control None X X X X X X X CR Lead Code Device ID where 01 indicates Device ID 01 Command ID Space Variable Carriage return ...

Страница 103: ...ode Standard xx252 n n 1 7E 30 30 32 35 32 20 31 0d P F Meeting n 4 7E 30 30 32 35 32 20 34 0d P F User n 2 7E 30 30 32 35 32 20 32 0d P F Classroom n 3 7E 30 30 32 35 32 20 33 0d P F Movie n 5 7E 30 30 32 35 32 20 35 0d P F Volume 0 100 xx81 n n 0 100 7E 30 30 38 31 20 30 0d to 7E 30 30 38 31 20 31 30 30 0d P F Video Mute Off xx13 n n 0 7E 30 30 31 33 20 30 0d P F On n 1 7E 30 30 31 33 20 31 0d P...

Страница 104: ...37 30 20 31 31 0d P F Norge n 10 7E 30 30 37 30 20 31 30 0d P F Picture Mode Presentation xx20 n n 1 7E 30 30 32 30 20 31 0d P F Bright n 2 7E 30 30 32 30 20 32 0d P F Cinema n 3 7E 30 30 32 30 20 33 0d P F User n 5 7E 30 30 32 30 20 35 0d P F HDR n 21 7E 30 30 32 30 20 32 31 0d P F Color 0 100 xx45 n n 0 100 7E 30 30 34 35 20 30 0d to 7E 30 30 34 35 20 31 30 30 0d P F Backlight 0 100 xx251 n n 0 ...

Страница 105: ... od P F OSD lock OSD lock On with password xx239 n 1 nnnn 7E 30 30 32 33 39 20 31 20 a 0d P F OSD lock Off with password xx239 n 2 nnnn 7E 30 30 32 33 39 20 32 20 a 0d P F GET Command Type Category CMD Hex Code CMD Response Success Parameter Failed GET Power xx124 n n 1 7E 30 30 31 32 34 20 31 0D Ok0 Power off F OK1 Power on F Contrast xx126 n n 1 7E 30 30 31 32 36 20 31 0D OK0 100 0 100 F Brightn...

Страница 106: ...n n 1 7E 30 30 35 35 35 20 31 0D Oknn nn nn nn nn nn Mac Address F LAN IP address xx87 n n 3 7E 30 30 38 37 20 33 0D Oknnn nnn nnn nnn IP address F FW version xx122 n n 1 7E 30 30 31 32 32 20 31 0D Oknnnnnnnnnnnnnn ex 20190926164814 FW version F Usage hour xx108 n n 1 7E 30 30 31 30 38 20 31 0D Oknnnnn Suage hours F Device type xx149 n n 1 7E 30 30 31 34 39 20 31 0D OK2 Device type IFP F Informati...

Страница 107: ...SD lock xx229 n n 1 7E 30 30 32 32 39 20 31 0D OK0 OSD lock Off F OK1 OSD lock On F Note 1 Power Running Time Input Source Firmware Version Display Mode a 0 Power Off a 1 Power On Usage hours nnnnn cc 02 VGA1 cc 08 HDMI2 cc 10 Component cc 14 HDMI3 cc 15 DisplayPort cc 18 Android cc 19 Slot in PC cc 21 USB Type C ee 01 Presentation ee 02 Bright ee 05 User ee 21 HDR ee 03 Cinema ee 10 DICOM SIM LED...

Страница 108: ...tible Refer to the Supported Timing List section For the VGA input source try the automatic screen adjustment or adjust the Frequency and Phase settings in OSD Signal menu The touch panel does not respond Make sure the screen is not exposed to direct sunlight or other strong light For the external device connection make sure the USB cable is properly connected to the Touch USB port of the IFP If t...

Страница 109: ... to unplug the power cord from the power outlet to prevent electric shock Cleaning the Screen When the screen requires cleaning please unplug the power cord first Please use a soft dust free dry cloth to wipe the screen Do not use water or a spray cleaner to clean the IFP Please contact the service center for internal cleaning of the IFP Clean the Front Frame Use a dry soft lint free cloth to wipe...

Страница 110: ...oulogne Billancourt France savoptoma optoma fr Spain C José Hierro 36 Of 1C 34 91 499 06 06 28522 Rivas VaciaMadrid 34 91 670 08 32 Spain Deutschland Wiesenstrasse 21 W 49 0 211 506 6670 D40549 Düsseldorf 49 0 211 506 66799 Germany info optoma de Scandinavia Lerpeveien 25 47 32 98 89 90 3040 Drammen 47 32 98 89 99 Norway info optoma no PO BOX 9515 3038 Drammen Norway Korea WOOMI TECH CO LTD 82 2 3...

Страница 111: ...www optoma com ...

Отзывы: