


Installation Instructions EC 2-25 Lift
(Subject to technical alterations! - Status 09/2018)
This is a translation. The German original shall prevail.
Page 10 of 50
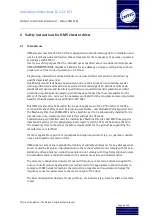
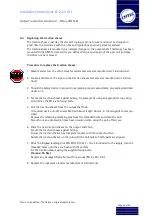
1.
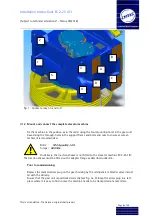
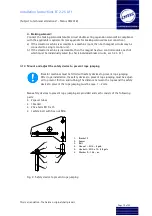
Bracket 2
2.
Spacer
3.
Bolt
4.
Hex nut – M16 – 8 galv.
5.
Hex bolt – M10 x 75– 8.8 galv.
6.
Washer A – 10.5 – pc.
4.
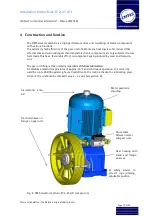
Braking solenoid:
Connect the braking solenoids (double circuit double acting expansion solenoid) in compliance
with the applicable requirements (see appendix for braking solenoid mains connection).
a) If the elevator machine is accessible in a machine room, then both magnet circuits may be
connected to a single control unit.
b) If the elevator machine is inaccessible, then the magnet has two control modules, each of
which must be individually wired (to check individual brake circuits, see 3.2.3- b1).
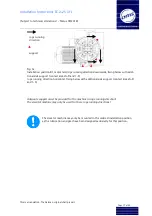
3.1.3
Mount and adjust the safety device to prevent rope jumping
Elevator machines must be fitted with safety devices to prevent rope jumping.
After rope installation, the safety devices to prevent rope jumping must be adjust-
ed to prevent friction and rubbing. The distance between the ropes and the safety
device to prevent the rope jumping must be max. 1 – 2 mm.
Two
safety devices to prevent rope jumping are provided
and each consists of the following
parts:
•
2 spacer tubes
•
1 bracket
•
2 hex bolts M10 x 75
•
1 safety bolt with hex nut M16
Fig. 2: Safety device to prevent rope jumping
7
3
6
1
4
6
5
2
Содержание Hypodrive EC 2-25 Lift
Страница 2: ......


