background image

9

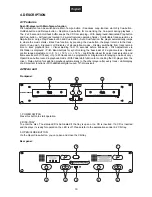
3. OPEN/CLOSE-TASTEN
Über die Open/Close-Tasten können Sie den CD-Trägereinschub öffnen und schließen. Bitte beachten Sie
die Hinweise unter 6.2 CD-Schubfach.

Rückseite:

4

5

6

7

8

8

6

AUDIO OUT

AUDIO OUT

R

R

L

L

115 V

230 V

VOLTAGE SELECTOR

DIGITAL OUT

CONNECT TO

REMOTE CONTROL 2

CONNECT TO

REMOTE CONTROL 1

2

1

DIGITAL OUT

AC INPUT

115/230 V, 50/60 Hz

4. NETZANSCHLUSS

5. SPANNUNGSWAHLSCHALTER
Achten Sie darauf, dass die richtige Spannung eingestellt ist.

6. AUDIO OUT-BUCHSEN
An diese Buchsen wird das Musiksignal in analoger Form ausgegeben. Zum Anschluss an Ihr Mischpult.

7. DIGITAL OUT-BUCHSE
An diese Buchse wird das Musiksignal in digitaler Form ausgegeben. Z. B. zum Anschluss an eine digitale
Endstufe.

8. FERNBEDIENUNGSANSCHLÜSSE
Zum Anschluss an die Steuereinheit.

4.3 Steuereinheit

Um diese Bedienunganleitung möglichst übersichtlich gestalten zu können, beschränkt sich die
Beschreibung der Steuereinheit nur auf einen CD-Player.

Vorderseite:

1

2

3

4

5

6

7

8

9

11

12

13

14

15

16

17

10

3

4

5

6

7

8

9

11

12

13

14

15

16

10

18

18

_

_

_

_

SEAMLESS LOOP

SEAMLESS LOOP

LOOP IN/FLY CUE

LOOP IN/FLY CUE

PGM

PGM

SGL

SGL

TIME

TIME

LOOP OUT/EXIT

LOOP OUT/EXIT

RELOOP

RELOOP

LOOP

ON

LOOP

ON

OPEN/CLOSE

OPEN/CLOSE

1

2

PITCH

PITCH

8% 12% 16%

8% 12% 16%

8% 12% 16%

8% 12% 16%

RELAY

TRACK

TRACK

MAIN TEMPO

MAIN TEMPO

PITCH BEND

PITCH BEND

REV-

REV-

FWD+

FWD+

SHUTTLE/SCAN

SHUTTLE/SCAN

JOG/SEARCH

JOG/SEARCH

0 %

0 %

PITCH

PITCH

TRACK                          M                           S                           F

TRACK                          M                           S                           F

CDP-500

DUAL CD-PLAYER

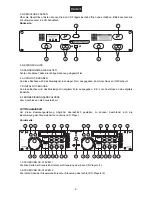
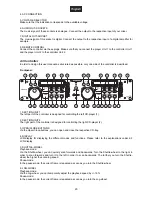
1. STEUERUNG CD-PLAYER 1
Die linke Seite der Steuereinheit dient zur Steuerung des linken CD-Players (1).

2. STEUERUNG CD-PLAYER 2
Die rechte Seite der Steuereinheit dient zur Steuerung des rechten CD-Players (2).

Содержание CDP-500

Страница 1: ... REV FWD FWD SHUTTLE SCAN SHUTTLE SCAN JOG SEARCH JOG SEARCH 0 0 PITCH PITCH TRACK M S F TRACK M S F CDP 500 DUAL CD PLAYER OPEN CLOSE 1 2 FADER CUE START PLAYER 2 PLAYER 1 HAVE FUN 1 BIT 8 TIMES OVERSAMPLING D A CONVERTER COMPACT DISC PLAYER 1 BIT 8 TIMES OVERSAMPLING D A CONVERTER COMPACT DISC PLAYER CDP 500 COPYRIGHT Nachdruck verboten All rights reserved Réproduction interdite Prohibida toda r...

Страница 2: ... LOOP OUT EXIT LOOP OUT EXIT RELOOP RELOOP LOOP ON LOOP ON OPEN CLOSE OPEN CLOSE 1 2 PITCH PITCH 8 12 16 8 12 16 8 12 16 8 12 16 RELAY TRACK TRACK MAIN TEMPO MAIN TEMPO PITCH BEND PITCH BEND REV REV FWD FWD SHUTTLE SCAN SHUTTLE SCAN JOG SEARCH JOG SEARCH 0 0 PITCH PITCH TRACK M S F TRACK M S F CDP 500 DUAL CD PLAYER 19 19 20 20 CONNECT TO MAIN UNIT 1 1 FADER FADER CUE START CUE START CONTROL 1 CON...

Страница 3: ...HAVE FUN 1 BIT 8 TIMES OVERSAMPLING D A CONVERTER COMPACT DISC PLAYER 1 BIT 8 TIMES OVERSAMPLING D A CONVERTER COMPACT DISC PLAYER CDP 500 4 5 6 7 8 8 6 AUDIO OUT AUDIO OUT R R L L 115 V 230 V VOLTAGE SELECTOR DIGITAL OUT CONNECT TO REMOTE CONTROL 2 CONNECT TO REMOTE CONTROL 1 2 1 DIGITAL OUT AC INPUT 115 230 V 50 60 Hz ...

Страница 4: ...op Funktion 14 6 10 Relay Betrieb 14 6 11 Faderstart 14 6 12 Ende der Benutzung 15 7 VORSICHTSMASSNAHMEN 15 8 REINIGUNG UND WARTUNG 16 9 TECHNISCHE DATEN 16 1 INTRODUCTION 17 2 SAFETY INSTRUCTIONS 17 3 OPERATING DETERMINATIONS 18 4 DESCRIPTION 19 4 1 Features 19 4 2 Main unit 19 4 3 Controller 20 5 INSTALLATION 22 6 OPERATION 23 6 1 Setup 23 6 2 CD tray 23 6 3 LCD display 23 6 4 Play Pause 23 6 5 ...

Страница 5: ... Features 40 4 2 Unidad principal 40 4 3 Controlador 41 5 INSTALACIÓN 43 6 MANEJO 44 6 1 Puesta en marcha 44 6 2 Bandeja del CD 44 6 3 Pantalla LCD 44 6 4 Lectura Pausa 44 6 5 Selección de una canción mediante los botones Track 44 6 6 Sincronización de la velocidad de lectura 45 6 7 Programación 45 6 8 Escucha 45 6 9 Memorizar una secuencia función Loop 45 6 10 Operación Relay 46 6 11 Faderstart 4...

Страница 6: ...n Inbetriebnahme ob kein offensichtlicher Transportschaden vorliegt Sollten Sie Schäden an der Netzleitung oder am Gehäuse entdecken nehmen Sie das Gerät nicht in Betrieb und setzen sich bitte mit Ihrem Fachhändler in Verbindung 2 SICHERHEITSHINWEISE ACHTUNG Seien Sie besonders vorsichtig beim Umgang mit gefährlicher Netzspannung Bei die ser Spannung können Sie einen lebensgefährlichen elektrische...

Страница 7: ...nigung vom Netz trennen Fassen Sie dazu den Netzstecker an der Griffläche an und ziehen Sie niemals an der Netzleitung ACHTUNG Endstufen immer zuletzt einschalten und zuerst ausschalten Beachten Sie bitte dass Schäden die durch manuelle Veränderungen an diesem Gerät verursacht werden nicht unter den Garantieanspruch fallen Kinder und Laien vom Gerät fern halten ACHTUNG Zu hohe Lautstärken können d...

Страница 8: ...r Player kehrt durch Drücken der Cue Taste zum Liedanfang bzw Cue Punkt zurück Übersichtliche LCD Displays aller Betriebszustände Displays umschaltbar von Titelrestspielzeit Remain auf Titelabspielzeit Elapsed Visuelle Warnung ab 15 Sekunden vor Titelende Geschwindigkeitsänderung über den Pitchfader wird im Display angezeigt Pitch Bend Tasten zur Synchronisation der Basstakte bei 2 Signalquellen B...

Страница 9: ...SCHLÜSSE Zum Anschluss an die Steuereinheit 4 3 Steuereinheit Um diese Bedienunganleitung möglichst übersichtlich gestalten zu können beschränkt sich die Beschreibung der Steuereinheit nur auf einen CD Player Vorderseite 1 2 3 4 5 6 7 8 9 11 12 13 14 15 16 17 10 3 4 5 6 7 8 9 11 12 13 14 15 16 10 18 18 _ _ _ _ SEAMLESS LOOP SEAMLESS LOOP LOOP IN FLY CUE LOOP IN FLY CUE PGM PGM SGL SGL TIME TIME LO...

Страница 10: ...6 5 Titelauswahl über die Track Tasten 8 CUE TASTE Pausemodus Im Pausemodus kann durch Gedrückthalten der Cue Taste vorgehört werden Sobald Sie die Cue Taste wieder loslassen kehrt der CD Player zum Liedanfang bzw zum Cue Punkt zurück Wiedergabemodus Wenn Sie die Cue Taste während der Wiedergabe drücken kehrt der CD Player zum Liedanfang bzw zum Cue Punkt zurück und befindet sich im Pausemodus Bit...

Страница 11: ... CUE START CONTROL 1 CONTROL 2 CONNECT TO MAIN UNIT 2 2 19 ANSCHLUSSBUCHSEN Schließen Sie hier die Abspieleinheit an 20 CONTROL BUCHSEN Über die Control Buchse lässt sich der jeweilige CD Player fernsteuern Wenn Sie ein Mischpult mit Faderstart Funktion verwenden schließen Sie den Player dort an die Control Out Buchse an Bitte beachten Sie dass an diese Buchsen niemals Spannung angelegt werden dar...

Страница 12: ...ießen Sie das Schubfach nicht durch Zudrücken dies könnte den Mechanismus beschädigen Drücken Sie erneut die Open Close Taste um das Schubfach zu schließen Die Status LED blinkt bis das Fach geschlossen ist und erlischt dann Der CD Player ist nun betriebsbereit 6 3 LCD Display Wurde die CD nicht korrekt eingelegt erscheint auf dem Display ERR oder NO DISC Wurde die CD korrekt eingelegt wird für ku...

Страница 13: ...er weiteren Signalquelle synchronisieren Möglichkeit 1 Stellen Sie den CD Player auf Wiedergabemodus Benutzen Sie den Kopfhörer zum Vorhören Synchronisieren Sie die Abspielgeschwindigkeit über den Pitchfader des CD Players Pitch Taste muss gedrückt sein Möglichkeit 2 Wenn sich die zwei Signalquellen nur im Basstakt unterscheiden können Sie die Synchronisation über die Pitch Bend Tasten vornehmen S...

Страница 14: ...rd Möglichkeit 2 Der Player befindet sich im Wiedergabemodus Drücken Sie die Play Pause Taste und das Gerät befindet sich im Pausemodus Wählen Sie den Punkt A Anfangspunkt einer Sequenz über das Jog Shuttle Rad aus Auf der Anzeige erscheint der gewählte A Punkt z B 3 42 22 Drücken Sie die In Fly Cue Taste und der gewählte A Punkt wird gespeichert Wählen Sie den Punkt B Endpunkt der Sequenz über da...

Страница 15: ...n Sie das Schubfach mit der Open Close Taste 7 VORSICHTSMASSNAHMEN Dieses Gerät kann nicht mit konventionellen Hifi CD Playern verglichen werden auch wenn sich die Geräte in ihrem Aussehen ähneln Dieses Gerät wurde besonders stabil gebaut um den harten Anforderungen beim Transport und bei Mobildiskotheken gewachsen sein zu können Vibrationen durch starke Bassfrequenzen können zu einem Springen der...

Страница 16: ...ändler erhältlich ist Sollten Sie noch weitere Fragen haben steht Ihnen Ihr Fachhändler jederzeit gerne zur Verfügung 9 TECHNISCHE DATEN Spannungsversorgung 115 230 V AC 50 60 Hz Gesamtanschlusswert 25 W Typ Doppel Compact Disc Player Geeignete CDs Standard CDs 8 and 12 cm Quantisierung D A Wandler 1 Bit Samplingfrequenz 44 1 kHz Frame Genauigkeit 1 75 sec Programmspeicher Bis zu 20 Titel Geschwin...

Страница 17: ...t damages Should you notice any damages on the A C connection cable or on the casing do not take the device into operation and immediately consult your local dealer 2 SAFETY INSTRUCTIONS CAUTION Be careful with your operations With a dangerous voltage you can suffer a dangerous electric shock when touching the wires This device has left our premises in absolutely perfect condition In order to main...

Страница 18: ...ubject to warranty Keep away children and amateurs CAUTION High volumes can cause hearing damage There are no serviceable parts inside the device Maintenance and service operations are only to be carried out by authorized dealers 3 OPERATING DETERMINATIONS This device is a professional CD player for playing CDs This product is allowed to be operated with an alternating current of 115 230 V 50 60 H...

Страница 19: ... 12 or 16 Jog Shuttle wheel for quick track selection and framewise search 1 75 sec Up to 20 tracks can be programmed Single mode for playing one track only Open Close button locked in playback mode With Faderstart function for controlling the CD player from the mixer Relay button for switching playback automatically to the other player after every track LED display of all important functions With...

Страница 20: ...12 16 RELAY TRACK TRACK MAIN TEMPO MAIN TEMPO PITCH BEND PITCH BEND REV REV FWD FWD SHUTTLE SCAN SHUTTLE SCAN JOG SEARCH JOG SEARCH 0 0 PITCH PITCH TRACK M S F TRACK M S F CDP 500 DUAL CD PLAYER 1 SECTION UNIT 1 The left part of the controller is designed for controlling the left CD player 1 2 SECTION UNIT 2 The right part of the controller is designed for controlling the right CD player 2 3 OPEN ...

Страница 21: ...yback speed temporarily by 16 Furthermore you can synchronize the bass beat of two different signal sources with these buttons Please refer to 6 6 Synchronisation of the playback speed 12 PITCH SELECT BUTTON You can select the speed adjusting range between 8 12 or 16 by pressing and holding the Pitch Select button and selecting the desired range 13 PITCHFADER You can adjust the desired speed with ...

Страница 22: ...e you can open the frontpanel and the rear panel The rack should be provided with a cooling fan When mounting the CD player into the rack please make sure that there is enough space around the device so that the heated air can be passed on Steady overheating will damage your device You can fix the CD player with four screws M6 in the rack Be aware that fastening the device with four screws on the ...

Страница 23: ...lashing The indication CONTINU means that the CD player is in normal playback mode By pressing the Single button the CD player is put into Single mode and the display shows SINGLE The indication 0 0 means that the playback speed has not been changed If you adjust the playback speed via the Pitchfader Pitch button has to be pressed the respective percentage is indicated in the display 6 4 Play Paus...

Страница 24: ...peatedly and the display will show the order of programmed tracks You can edit every program number and choose a different track Read a program After entering your last track press the Program button and the last track will be memorized Press the Play Pause button and the program will be played back During the program playback the Program LED is shining You can enter the Program mode at any time i...

Страница 25: ...ective channel of the mixer and goes into Pause mode and returns to the Cue point after activating the channel again Prerequisites for the Faderstart operation The mixer has to be connected via a 3 5 mm mono jack with the CD player For starting the playback the jack s positive pin tip is to be connected with the audio mass via a short impulse For pausing the playback the jack s negative pin sleeve...

Страница 26: ...no servicable parts inside the device Maintenance and service operations are only to be carried out by authorized dealers Should you need any spare parts please use genuine parts If the power supply cable of this device becomes damaged it has to be replaced by a special power supply cable available at your dealer Should you have further questions please contact your dealer 9 TECHNICAL SPECIFICATIO...

Страница 27: ...OMNITRONIC CDP 500 de son emballage Avant tout assurez vous que l appareil n a pas subi de dommages lors de son transport Si tel était le cas contactez immédiatement votre revendeur 2 INSTRUCTIONS DE SECURITE ATTENTION Soyez prudent lors de manipulations électriques avec une tension dangereuse vous êtes soumis à des risques d électrocution Cet appareil a quitté les ateliers dans un état irréprocha...

Страница 28: ...eil du secteur lorsque vous ne l utilisez pas et chaque fois avant de le nettoyer Dans ce but utilisez les surfaces de maintien sur la fiche et ne tirez jamais sur le câble secteur ATTENTION Allumez toujours l amplificateur en dèrnier lieu et éteignez le en premier Tenez compte du fait que tout dommage résultant d une modification manuelle sur cet appareil n est pas couvert par la garantie Tenir l...

Страница 29: ...les conditions d opération Affichage commutable du temps restant de la plage Remain à temps écoulé de la plage Elapsed Indication visuelle à partir de 15 sécondes avant la fin de la plage Changement de vitesse grâce au Pitchfader indiqué à l affichage Touches Pitch Bend pour synchroniser les rythmes des graves de 2 sources de signal Gamme de vitesse de lecture ajustable à 8 12 ou 16 Disque Jog Shu...

Страница 30: ...stinées a la liaison avec le bloc de commande dit 4 3 Bloc de commande Pour faire ce mode d emploi le plus facile la description est limitée à un lecteur seulement Face avant 1 2 3 4 5 6 7 8 9 11 12 13 14 15 16 17 10 3 4 5 6 7 8 9 11 12 13 14 15 16 10 18 18 _ _ _ _ SEAMLESS LOOP SEAMLESS LOOP LOOP IN FLY CUE LOOP IN FLY CUE PGM PGM SGL SGL TIME TIME LOOP OUT EXIT LOOP OUT EXIT RELOOP RELOOP LOOP O...

Страница 31: ... lecteur retourne au debut de la plage ou au point Cue Mode de lecture Quand vous pressez la touche Cue durant la lecture le lecteur retourne au debut de la plage ou au point Cue et se place en mode Pause Veuillez faire attention aux instructions sous 6 8 Cueing 9 TOUCHE PLAY PAUSE Grâce à la touche Play Pause vous pouvez commencer et arrêter la lecture Veuillez faire attention aux instructions so...

Страница 32: ... le CD Player réspectif Si vous utilisez un mixer avec fonction de Faderstart connecter le CD Player à la douille Control Out Veuillez faire attention que ces douilles ne jamais doivent être connectées avec une voltage Veuillez faire attention aux instructions sous 6 11 Faderstart 5 INSTALLATION Installez le lecteur CD sur une surface plane ou dans votre rack Assurez vous que l angle d inclinaison...

Страница 33: ... musique commence Au dessus de TRACK s affichera le nombre de la plage Au dessus de M MIN S SEC et F FRAME s affichera le temps restant de la plage Remain Grâce à la touche Time l afficheur peut être commuté du temps restant de la plage Remain à temps écoulé de la plage Elapsed Au dessus de l indication du temps se trouvent dix barres indiquer visuellement le fin de la plage Le moins le temps rest...

Страница 34: ...touches Track pour amener sur l afficheur le n de la plage désirée pour n du programme 1 Presser sur la touche Program pour mémoriser le n de la plage Agir à nouveau sur l une des touches Track pour selectionner la plage pour le n du programme suivante Continuer ainsi de suite jusqu à fin de votre programmation le maximum de plages memorisable etant 20 Verification d une programmation Vous avez la...

Страница 35: ...oncion Faderstart foncionne encore une fois 6 11 Faderstart Le CDP 500 vous offre la possibilité de contrôler le lecteur réspectif directement du mixer Assurez vous que vous avez connectée la douille Contrôle avec la douille réspective du mixer Aditionnellement les douilles Audio Out doivent être connectées avec les douilles d entrée Line de votre mixer Veuillez faire attention que la fonction Fad...

Страница 36: ...iche Le lecteur ne veut pas démarrer Le disque est mal positionné ou sale Repositonner le disque avec le label sur le dessus ou le nettoyer avec un chiffon doux sec Pas de son Revoir les connexions et les reglages mixer et ampli Eventuellement remplacer les connexions En mode programmation pas de lecture Le disque est en mode de lecture normale Presser la touche PLAY PAUSE et refaire la programmat...

Страница 37: ...2 16 Affichage Temps restant de la plage et temps écoulé de la plage Distorsion 0 02 Rapport s n 75 dB Séparation de canaux 70 dB Bande de fréquences 20 20 000 Hz 1 dB Sortie audio asymmétrique via cinch Niveau de sortie 1 Vrms Sortie digitale asymmétrique via cinch Dimensions 482 x 88 8 x 251 mm lecteur CD 482 x 88 8 x 60 mm unité de contrôle Dimensions 19 Poids 5 kg lecteur CD 1 9 kg unité de co...

Страница 38: ...GURIDAD Tenga cuidado cuando opere con este aparato Con un voltaje peligroso puede sufrir una peligrosa descarga eléctrica al tocar los cables PRECAUCIÓN Este aparato ha salido de nuestro establecimiento en absolutas perfectas condiciones Para mantener esta condición y asegurar un manejo seguro es absolutamente necesario para el usuario seguir las instrucciones de seguridad y notas de advertencia ...

Страница 39: ...as a garantía Manténgalo lejos del alcance de los niños y de personal no profesional ATENCIÓN Un volumen demasiado alto puede dañar el oído No hay piezas que requieran servicio dentro del aparato Las operaciones de mantenimiento y servicio deben ser llavadas a cabo únicamente por concesionarios autorizados 3 INSTRUCCIONES DE MANEJO Este aparato es un CD player profesional para jugar CDs El aparato...

Страница 40: ...ia adelante y hacia atrás y para búsqueda exacta de frame 1 75 sec Programación hasta 20 títulos posible Modo Single para jugar un título sólo Tecla Open Close bloqueada mientras suena una canción Con función Faderstart para controlar el CD player mediante el mixer Tecla Relay para cambiar automáticamente al otro CD player después de cada canción Pantalla LED con todas las funciones importantes Co...

Страница 41: ...12 16 8 12 16 8 12 16 8 12 16 RELAY TRACK TRACK MAIN TEMPO MAIN TEMPO PITCH BEND PITCH BEND REV REV FWD FWD SHUTTLE SCAN SHUTTLE SCAN JOG SEARCH JOG SEARCH 0 0 PITCH PITCH TRACK M S F TRACK M S F CDP 500 DUAL CD PLAYER 1 SECCIÓN UNIDAD 1 La parte izquierda del controlador está diseñada para controlar el CD Player izquierdo 1 2 SECCIÓN UNIDAD 2 La parte derecha del controlador está diseñada para co...

Страница 42: ...elocidad de lectura temporalmente hasta 16 Además puede sincronizar el ritmo de los bajos de dos fuentes de señal diferentes con estos botones Por favor dirijase a las explicaciones del apartado 6 6 Sincronización de la velocidad de lectura 12 BOTÓN PITCH SELECT Vd puede seleccionar el rango del ajuste de la velocidad de lectura entre 8 12 o 16 con este botón Pulse y mantiene el botón Pitch Select...

Страница 43: ...donde usted pueda abrir el panel frontal y el panel trasero El rack debe disponer de un ventilador para la refrigeración Cuando monte el CD player en el rack por favor asegúrese de que hay suficiente espacio alrededor del aparato para que pueda circular el aire caliente El sobrecalentamiento continuo puede dañar su aparato Puede fijar el CD player en el rack con cuatro tornillos M6 Tenga en cuenta...

Страница 44: ...mente el tiempo restante Cuanto menos tiempo queda menos barras aparecen en la pantalla 15 segundos ante del final de la canción las barras de la pantalla comienzan a parpadear La indicación CONTINU indica que el CD player está en el modo de lectura normal Al pulsar el botón Single el CD player se coloca en el modo Single y la pantalla muestra SINGLE La indicación 0 0 significa que la velocidad de...

Страница 45: ... los botones Track para elegir una canción para el próximo número del programa Siga así hasta que no tenga más canciones para programar o haya llegado al máximo de canciones programables 20 Comprobar el programa Puede interrumpir el procedimiento de programación para el programa presionando el botón de programa una vez más después de que haya dado entrada a una canción Presione el botón de program...

Страница 46: ...off y la función Faderstart funciona otra vez 6 11 Faderstart El CDP 500 ofrece la posibilidad de controlar el CD Player respectivo directamente de su mixer Asegúrese de que el casquillo Control está conectado con el casquillo respectivo del mixer Además los casquillos Audio Out deben ser conectados con los casquillos de entrada Line del mixer Note que la función Faderstart sólo funciona con mixer...

Страница 47: ...stá mal colocado o sucio Volver a colocar el CD con la etiqueta hacia arriba o limpiar con un paño limpio seco y suave No hay sonido Compruebe las conexiones del mezclador y del amplificador Posiblemente cambiar las conexiones No reproduce el programa El lector está en el modo de lectura normal Pulse el botón Play Pause y vuelva a programar Ruido de fondo Conexiones inadecuadoas del mezclador o am...

Страница 48: ...alla Tiempo restante y tiempo transcurrido Distorsion 0 02 Relación señal ruido 75 dB Separación de los canales 70 dB Repuesta de frecuencias 20 20 000 Hz 1 dB Salida de audio Asimétrico mediante casquillos cinch Potencia de salida 1 Vrms Salida digital Asimétrico mediante casquillos cinch Dimensiones 482 x 88 8 x 251 mm CD player 482 x 88 8 x 60 mm controlador Dimensiones de 19 Peso 5 kg CD playe...

Отзывы: