background image

3

- -

Notes:

•  You can choose between 12 and 24 hour display by pressing the 

DISP

/

MENU

 button while setting 

the hour and minute.

•  You can change the order of the date indication by pressing the 

DISP

/

MENU

 button while you 

are setting the year, month, or day.

h

 Power Supply

h

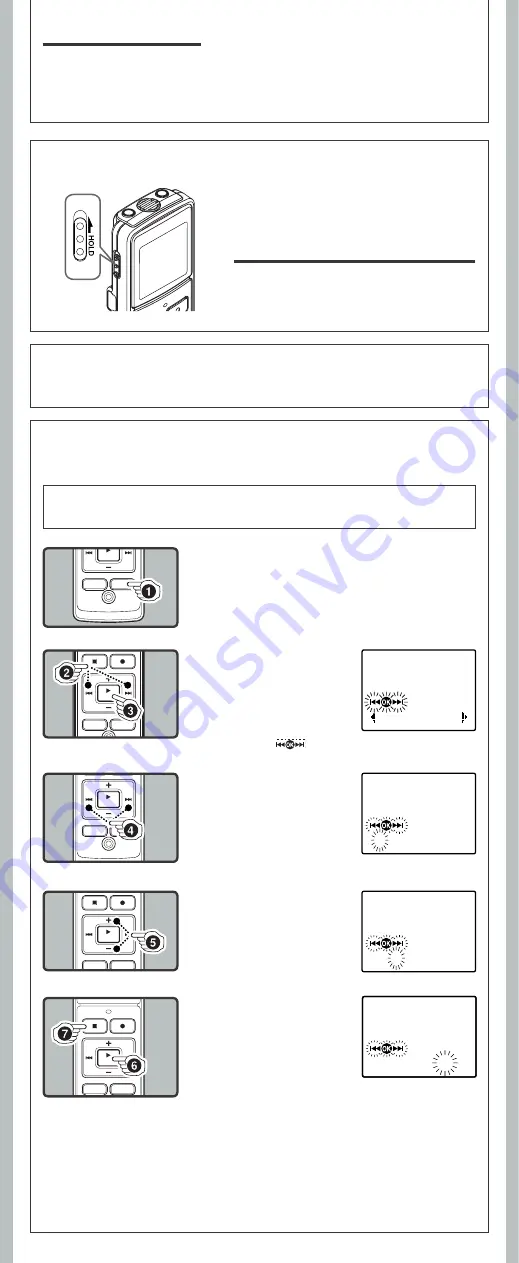
Hold

Setting the 

HOLD

 switch to the direction of the arrow holds the current status, and all button 

operations are disabled. Remember to release the 

HOLD

 switch to use the recorder.

4

 Press  the 

9

 or 

0


button to select the item 
to set.

•  Select the item from “

Month

”, 

Day

”, “

Year

”, “

Hour

” and 

M inu te

” with a f lashing 

point.

Replacing the Batteries:

When [

N

] appears on the display, replace the batteries as soon as possible. Size-AAA alkaline 

batteries are recommended. When the batteries are depleted, [

O

] appears on the display, and 

the recor-der shuts off.
•  To replace the battery, make sure that you set the 

HOLD

 switch to the opposite direction of the 

arrow before replacing.

Power on

: Slide the 

HOLD

 switch in the direction 

opposite that indicated by the arrow.

Power off

: Slide the 

HOLD

  switch  in  the 

direction indicated by the arrow while the 
recorder is not in operation.

Standby Mode and Display Shut Off:

If the recorder is stopped for 5 minutes or longer during 
recording or playing, it goes into Standby (power-save) 
mode, and the display shuts off. To exit Standby mode 
and turn on the display, press any button.

2

 Press the 

9

 or 

0


button to select
[

Sub Menu

].

3

 Press  the 

PLAY

/

OK

  (

`

button.

• [

Time & Date

] appears on the 

display, and [

] flashes.

5

 Press the 

+

 or – button to 

set.

•  Follow the same steps by press-

ing the 

9

 or 

0

 button to 

elect the next item, and press 
the + or – button to set.

6

 Press  the 

PLAY

/

OK

 (

`

button to complete the 
setup screen.

•  The clock will start from the set 

date and time.

• Press 

the 

PLAY

/

OK

 (

`

) button 

according to the time signal.

7

 Press  the 

STOP

 (

4

) button to close the menu 

mode.

•  This completes the time and date setup procedure.

1

 Press and hold the 

DISP

/

MENU 

button for 1 

second or longer to go to the main menu.

h

 Setting Time and Date [

Time & Date

]

If you have set the time and date, information as to when a sound file was recorded is stored 
automatically with that file.

When you install batteries for the first time or each time you replace the batteries, the 
“Month” indication will flash. In such a case, be sure to set the time and date by following 
steps 

4

 through 

6

 described below.

Time & Date

1. 1‘08 12:00 AM

1. 1‘08 12:00 AM

7.25‘08 3:00 PM

Содержание VN-6500PC

Страница 1: ...mes and model numbers The utmost care has been taken to ensure the integrity of the contents of this document In the unlikely event that a questionable item error or omission is found please contact our Customer Support Center Any liability for passive damages or damage of any kind occurred due to data loss incurred by a defect of the product repair performed by the third party other than Olympus ...

Страница 2: ...w playback indicator Segment repeat playback indicator AnoptionalNi MHRechargeableBattery BR401 from Olympus can be used for the recorder Getting Started hIdentification of Parts 1 Built in Microphone 2 MIC Microphone jack 3 HOLD switch 4 USB terminal 5 STOP 4 button 6 PLAY OK button 7 0 Rewind button 8 Battery cover 9 FOLDER INDEX button 0 EAR Earphone jack Display LCD panel Record play indicator...

Страница 3: ...ecorder is not in operation Standby Mode and Display Shut Off If the recorder is stopped for 5 minutes or longer during recording or playing it goes into Standby power save mode and the display shuts off To exit Standby mode and turn on the display press any button 2 Press the 9 or 0 button to select Sub Menu 3 Press the PLAY OK button Time Date appears on the display and flashes 5 Pressthe or but...

Страница 4: ...cording time and Recording level meter While in stop mode or playback mode Press the DISP MENU button Each press switches the display in the order of Playback elapsed time Remaining playback time Date of recording and Time at recording Current folder hNotes on the Folders The recorder provides five folders F G H I and To change the folder selection press the FOLDER INDEX button while the recorder ...

Страница 5: ...e being played back hCanceling Playback hForwarding and Rewinding Rewind While the recorder is during playback mode press and hold the 0 button When you release the 0 button the recorder will resume normal playback Notes The recorder pauses when it reaches to the end of the file during fast forwarding or fast rewinding Pressing and holding it continues fast forwarding or fast rewinding If there is...

Страница 6: ...t a Time hHow to begin segment repeat playback For VN 6500PC only 1 While the recorder is during playback mode press the REC s but ton at the point you want to start segment repeat playback Repeat End flashes on the display 2 Press the REC s but tonagainattheposition where you want to end segment repeat play back The recorder repeatedly plays back the segment until the segment repeat playback is c...

Страница 7: ... menu screen Sub menu screen Rec Mode VCVA Mic Sense Lock LowCut Language LED Contrast Beep Format Main Menu System Time Date Sub Menu Voice For VN 6500PC only The menu item with mark can be set even during recording REC REC REC REC The menu item with mark can be set even during playback Step 1 Put the recorder in menu mode Step 2 Select the menu item in the main menu or sub menu screen Step 4 Com...

Страница 8: ...reached a preset volume the built in Variable Control Voice Actuator VCVA starts recording automatically and stops it when the volume drops In Menu mode selection VCVA Off VCVA On The recording mode can be chosen from HQ high quality sound recording SP standard recording and LP long term recording In Menu mode selection Mode HQ Mode SP Mode LP VN 6500PC VN 5500PC Approx 35hours 20 minutes Approx 6...

Страница 9: ...k Erase lock indicator Locking a file keeps important data from being accidentally erased Locked files are not erased when you choose to erase all files from a folder In Menu mode selection Lock Off Lock On hSystem Sounds Beep Informs a button operation or a wrong operation of the recorder by sound System sounds may be turned off In Menu mode selection Beep Off Beep On Note The record play indicat...

Страница 10: ...o select the index mark to delete 3 Press the ERASE s button Notes Index marks cannot be placed on files created on machines other than Olympus IC recorders but temp marks can be placed instead to temporarily remember desired locations Temp marks are temporary markings so if you move to another file or connect the recorder to a computer they will be automatically erased Up to 16 index and temp mar...

Страница 11: ...dows Operating System Microsoft Windows 2000 XP Vista Standard Installation Compatible PC s Windows PC s equipped with more than one free USB port Macintosh Operating System Mac OS X 10 2 8 10 5 Standard Installation Compatible PC s Apple Macintosh series equipped with more than one free USB port The support service will not cover if your PC has been updated from Windows 95 or 98 to Windows 2000 X...

Страница 12: ...er For details please see Formatting the Recorder Format Before deleting the data please make a backup file of the PDF data of the manual Battery life is measured by Olympus It varies greatly according to the type of batteries used and the conditions of use Your recorded contents are for your personal use or pleasure only It is prohibited to record copyrighted material without permission of the co...

Отзывы: