54
IX81
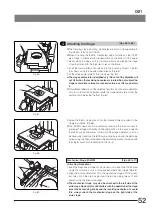
Fig. 74
Fig. 75
Fig. 76
5
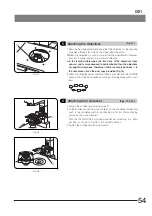
Attaching the Objectives
(Fig. 74)
1. Remove the stage center plate and attach the objectives to the revolving
nosepiece through the hole on the stage left by the plate.
}Attach the objectives in such a manner that the magnification increases
from low to higher powers in a clockwise direction.
# In the inverted microscope, the front lens of the objectives faces
upward, and is more exposed to contamination than the objectives
of upright microscopes. Therefore, if there are empty positions @ in
the nosepiece, attach the dust caps provided. (Fig. 74)
2. Attach the objective power indication stickers, provided with the U-HSTR2
hand switch, to the hand switch according to the objective position num-
bers.
6
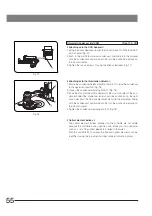
Attaching the Condenser
(Figs. 75 & 76)
1. Loosen the condenser clamping screw
1
.
2. Fit the condenser into the mount dovetail on the condenser holder, and
push in the condenser until its positioning pin fits into the positioning
groove on the mount dovetail.
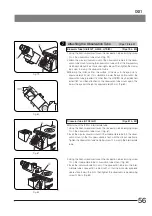
With the IX2-LWUCDA2 motorized condenser, attaching in a tilted
position as shown in Fig. 76 is the correct direction.
3. Tighten the condenser clamping screw
1
.
1
1
1

