background image

BIOS Utilities

5 - 12 Security Menu

5

Set User Password (Security Menu)

You can set a password for user mode access to the 

PhoenixBIOS Setup


Util-

ity

. This will not affect access to the computer OS, (only the 

Setup

 utility) un-

less you choose to set a 

Password on Boot

 (see below). Many menu items in

the 

PhoenixBIOS Setup


Utility

 cannot be modified in user mode. You can

only set the user password after you have set the supervisor password.

Password on boot: (Security Menu)

Specify whether or not a password should be entered to boot the computer
(

you may only set a password on boot if a supervisor password is en-

abled

). If “

Enabled

” is selected, only users who enter a correct password can

boot the system (

see the warning in the sidebar

). The default setting is “

Dis-

abled

”. 

Note

: To clear existing passwords press 

Enter

 and type the existing password,

then press 

Enter

 for the new password (without typing any password entry)

and 

Enter

 again to confirm the password clearance.

Password Warning

If you set a boot pass-
word (Password on boot
is “Enabled“), 

NEVER

forget your password. 

The consequences of this
could be serious. If you
cannot remember your
boot password you must
contact your vendor and
you may lose all of the in-
formation on your hard
disk.

Содержание Olibook P1500

Страница 1: ...USER GUIDE...

Страница 2: ...may be used in this document to refer to either the entities claiming the marks and names or their products Olivetti disclaims any proprietary interest in trademarks and trade names other than its ow...

Страница 3: ...ept by the user for backup purposes Brand and product names mentioned in this publication may or may not be copyrights and or registered trademarks of their respective companies They are mentioned for...

Страница 4: ...ghtning 3 Do not use the telephone to report a gas leak in the vicinity of the leak 4 Use only the power cord and batteries indicated in this manual Do not dispose of batteries in a fire They may expl...

Страница 5: ...ind of heating ele ment This is an electrical appliance If water or any other liquid gets into it the computer could be badly damaged Do not expose the computer to any shock or vibration Do not place...

Страница 6: ...nd don t forget to save your work Remember to periodically save your data as data may be lost if the battery is depleted 5 Take care when using peripheral devices Do not turn off the power until you p...

Страница 7: ...rician install one When you want to unplug the power cord be sure to disconnect it by the plug head not by its wire Make sure the socket and any extension cord s you use can support the total cur rent...

Страница 8: ...e or qualified service personnel Keep children away from and promptly dispose of a damaged battery Always dispose of batteries carefully Batteries may explode or leak if exposed to fire or improperly...

Страница 9: ...hen refer servicing to qualified service personnel under any of the following conditions When the power cord or AC DC adapter is damaged or frayed If the computer has been exposed to rain or other liq...

Страница 10: ...the notebook in its carrying bag and secure it with the bag s straps 7 If you re taking any peripherals e g a printer mouse or digital camera pack them and those devices adapters and or cables 8 Anti...

Страница 11: ...ta Pass your computer and disks around the devices Ask security officials to hand inspect them you may be asked to turn it on Note Some airports also scan luggage with these devices Fly safely Most ai...

Страница 12: ...s wrists and hands in a relaxed position Your knees should be slightly higher than your hips Place your feet flat on the floor or on a footrest if necessary Use a chair with a back and adjust it to su...

Страница 13: ...rectly in front of you at a comfortable viewing distance Adjust the display viewing angle to find the best position LCD Screen Care To prevent image persistence on LCD monitors caused by the continuou...

Страница 14: ...XII Preface...

Страница 15: ...d 1 12 Function Keys Visual Indicators 1 13 System Map Front Left Right Rear Views 1 14 System Map Bottom View 1 15 Video Features 1 16 Power Options 1 17 Windows Update 1 18 Features Components Overv...

Страница 16: ...ns 5 5 Main Menu 5 6 Advanced Menu 5 8 Security Menu 5 11 Boot Menu 5 13 Exit Menu 5 14 Upgrading The Computer Overview 6 1 When Not to Upgrade 6 2 Removing the Battery 6 3 Upgrading the Hard Disk Dri...

Страница 17: ...splays B 5 To Enable a Display Setting Mode B 6 Specifications Processor C 2 Core Logic C 2 LCD C 2 Video Adapter C 2 Memory C 2 Security C 2 BIOS C 3 Storage C 3 Audio C 3 Keyboard C 3 Pointing Devic...

Страница 18: ...XVI Preface...

Страница 19: ...he right to revise this publication or to change its contents without notice All computer s features have already been setup If you are planning to re configure or re install portions of the system re...

Страница 20: ...ed power supply If you are unsure of your local power specifications consult your service representative or local power company The AC DC adapter may have either a 2 prong or a 3 prong grounded plug T...

Страница 21: ...ter has been dropped or damaged do not touch the poisonous liquid if the LCD panel bre aks If there is an unusual odor heat or smoke coming from your computer Cleaning Use a soft clean cloth to clean...

Страница 22: ...C DC adapter 5 Use one hand to raise the lid LCD to a comfortable viewing angle do not exceed 120 degrees use the other hand as illustrated in Figure 1 to support the base of the computer Note Never l...

Страница 23: ...he basis of user requirements 1 On first powering on the portable computer after a short phase with a black screen and scrolling white bar a screen appears in which you can select the nationality for...

Страница 24: ...o access Computer Resources 4 Enter the user name and password and choose an image to associate with the user account The serial code can be found on the label on the back of the notebook If you do no...

Страница 25: ...he date and time proposed so check them and press Next to continue 7 The configuration is complete Wait while the operating system saves the settings and loads Windows Vista 8 When loading is complete...

Страница 26: ...ot the computer Figure 2 BIOS Operating System Selection Main Advanced Security Boot Exit F1 Help Select Item Change Values F9 Setup Defaults Esc Exit Select Menu Enter Select Sub Menu F10 Save and Ex...

Страница 27: ...h act as an interface between the computer and a hard ware component e g a wireless network module It is very im portant that you install the drivers in the order listed in Table 4 You will be unable...

Страница 28: ...Figure 3 Front View with LCD Panel Open 1 Built In PC Camera 2 LCD 3 Speakers 4 Power Button 5 Hot Key Buttons 6 Keyboard 7 Built In Microphone 8 TouchPad Buttons 9 LED Indicators 8 TouchPad Buttons...

Страница 29: ...puter Table 3 LED Indicators Hot Key Button Function Activate the Default E Mail Browser Activate the Default Internet Program Toggle Silent Mode for power saving Icon Color Description Orange DC Powe...

Страница 30: ...Keys Numeric Keypad Function Keys NumLk ScrLk Numeric Keypad Fn Key Special Characters Some software applications allow the number keys to be used with Alt to produce special characters These special...

Страница 31: ...n Keys Visual Indicators Keys Function Visual Indicators Keys Function Visual Indicators Fn Play Pause in Audio Video Programs Fn F8 F9 Brightness Decrease Increase Fn F1 TouchPad Toggle Fn F10 PC Cam...

Страница 32: ...1 Headphone Out Jack 12 Optical Device Drive Bay 13 Emergency Eject Hole 14 RJ 11 Modem Jack 15 Security Lock Slot 16 Battery 1 2 5 4 6 3 7 6 8 Front Left Right Rear 9 10 11 16 15 14 13 6 Disc Emergen...

Страница 33: ...Battery 2 RAM CPU Bay Cover 3 Vent 4 Hard Disk Bay Cover 5 Bluetooth Module Cover 6 Speakers Overheating To prevent your computer from overheating make sure nothing blocks any vent while the computer...

Страница 34: ...n resolution under the Appearance and Personalization menu or double click Personalization Display Settings 3 Move the slider to the preferred setting in Resolution 4 Click the arrow and scroll to the...

Страница 35: ...guration options Audio Features You can configure the audio options on your computer from the Sound control panel in Windows or from the Realtek HD Audio Manager icon in the taskbar control panel righ...

Страница 36: ...tallation procedure click Cancel and follow the installation procedure as directed Windows Update After installing all the drivers make sure you enable Windows Update in order to get all the latest se...

Страница 37: ...Features Components Overview Read this chapter to learn more about the following main features and compo nents of the computer Hard Disk Drive Optical CD DVD Device 7 in 1 Card Reader ExpressCard Slo...

Страница 38: ...ble from the bottom of your computer as seen below For further details see Upgrading the Hard Disk Drive on page 6 4 Power Safety Before attempting to ac cess any of the internal components of your co...

Страница 39: ...p use just enough force for the disc to click onto the tray s spindle Gently push the CD DVD tray in until its lock clicks and you are ready to start The busy indicator will light up while data is bei...

Страница 40: ...er materials to the surface of the disc Do not store or place the CD or DVD in high temperature areas Do not use benzene thinner or other cleaners to clean the CD or DVD Do not bend the CD or DVD Do n...

Страница 41: ...e you install the Card Reader driver Note The PC adapters are usually supplied with these cards Card Reader Cover Make sure you keep the rubber cover provided in the card reader when not in use This w...

Страница 42: ...ber denotes the card width 54mm for the Express Card 54 and 34mm for the ExpressCard 34 Inserting and Removing ExpressCards Align the ExpressCard with the slot and push it in until it locks into place...

Страница 43: ...n configure the functions by double clicking the TouchPad driver icon on the taskbar You may then configure the TouchPad tapping buttons scrolling pointer motion and sensi tivity options to your prefe...

Страница 44: ...ol panel right click the taskbar icon to bring up an audio menu The volume may also be adjusted by means of the Fn F5 F6 key combination Sound Volume Adjustment The sound volume level is set using the...

Страница 45: ...er saving techniques to give the operating system OS direct control over the power and thermal states of devices and processors For example this enables the OS to set devices into low power states bas...

Страница 46: ...the AC power cord to the AC DC adapter 3 Raise the lid LCD to a comfortable viewing angle 4 Press the power button to turn On Battery The battery allows you to use your computer while you are on the...

Страница 47: ...his feature Shut Down Note that you should al ways shut your computer down by choosing the Shut Down command from the Lock Button Menu in Windows Vis ta This will help prevent hard disk or system prob...

Страница 48: ...ified time and to send the computer into Sleep after a period of inactivity Click Change plan settings and then click Change advanced power set tings to access further configuration options in Advance...

Страница 49: ...encing any reduced performance especially under DC battery power Choose High performance for maximum performance when the computer is powered from an AC power source Choose the Power saver bear in min...

Страница 50: ...ing system it will enter Sleep to save power The PC wakes from Sleep within seconds and will return you to where you last left off what was on your desktop without reopening the application s and file...

Страница 51: ...put your mobile PC into Hibernate if you will not use the computer for a period of time and will not have the chance to charge the battery Shut Down You should shut down the computer if you plan to in...

Страница 52: ...power saving state Password Protection It is recommended that you enable a password on wake up in order to protect your data However you can disable this setting from the Power Options menu by clicki...

Страница 53: ...F4 Key Combo Hibernate Off battery Press the Power Button Orange AC DC adapter Display Turned Off Green Press a Key or Move the Mouse Touchpad Closing the Lid If you have chosen to send the computer t...

Страница 54: ...set actions to be taken e g Shut down Hibernate etc and set critical and low battery levels from power plan Advanced Settings see Figure 3 1 on page 3 4 Click the battery icon in the taskbar to see th...

Страница 55: ...f the LCD display The system will decrease LCD brightness slightly to save power when it is not powered by the AC DC adapter Reduce the amount of time before the display is turned off Close wireless D...

Страница 56: ...charge a new battery see Battery FAQ on page 3 14 for instructions on how to do this Recharging the Battery with the AC DC Adapter The battery pack automatically recharges when the AC DC adapter is at...

Страница 57: ...er Discard used battery according to the manufacturer s in structions Damaged Battery Warning Should you notice any physical defects e g the battery is bent out of shape after being dropped or any unu...

Страница 58: ...he computer even if a message indicates the battery is critically low just let the computer use up all of the battery power and shut down on its own 1 Save and close all files and applications 2 Creat...

Страница 59: ...battery options 5 Choose the options below click Yes if a warning appears Low battery levels 0 Critical battery Levels 0 Low battery action Do Nothing Critical battery action On battery Shut Down Crit...

Страница 60: ...arge the battery When charging the battery don t stop until the LED charging indicator light changes from orange to green How do I maintain the battery Completely discharge and charge the battery at l...

Страница 61: ...ng systems haven t built in drivers and utili ties Thus some of the system components won t be auto configured with an appropriate driver or utility during operating system installation Instead you ne...

Страница 62: ...nstallation From my Computer select the CD DVD unit con tainning the Device Drivers User s Manual disc RightClick and select Browse Open the Drivers folder and and browse to the exe cutable file Setup...

Страница 63: ...follow the on screen prompts it may be necessary to restart the comput er Reinstall the driver as outlined in this chapter If the driver is not listed in the Programs and Fea tures menu 1 Click Start...

Страница 64: ...directed Windows Security Message If you receive a Windows security message as part of the driver installation process Just click Install this driver software anyway or Install to continue the install...

Страница 65: ...evision so the exact procedure for certain drivers may differ slightly As a general guide follow the default on screen instructions for each driver e g Next Next Finish unless you are an advanced user...

Страница 66: ...Drivers Utilities 4 6 What to Install 4...

Страница 67: ...gs found in Setup Even if you are a beginner keep a record of the settings you find and any changes you make This information could be useful if your system ever needs servicing There is one general r...

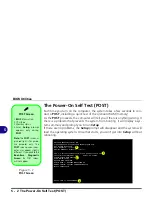
Страница 68: ...thout rebooting POST Screen 1 BIOS information 2 CPU type 3 Memory status 4 Enter Setup prompt appears only during POST Note The POST screen as pictured right is for guide line purposes only The POST...

Страница 69: ...r authorized service center as soon as possible Non Fatal Errors This kind of error still allows you to boot You will get a message identifying the problem make a note of this message followed by the...

Страница 70: ...r Setup turn on the computer and press F2 during the POST The prompt Press F2 to Enter Setup seen on page 5 2 is usually present for a few seconds after you turn on the system If you get a Keyboard Er...

Страница 71: ...these tools are confusing press F1 to call up a General Help screen and then use the arrow keys to scroll up or down the page The Item Specific Help on the right side of each screen explains the highl...

Страница 72: ...e 5 2 Main Menu Main Advanced Security Boot Exit F1 Help Select Item Change Values F9 Setup Defaults Esc Exit Select Menu Enter Select Sub Menu F10 Save and Exit Item Specific Help Tab Shift Tab or En...

Страница 73: ...nu to show the configuration of a optical De vice HDD on the computer s SATA Port 1 2 Use the Auto Type setting to have the items configured automatically for you System Extended Memory Main Menu This...

Страница 74: ...5 3 Advanced Menu Main A Advanced Security Boot Exit F1 Help Select Item Change Values F9 Setup Defaults Esc Exit Select Menu Enter Select Sub Menu F10 Save and Exit Item Specific Help Advanced Selec...

Страница 75: ...E mode If you are unsure of the mode your hard disk supports contact your service center Legacy USB Support Advanced Menu Use this menu item to enable disable the support for Legacy Universal Serial B...

Страница 76: ...able the beep as the computer starts up Battery Low Alarm Beep Advanced Menu Use this menu item to enable disable the battery low alarm beep Embedded Shared Memory Advanced Menu Use this menu item to...

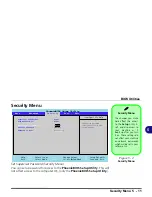
Страница 77: ...n it on These settings do not affect your machine or network passwords which will be set in your software OS Figure 5 4 Security Menu Main Advanced S Se ec cu ur ri it ty y Boot Exit F1 Hel p Sel ect...

Страница 78: ...to boot the computer you may only set a password on boot if a supervisor password is en abled If Enabled is selected only users who enter a correct password can boot the system see the warning in the...

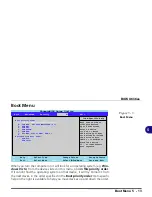
Страница 79: ...r Figure 5 5 Boot Menu PhoenixBIOS Setup Utility F1 Help Select Item Change Values F9 Setup Defaults Esc Exit Select Menu Enter Select Sub Menu F10 Save and Exit Item Specific Help Keys used to view o...

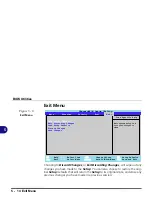
Страница 80: ...its original state and erase any previous changes you have made in a previous session Figure 5 6 Exit Menu F1 Help Select Item Change Values F9 Setup Defaults Esc Exit Select Menu Enter Select Sub Me...

Страница 81: ...slotted flathead screwdriver An antistatic wrist strap Before working with the internal components you will need to wear an antistat ic wrist strap to ground yourself because static electricity may da...

Страница 82: ...rade your computer by replacing the existing processor with a faster new one you will need to contact your customer service representative We recommend that you do not do this yourself since if it is...

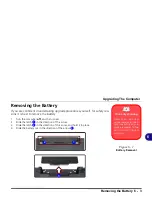
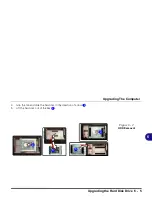
Страница 83: ...the computer off and turn it over 2 Slide the latch in the direction of the arrow 3 Slide the latch in the direction of the arrow and hold it in place 4 Slide the battery out in the direction of the a...

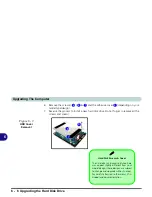
Страница 84: ...ard disk 1 Turn off the computer and turn it over and remove the battery 2 Locate the hard disk bay cover and loosen screws 3 Remove the hard disk bay cover HDD System Warning New HDD s are blank Be f...

Страница 85: ...Upgrading The Computer Upgrading the Hard Disk Drive 6 5 6 4 Grip the tab and slide the hard disk in the direction of arrow 5 Lift the hard disk out of the bay 4 Figure 6 2 HDD Removal 5 4 5 4 5...

Страница 86: ...ll a new hard disk drive do not forget to replace all the screws and covers Figure 6 3 HDD Cover Removal 6 6 7 8 8 Hard Disk Screws Cover The hard disks and covers pictured here may appear slightly di...

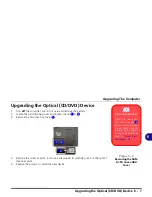
Страница 87: ...3 Remove the hard disk bay cover 4 Remove the screw at point and use a screwdriver to carefully push out the optical device at point 5 Reverse the process to install the new device Fan Cable Cover Mak...

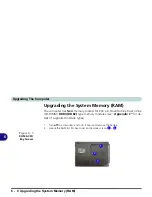
Страница 88: ...as two memory sockets for 200 pin Small Outline Dual In line SO DIMM DDRII DDR2 type memory modules see Appendix C for de tails of supported module types 1 Turn off the computer and turn it over and r...

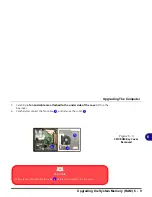
Страница 89: ...a fan and cable are attached to the under side of the cover lift up the bay cover 4 Carefully disconnect the fan cable and remove the cover Figure 6 6 CPU RAM Bay Cover Removed 4 5 5 4 4 Fan Cable Ma...

Страница 90: ...puter 6 10 Upgrading the System Memory RAM 6 5 Gently pull the two release latches on the sides of the memory socket in the direction indicated by the arrows in Figure 6 7 6 7 Figure 6 7 RAM Module Re...

Страница 91: ...at about a 30 angle and fit the connectors firmly into the memory slot 9 The module s pin alignment will allow it to only fit one way Make sure the module is seated as far into the slot as it will go...

Страница 92: ...tart the computer to allow the BIOS to register the new memory configuration as it starts up Figure 6 9 Cover Pin Alignment Cover Pins Note that Model B D computers have four cover pins Model E F comp...

Страница 93: ...ollowing modules which come with your computer Bluetooth Module PC Camera Module Wireless LAN Module Wireless Device Operation Aboard Aircraft The use of any portable elec tronic transmission devices...

Страница 94: ...luetooth module and check the LED indicator to see if the module is powered on or not Bluetooth Data Transfer Note that the transfer of data between the computer and a Bluetooth enabled device is sup...

Страница 95: ...Bluetooth Devices control panel Double click the icon to access the Bluetooth Devices control panel Click Start and click Control Panel or point to Settings and click Control Panel and then click Blu...

Страница 96: ...ppear 5 Click to select My device is set up and ready to be found and then click Next 6 The Wizard will then search for any available Bluetooth devices within range 7 Click to select the device you wa...

Страница 97: ...ices 1 Access the Bluetooth Devices control panel 2 Click Options and make sure that Allow Bluetooth devices to find this computer check box Discovery has a tick inside it 3 Make sure that Alert me wh...

Страница 98: ...er indicated in Table 4 1 on page 4 2 You will have the BisonCap application allowing to capture video files and to take pictures installed in your system Make sure you access the application via the...

Страница 99: ...the BisonCap application program from the WebCam desktop shortcut if the hardware is turned off use the Fn F10 key combina tion to turn it on again PC Camera Screen Refresh The PC Camera module sup po...

Страница 100: ...Realtek High Definition Audio and make sure the item is not disabled 5 Double click Microphone or select Properties from the right click menu 6 Click Levels tab and adjust the Microphone and Micropho...

Страница 101: ...Additional Modules PC Camera Module 7 9 7 Figure 7 5 Audio Setup for PC Camera Right click...

Страница 102: ...etup on page 7 8 and select Start Capture For BisonCap 3 Click OK the file location will be displayed in the pop up box to start capturing the video and press Esc to stop the capture you can view the...

Страница 103: ...DVD or USB Flash drive Note that the Windows Vista system requires a minimum of 15GB of free space on the C drive system partition In order to prevent system problems it is recom mended that you save...

Страница 104: ...am is flickering you can try to adjust the setting in the Video Capture Filter options 1 Run the BisonCap application program from the desktop shortcut 2 Go to Options and scroll down to select Video...

Страница 105: ...esktop shortcut 2 Go to Options and select Take Picture 3 The picture in JPEG format will be placed in the Snapshot folder on the desktop see sidebar Figure 7 7 Zoom Setting Snapshot Folder In BisonCa...

Страница 106: ...anual disc into the CD DVD drive 2 Browse the CD and go to the Drivers WLAN folder 3 Start the executable file Setup exe 4 Choose the language you prefer and click NextClick Next Install 5 Click Finis...

Страница 107: ...icon and then click Connect to a network 2 In the Show list click to choose Wireless from the drop down menu 3 A list of currently available networks will appear Figure 7 8 Taskbar Menus Network and...

Страница 108: ...do not see a network you want to connect to click Set up a connection or network a list of options will appear allowing manual searching and creating a new network 6 Move the cursor over the taskbar i...

Страница 109: ...the network menu and click Disconnect or right click the icon and then click Disconnect from Security Enabled Networks You should try to make sure that any network you are connecting to is a secure n...

Страница 110: ...on battery status power plans used and wireless device status etc To access the Windows Mobility Center 1 Click Start and click Control Panel or point to Settings and click Control Panel 2 Double cli...

Страница 111: ...es make sure you have followed the instructions carefully and observed the safety precautions in the preface If all else fails talk to your service representative You should also make a record of what...

Страница 112: ...ctions anywhere Power Savings Make sure that the system is not in Hibernate or Sleep mode by pressing the keys configured in your Power Options see Power Saving States on page 3 6 the Fn F4 key combin...

Страница 113: ...run at times when you are not using your computer You can use those that are provided free with your OS or buy the more powerful dedicated programs to do so Write down your passwords and keep them saf...

Страница 114: ...ow Viruses are often triggered from within e mail attachments so take care when opening any attached file You can configure most Anti Virus programs to check all e mail attachments Note You should als...

Страница 115: ...looking at the computer s manual but what about any new peripheral devices you have just purchased Many prob lems are caused by the installation of new hardware and or software Always refer to the doc...

Страница 116: ...ings The less you have to deal with then the easier the source of the problem may be found Example if your computer has many devices plugged into its ports and a number of programs running then it wil...

Страница 117: ...r doesn t start up immediately turn it off then on again You are losing battery power too quickly The system is using too much power If your OS has a Power Options scheme check its settings You may al...

Страница 118: ...m is in a power saving mode Toggle the sleep resume key combination Fn F4 The screen controls need to be adjusted Toggle the screen control key combinations Fn F8 F9 If you re connected to an external...

Страница 119: ...cannot be read The CD DVD is dirty Clean it with a CD DVD cleaner kit The CD DVD tray will not open when there is a disc in the tray The CD DVD is not correctly placed in the tray Gently try to remov...

Страница 120: ...function key indicator to see if the WLAN Bluetooth module is on or off see System Map LCD Panel Open Chapter 1 If the LED indicator is off then press the Fn F11 WLAN Fn F12 Bluetooth key combination...

Страница 121: ...nd a Bluetooth enabled device is supported in one direction only simultaneous data transfer is not supported If you are copying a file from your computer to a Bluetooth enabled device you will not be...

Страница 122: ...in dows Vista Service Pack 1 To re enable Hibernate mode go to the Command Prompt and type the command powercfg h on make sure you are logged on as an Administrator 1 Click Start menu button 2 Type cm...

Страница 123: ...lved by installing the USB hotfix provided on the Device Drivers Utilities User s Manual as follows make sure your user account type is set as an adminis trator 1 Insert the Device Drivers Utilities U...

Страница 124: ...notebook lid S3 is closed TMM disconnects the LCD display from the OS and then adds the LCD display back when the lid is opened This may trigger TMM to restore an old display setting which may result...

Страница 125: ...Troubleshooting Screen Resolution Error 8 15 8 4 Click MobilePC to open the control panel 5 Right click TMM and select Disable Figure 8 2 TMM Disable 6 Close all the control panels...

Страница 126: ...Troubleshooting 8 16 8...

Страница 127: ...Ports Jacks A 1 A Appendix A Interface Ports Jacks Overview The following chapter will give a quick description of the interface ports jacks which allow your com puter to communicate with external dev...

Страница 128: ...u to connect an external monitor or Flat Panel Display to get dual video or simultaneous display on the LCD and external monitor FPD Headphone Out Jack Headphones or speakers may be connected through...

Страница 129: ...to connect your DVD capable PC to a Dolby AC 3 compatible receiver for 5 1 or dts surround sound USB 2 0 1 1 Ports These USB 2 0 compatible ports USB 2 0 is fully USB 1 1 compliant are for low speed p...

Страница 130: ...Interface Ports Jacks A 4 A...

Страница 131: ...e After installing the video driver go to the Display Settings control panel to adjust the video settings to the highest resolution Video Memory The system does not feature dedicated video memory but...

Страница 132: ...A Con trol Center 1 Click Start and click Control Panel or point to Settings and click Control Panel 2 Double click SiS VGA Control Center click Classic View from the left of the menu if you are in Co...

Страница 133: ...SIS VGA Control Center B 3 B You may make changes to the video and display settings by clicking the appro priate menu button Figure B 2 SIS VGA Control Center Control Panels...

Страница 134: ...itor port The following display modes are available Display Setting Mode Description Single One of the connected displays is used as the display device Clone Both connected displays output the same vi...

Страница 135: ...the external monitor port and turn it on 2 Click Start and click Control Panel or point to Settings and click Control Panel 3 Click SiS VGA Control Center or click Appearance and Personalization SiS V...

Страница 136: ...itor port and turn it on 2 Go to the SiS VGA Control Center Display Setting menu 3 Click the appropriate icon for the display setting mode you wish to use 4 Click Yes within 15 seconds in order to sav...

Страница 137: ...ay Settings control panel Multi Mode Clone Display Settings Extended Desktop Use the control panel to drag the monitors to match the physical ar rangement you wish to use You can drag any icons or win...

Страница 138: ...ecked Extend the desktop onto this monitor and click Apply 2 Click the appropriate monitor icon e g to be able to select the option to extend the desktop on to it In this example the Primary Dis play...

Страница 139: ...rmation The specifications listed in this Appendix are correct at the time of going to press Certain items particularly processor types speeds and CD DVD device types may be changed delayed or updated...

Страница 140: ...CD Video Adapter SIS M672 Integrated Video High Preference 3D 2D Graphic Accelerator Shared Memory Architecture up to 256MB dynamically allocated from system memory where needed Supports DirectX 9 0 S...

Страница 141: ...Keyboard with embedded numeric keypad Pointing Device Built In TouchPad with Scrolling Function Interface Three USB 2 0 Ports One Headphone Out Jack One Microphone In Jack One S PDIF Out Jack One RJ...

Страница 142: ...LAN Supports Wake on USB Supports Resume from Modem Ring Power Full Range AC DC Adapter AC input 100 240V 50 60Hz DC Output 19V 3 42A 65 Watts 6 Cell Smart Lithium Ion Battery Pack 4400mAH Operating S...

Страница 143: ...ken to the equipped waste collection centres and is to be handled separately from urban waste Olivetti guarantees the activation of the treatment collection recycling and disposal procedures in accord...

Страница 144: ...Code 383314U 01...

Отзывы: