background image

M

AINTENANCE

109

CLEANING THE CASING ...

1.


Disconnect the fax machine from the electrical
power supply and telephone socket.

2.


Only use a soft, lint-free cloth dampened with a
diluted neutral detergent.

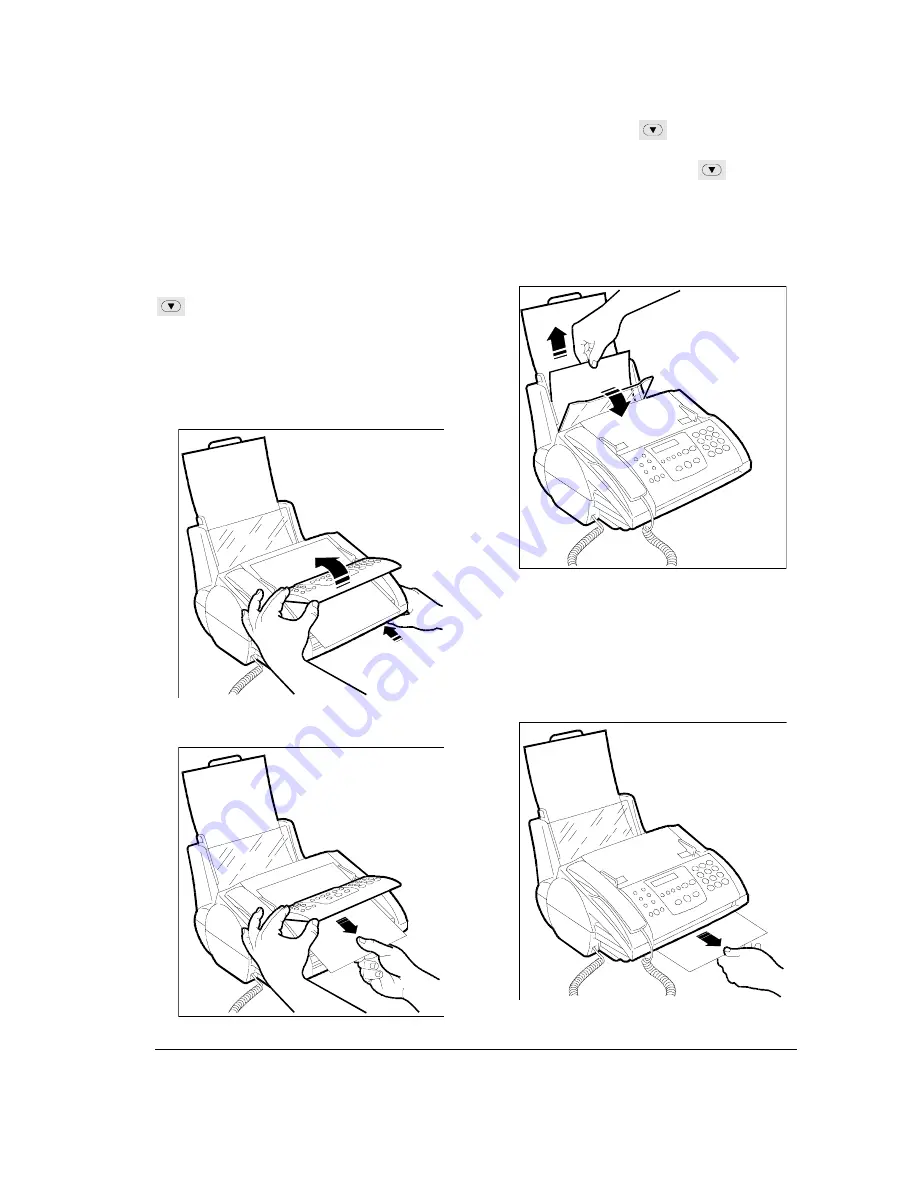
REMOVING JAMMED DOCUMENTS ...

During transmission or when copying, a document
may become jammed  in the ADF. The display will
show the message: "REMOVE DOCUMENT, PRESS

".

Try to eject the original by pressing the STOP  key. If
this is not successful, you must remove it manually as
follows:

1.


Push in the lever situated under the right hand
side of the console and lift the console panel.

2.


Holding the console up, remove any documents
from the ADF.

3.


Close the console panel carefully and securely.

REMOVING JAMMED SHEETS OF PAPER ...

If the paper used to print documents received or copied
becomes jammed, the display will show the message:

"PAPER ERROR, PRESS 

".

Try to eject the sheet by pressing the 

 key. If this is

not successful, you must remove it manually as follows:


If the paper jams in the ASF:

1.


Lift the ASF cover and remove the jammed
sheet of paper.

2.


Check that the paper has been loaded
correctly in the ASF, and that it is not torn or
creased.


If the paper jams in the exit slot:
Remove the jammed sheet of paper, pulling it
carefully out of the fax machine.

Содержание JET-LAB 600@

Страница 1: ...237204C 01 User s manual...

Страница 2: ...atibility declaration This product has been designed and developed to operate in the networks of all European Community countries and in those of Switzerland and Norway Full compatibility with the net...

Страница 3: ...BLANK PAGE...

Страница 4: ...ho tocopier With a subscription to an Internet Service Provider Fax2Net you can transmit and receive documents even as e mail attachments using the Internet and also print WEB pages When controlled by...

Страница 5: ...needs These settings and those indicated in the manual may not always be the same We suggest that you print them out before making any modifications MAINTENANCE Disconnect the fax machine from the mai...

Страница 6: ...ransmitted or copied Maximum capacity 25 sheets A4 A5 Letter or Legal Paper guide adjustable to suit the width of the document to be transmitted or copied Operator panell Display Parallel interface co...

Страница 7: ...PONENTS VI Outlet for copied transmitted documents to which supplied tray can be attached Print head compartment Optical reader Exit for documents received copied or printed Telephone handset plug soc...

Страница 8: ...handset The following keys located immediately below the LCD display are used for COPYING operations Their functions are de scribed in the Copier chapter Starting from the left RX MODE With the machin...

Страница 9: ...ile dialling a telephone or fax number enables the number to recognise a second tone during dialling if connected to certain types of switchboard With the machine in programming mode se lects lower up...

Страница 10: ...step With the machine in connect mode starts re ception of a document LINE With the machine in waiting mode connects to the telephone line permitting the dialling of the number to be call NUMERIC KEY...

Страница 11: ...BLANK PAGE...

Страница 12: ...the ADF 25 Inserting documents in the ADF 26 Adjusting the contrast and resolution of a document to be transmitted 26 Transmitting a document 27 Special dialling cases 29 Transmitting a document usin...

Страница 13: ...75 Introducing the Internet 75 Subscribing to a Provider 76 Setting up your fax machine for Internet 77 Paying for the Internet Service 78 Receiving e mail 79 Updating the call rates 79 Operating in t...

Страница 14: ...TABLE OF CONTENTS XIII Removing jammed documents 109 Removing jammed sheets of paper 109 Solving minor problems 110 Conflicting operations 111 Error codes 113 TECHNICAL DATA 114...

Страница 15: ...BLANK PAGE...

Страница 16: ...INSTALLATION...

Страница 17: ......

Страница 18: ...containing Unimessage OCR Appli cation software Fax2Net promotional leaflet Fax2Net registration form warranty card MOUNTING THE ASF PAPER SUPPORT Insert the Automatic Sheet Feeder ASF paper sup port...

Страница 19: ...MODEM ETC 1 Plug the cord of the emergency telephone or the answering machine into the extension socket on the main telephone cord plug If the network to which the machine is connected has more than o...

Страница 20: ...le into the wall power socket The machine automatically performs a self test proce dure to check that its components operate properly Two messages RX ON FAX 100 with the date and time and CHECK PRINT...

Страница 21: ...ess 9 on the numeric key pad 9 INSTALLATION 1 9 3 Press the START key TEL LINE SETUP 4 Press the FUNCTION key until the display shows LANGUAGE 5 Press the START key 6 Press you require 7 Press the STA...

Страница 22: ...he paper to ensure the correct func tioning of the machine you should also check that the paper format set on the machine coincides with the format you have loaded 1 Press the FUNCTION key until the d...

Страница 23: ...a monochrome print head When inserting the print head take care not to move the the print head carriage from the loading position 1 Press the key the display will show the message CHANGE PRINT HEAD P...

Страница 24: ...different setting using the then press the START key The display will show PRINTING The machine will print another test page with the val ues you have set which will read Alignment confir mation and t...

Страница 25: ...ION key 7 Type in the new date and time e g 30 09 99 15 30 Each time you enter a digit the cursor moves on to the next one DD MM YY HH MM 30 09 99 15 30 If you only want to change some of the digits m...

Страница 26: ...ng each successive character in turn Key 1st 2nd 3rd 4th 0 1 SPACE 2 A B C 3 D E F 4 G H I 5 J K L 6 M N O 7 P Q R S 8 T U V 9 W X Y Z Pressing the and keys you can scroll forwards backwards to select...

Страница 27: ...n set to transmit this information within the text area Changing the position 1 Press the FUNCTION key 1 MEMORY TX 1 9 2 Press 8 on the numeric key pad 8 SET UP 1 9 3 Press the START key DATE AND TIME...

Страница 28: ...ronment The drivers and documentation files that will be copied to your hard disk drive during installation will occupy about 20 MB of disk space Installation of the Linkfax Pro software will clear a...

Страница 29: ...further information open and read the electronic documentation on the CD Electronic documentation The electronic documentation files are loaded with the software These files contain further informati...

Страница 30: ...PAPER AND OTHER PRINT MEDIA...

Страница 31: ......

Страница 32: ...8 27 inches 148 5 x 210 mm U S letter 8 5 x 11 inches 216 x 279 mm U S legal 8 5 x 14 inches 216 x 356 mm U S Executive 7 25 x 10 5 inches 184 x 267 mm Cards U S Card 4x6 4 x 6 inches 102 x 152 mm U...

Страница 33: ...ood quality office or photocopy paper Special print copy media All these types of special media can be handled automatically only in printer mode When using any special print media read the instructio...

Страница 34: ...at there is not too much or insufficient play Sheets of paper and envelopes must not be bent creased or torn as this may cause them to jam or prevent them from being fed correctly into the machine Onl...

Страница 35: ...BLANK PAGE...

Страница 36: ...FACSIMILE...

Страница 37: ......

Страница 38: ...L TONE 7 Press the mode PSTN DIAL PULSE PSTN DIAL PULSE 8 Press the START key to confirm the selection and then the STOP to restore the fax machine to the initial waiting mode RX ON FAX 100 02 10 99 1...

Страница 39: ...the EXT LINE PREFIX output mode EXT LINE FLASH 11 Press the START key PSTN DIAL TONE 12 Press the mode PSTN SEL DIAL PULSE PSTN DIAL PULSE 13 Press the START key to confirm your selection and then the...

Страница 40: ...eric key for more than one second one touch dial key Press the SPEED DIAL key and enter a speed dialling code Incoming call WHAT DOCUMENTS CAN BE INSERTED IN THE ADF Dimensions Width min 148 mm max 21...

Страница 41: ...cters by setting higher or lower resolution values depending on the type of text or images in the document Select the type of contrast as follows 1 Make sure that the display shows the initial waiting...

Страница 42: ...e that the display shows the initial waiting mode and the date and time RX ON FAX 100 02 10 99 15 29 2 Press the FUNCTION key 1 MEMORY TX 1 9 3 Press 8 on the numeric key pad 8 SETUP 1 9 4 Press the S...

Страница 43: ...e If it is set for manual reception someone will answer the phone Ask them to press the START key on their fax machine and wait to hear the fax tone 5 Press the START key to start the transmission At...

Страница 44: ...e when using a pulse dialling mode to insert a pause PAUSE between the international code the area code and the recipient s telephone number The display shows a P pause The recipient is connected to a...

Страница 45: ...START key to end the procedure If you want to send the document to only one recipient press the START key immediately without entering any other numbers When the transmission is finished if it has be...

Страница 46: ...smission on the list will be shown CHANGING RESENDING OR CLEARING A TRANSMISSIONALREADYSTORED 1 Make sure you have set a transmission from memory RX ON FAX 98 TX MEM SET 2 Press the FUNCTION key 1 MEM...

Страница 47: ...e FUNCTION key until the display shows VARIOUS SETTINGS 6 Press the START key until the display shows AUTO RE TRAN NO 7 Press the START key if you wish to exclude certain pages not transmitted Otherwi...

Страница 48: ...ON FAX for when you are absent but wish to receive faxes anyway This is the mode in which the fax machine is preset Automatic reception with call type recognition FAX PHONE In this reception mode the...

Страница 49: ...tial waiting mode Under this setting when the black ink in the print head runs out incoming documents will continue to be printed using black ink created by the blending of the other three colours in...

Страница 50: ...e caller called just to speak replace the receiver at the end of the conversation If your telephone installation has several sockets and the connected telephone is not near the fax machine you can ena...

Страница 51: ...end of the conversation you can hang up The caller asks you to receive Your fax machine pre pares to receive Your fax machine prepares automati cally to receive It will wait to receive a document for...

Страница 52: ...the silence lapse the time after which the answering machine hangs up if it does not detect either a reply message or the connection tones set on the answering machine is longer than that set on the...

Страница 53: ...r example 1 1 FAX TEL NUM If a number has already been stored under this key it will be displayed 8 Dial the recipient s fax telephone number max 64 digits on your fax machine s numeric keypad If you...

Страница 54: ...number follow points 1 to 7 in the procedure above and then continue as follows The FAX TEL NUM field MUST be empty If there are characters in this field the key will NOT be accepted and an acoustic s...

Страница 55: ...sor on it and type the correct one If you want to delete a number completely press the CANCEL key If your fax machine is connected to a private line connect to the public line by pressing the EXTERNAL...

Страница 56: ...erating console the display will show 01 ADDRESS _ 9 Type in the entire address using the alphanumeric keypad the alphabetical characters are displayed in lower case If the address contains upper case...

Страница 57: ...automatically When the last number has been dialled the transmission continues as described in Transmitting a document TRANSMITTING USING ONE TOUCH OR SPEED DIALLING BY SEARCHING THE CORRESPONDING LI...

Страница 58: ...ding the last transmission The fax machine is factory set to print automatically this type of report only in the case of failed transmission TX REPORT FAILED If you want to print it always and automat...

Страница 59: ...ery transmission irrespective of the result Choosing REPORT TX NO sets the fax machine not to print automatically a report 8 Press the START key to confirm this choice then press the STOP key to retur...

Страница 60: ...t carried out from memory Type type of transaction TX ADF transmission from ADF TX ADF ECM transmission from ADF ECM mode TX MEM memory transmission TX MEM ECM memory transmission ECM mode RX POLL pol...

Страница 61: ...f installation and configuration settings along with a list of excluded black listed numbers can be requested at any time as well as a printout of data stored under the keys for one touch or speed dia...

Страница 62: ...8 on the numeric key pad 8 SETUP 1 9 4 Press the START key DATE AND TIME 5 Press the FUNCTION key until the display shows PRINT CONFIG 6 Press the START key PRINT SETTINGS 7 Press the options availabl...

Страница 63: ...hen confirm your choice using the START key Press the STOP key to return the fax machine to the initial waiting mode RX ON FAX 100 28 06 99 10 44 Receiving a document that is longer than the paper for...

Страница 64: ...ncoming call arrives When this feature is enabled the fax machine s behaviour is governed by the reception mode selected and by who is calling in RX ON FAX mode the fax machine will not ring for an in...

Страница 65: ...for each call If you are programming the fax number and wish to see the number and name related to an incoming call you must press the LINE key to display the caller identifier and then decide whether...

Страница 66: ...is feature is very useful in a domestic or small office environment where the telephone line is shared between a number of people Your fax machine can learn one of these tones This way in FAX PHONE an...

Страница 67: ...ng Changing the duration of the beep When the fax machine is set for automatic reception and recognition of call type it operates in the following way if the caller is a fax machine it will automatica...

Страница 68: ...anging the remote control code If the fax machine is connected to an extension that uses multi frequency dialling and is set for manual reception or for automatic reception with call type recognition...

Страница 69: ...r example 8 TYPE CODE CODE 0 9 8 9 Press the START key to confirm then the STOP key to return the fax machine to the initial waiting mode MANUAL 100 28 10 99 16 28 If you are connected to a private li...

Страница 70: ...mode RX ON FAX 100 29 10 99 16 28 Listening to the connection signal As explained in Special dialling cases the fax machine is already set to be able to listen to the line tones during the dialling ph...

Страница 71: ...X ON FAX 100 28 10 99 11 45 Adjusting the volume of the acoustic warning tone 1 Ensure that the display shows the initial waiting mode and the date and time RX ON FAX 100 29 10 99 16 28 2 Press the FU...

Страница 72: ...FAX 100 29 10 99 16 28 Enabling disabling ECM mode The ECM Error Correction Mode is a system for correcting errors caused by disturbance on the line This feature is only effective if it has been enab...

Страница 73: ...ission of the fax with the sender so that they can insert the document to be transmitted in their machine at the appropriate time Set your fax machine to receive the document programming the type of d...

Страница 74: ...FUNCTION key 1 MEMORY TX 1 9 3 Press 4 on the numeric key pad 4 RX POLLING 1 9 4 Press the START key ALREADY BOOKED 5 Press the START key VARIOUS SETTINGS To cancel reception polling already set press...

Страница 75: ...Cancelling polling transmission already set 1 Make sure you have set polling transmission RX ON FAX 97 POLL TX SET 2 Press the FUNCTION key until the display shows 1 MEMORY TX 1 9 3 Press 5 on the nu...

Страница 76: ...me an attempt is made to activate or access certain features or to modify fax machine settings If the password is not entered correctly access will be denied SETTING PASSWORDS To change a password tha...

Страница 77: ...key PROGR ACC PASSW 7 Press the password for another security feature or move on to the next point 8 Press the START key TYPE CURR PASSW _ 9 Type the current password and confirm it by pressing the ST...

Страница 78: ...hows the initial waiting mode and the date and time RX ON FAX 100 29 10 99 14 42 2 Press the FUNCTION key 1 MEMORY TX 1 9 3 Press 9 on the numeric key pad 9 INSTALLATION 1 9 4 Press the START key TEL...

Страница 79: ...e is a document stored in the mailbox the display will show PRINT LIST Otherwise the first line of the display shows EMPTY and then the initial waiting mode 6 Press the START key to print the list of...

Страница 80: ...then the initial waiting mode 6 Press the START key to print the list of documents stored in the memory or press the DOC SEARCH 7 Press the START key DOC NO xxxx 8 Press the identification list then p...

Страница 81: ...l be aborted 9 Press any key on the numeric key pad The identifier x is displayed briefly in the lower right corner and then the display shows x TYPE NUMBER 10 Type in the fax phone number to be assoc...

Страница 82: ...TELEPHONE...

Страница 83: ......

Страница 84: ...eceived incoming without having to dial the line again IMPORTANT WARNING If the TX PROTECTION function has been enabled on your machine see SECURITY FEATURES in Facsimile only people who know the pass...

Страница 85: ...B C D E F G H I J K L M N O P V W X Y Z _ o 5 Press the START key to start the selection REDIALLING ONE OF THE LAST 10 NUMBERS CALLED OR ONE OF THE LAST 20 INCOMING NUMBERS To re call any of the these...

Страница 86: ...onfirm the existing area code by simply pressing the START key TYPE ACRONYM a z x 5 Type the new acronym 1 character and press the START key or confirm the existing acronym by simply pressing the STAR...

Страница 87: ...se quick dialling methods such as one touch keys and speed dial codes the key must be pressed once during programming see Programming one touch and speed dialling in Transmitting and receiving before...

Страница 88: ...THE INTERNET...

Страница 89: ......

Страница 90: ...arts separated by E g www example com item page html where www World Wide Web WEB example dot example name of the site com dot com type of site com usually indicates a firm or commerical site net is a...

Страница 91: ...you want to receive and in what format a fax transmission receipt 4 Send the registration form to the number of the Customer Support Centre indicated on the form as follows a Make sure that the displ...

Страница 92: ...nnected to the network through a private switchboard you must first key in the access number for the external line and then press the START key ACCOUNT ID _ 10 Type in the ACCOUNT ID indicated in the...

Страница 93: ...f credit To increase your credit If you want to buy more time fill in the form that came will your credit statement indicating your personal data e mail address and account and fax machine numbers Fax...

Страница 94: ...he other option available EMAIL RECEP YES 10 Press the START key You will receive your e mail messages directly on your fax machine which will print them out for you UPDATING THE CALL RATES Callng the...

Страница 95: ...ress associated with a one touch key or a speed dial code for further information see Programming one touch and speed dialling and Transmitting using one touch speed dialling in the Facsimile section...

Страница 96: ...PHOTOCOPIER...

Страница 97: ......

Страница 98: ...will appear when the key is pressed once There are 9 reductions enlargements available to suit all formats of paper A4 LETTER LEGAL For example the following formats can be copied onto an A4 sheet by...

Страница 99: ...completed the display will show RX ON FAX 100 29 10 99 14 42 Proceed as follows 1 If necessary load paper into the ASF and check that the format corresponds to what is set on the Configuration menu s...

Страница 100: ...n the display Replace the print head see Maintenance If you have set the machine to make colour copies and the print head is black or vice versa the message CHECK PRINT HEAD will flash on the display...

Страница 101: ...BLANK PAGE...

Страница 102: ...PRINTER...

Страница 103: ......

Страница 104: ...at features in the printer driver correspond to the characteristics of the print support programs that you intend using Calibration of the colours is specifically set in the printer driver for the ind...

Страница 105: ...LP button in the bottom right corner of the window This accesses the entire section relating to the Settings window SELECTING THE MACHINE AS YOUR OUTPUT DEVICE The machine is usually set as the defaul...

Страница 106: ...SCANNER...

Страница 107: ......

Страница 108: ...port 4 Insert the document you want to scan into the ADF 5 Click on the SCAN tab on the scanner driver window The scanning driver opens and the machine scans the document 6 Once scanning is completed...

Страница 109: ...BLANK PAGE...

Страница 110: ...PC COLOUR FAX APPLICATION...

Страница 111: ......

Страница 112: ...nd your machine LinkFax Pro also ensures synchronisation between scanning communicating transmitting and receiving and printing operations so that they do not conflict To install the software refer to...

Страница 113: ...BLANK PAGE...

Страница 114: ...MAINTENANCE...

Страница 115: ......

Страница 116: ...RINT HEAD OUT OF INK When the ink in the cartridge runs out the display shows the message OUT OF INK At this point you must change the print head When changing the print head take care not to move the...

Страница 117: ...in the direction indicated by the arrow until a click is heard confirming that it has been correctly inserted 8 Close the print head compartment cover and press the key again The machine will automat...

Страница 118: ...3 HEAD MAINTEN 1 9 8 Press the START key NEW HEAD NO 9 Press the available NEW HEAD YES and then press the START key followed by the STOP key to return the machine to the initial waiting mode ALIGNING...

Страница 119: ...have inserted is new see previous paragraph PRINT HEAD CLEANING AND NOZZLE TESTING If the printing quality deteriorates you can clean the print head and test the nozzles with a printout showing their...

Страница 120: ...ust particles on the print nozzles If there are remove them carefully Taking care not to touch the clean nozzles clean the print head pads see Cleaning the print head pad and re insert the print head...

Страница 121: ...al contacts using a slightly dampened cloth Do not touch the nozzles 6 Disconnect the fax machine from the electrical power supply 7 Clean the electrical contacts on the print head carriage using a sl...

Страница 122: ...ift the print head compartment cover 3 Disconnect the fax machine from the electrical power supply 4 Move the print head carriage to the left as shown in the figure 5 Clean the print head pad with a d...

Страница 123: ...perfectly clean contact a qualified technician CALIBRATING THE OPTICAL READER If the machine has been transported or moved you should re calibrate the scanner before using it 1 Press the FUNCTION key...

Страница 124: ...and side of the console and lift the console panel 2 Holding the console up remove any documents from the ADF 3 Close the console panel carefully and securely REMOVING JAMMED SHEETS OF PAPER If the pa...

Страница 125: ...smit The fax machine does not receive in automatic mode You have set it for manual reception reset it for automatic reception The fax machine neither copies nor receives Check that the document or the...

Страница 126: ...s Operations permitted Operations not permitted User operation TX from memory Reception Automatic printing Scanning to PC Printing from PC Unimessage operations TX from ADF Copying Telephone call Use...

Страница 127: ...printing Printing from PC Use of remote operator panel Copying TX from ADF Unimessage operation Printing from PC User operation TX from ADF TX from memory Reception Telephone call Scanning to PC Use o...

Страница 128: ...in the length permitted 08 Check the document Paper has jammed Remove the document or paper that has jammed and check that documents in the ADF and paper in the ASF have been correctly loaded 10 Recep...

Страница 129: ...Telephone network Public private Compatibility ITU G3 Compression method MH MR MMR Document format A4 Transmission time 7 s 14400 bps Test Sheet No 1 in MMR standard resolution Memory capacity up to...

Страница 130: ...Test Sheet No 1...

Отзывы: