background image

6

Unloads a document from the ADF.

Turns off the "

" LED indicator.

Returns the fax machine to the stand-by mode.

Stops the programming, transmission, reception
or copying operation in progress.

In "MANUAL" and "PHONE/FAX" reception modes starts
receiving a document.

After the fax number has been dialled, starts sending a
document (only with the document inserted in the ADF).

Confirms the selection of menus, submenus, param-
eters and their values and moves on to the next condi-
tion.

Starts copying a document (only with the document
inserted in the ADF).

Used to dial a telephone or fax number without lifting
the telephone handset.

Gives access to the Phone book.

Deletes incorrect settings from the display.

During the function programming phase, it moves
one function back.

Displays a list of the last 10 fax or telephone
numbers dialled (

outgoing calls

) or the last 20

numbers from which calls have been received
and not answered (

incoming calls

), irrespec-

tive of whether or not a document was present in
the ADF.

Adjusts the resolution of the documents to be sent and
copied (only with the document inserted in the ADF).

Puts the line on hold during a telephone conversation (with
the handset raised).

Gives access to the menu and its func-
tions.

Inserts a pause during the dialling of the
telephone or fax number.

Содержание Fax-Lab 610

Страница 1: ...INSTRUCTIONS ...

Страница 2: ...he manufacturer reserves the right to make any changes to the machine described in this manual at any time and without prior warning This machine has been approved under the terms of Council Decision 98 482 EC for Europe wide connection as a single terminal to an analogue Public Switched Telephone System PSTN system However due to differences between individual PSTNs in the various countries the a...

Страница 3: ...TUP PARAMETERS 4 ABOUT THE FAX MACHINE 5 CONSOLE 5 COMPONENTS 7 HOW TO GET STARTED QUICKLY 8 PACKAGE CONTENTS 8 INSTALLATION CONDITIONS 8 CONNECTING TO THE TELEPHONE LINE AND POWER SUPPLY 8 SETTING SOME PARAMETERS 9 SETTING UP THE FAX MACHINE 14 TO PRINT THE MENU AND ITS FUNCTIONS 15 TRANSMISSION 16 RECEPTION 17 USING THE TELEPHONE 18 MAKING COPIES 19 ...

Страница 4: ......

Страница 5: ...Olivetti guarantees the activation of the treat ment collection recycling and disposal pro cedures in accordance with Directive 2002 96 CE and subsequent amendments 2 FOR OTHER COUNTRIES NOT IN THE EU The treatment collection recycling and disposal of electric and electronic devices will be carried out in accordance with the laws in force in the country in question SAFETY PRECAUTIONS RISK OF AN EL...

Страница 6: ...y to the fax machine in countries where this is allowed or directly to the telephone wall socket Leave enough room in front of the outlet from which docu ments and received copied documents are unloaded so that they do not fall on the floor IMPROPER USE The fax machine was designed to send and receive docu ments and to copy paper documents The machine may also be used as a telephone All other uses...

Страница 7: ...network manager and com monly known as REGISTER RECALL R function With the fax machine connected to a private exchange When pressed before the telephone or fax number is dialled it enables a call to be made on the public line if the output mode is Flash and if the fax machine was programmed correctly They scroll cyclically forwards or backwards through the functions and related parameters on the m...

Страница 8: ...o dial a telephone or fax number without lifting the telephone handset Gives access to the Phone book Deletes incorrect settings from the display During the function programming phase it moves one function back Displays a list of the last 10 fax or telephone numbers dialled outgoing calls or the last 20 numbers from which calls have been received and not answered incoming calls irrespec tive of wh...

Страница 9: ...aracters each It shows the date and time menu items error messages reso lution and contrast values PLAIN PAPER FEED COMPARTMENT ASF Maximum capacity 40 sheets 80gr m2 AUTOMATIC FEEDER FOR DOCUMENTS TO BE SENT AND COPIED ADF Maximum capacity 10 sheets of A4 80gr m2 OPERATOR CONSOLE RECEIVED OR COPIED DOCUMENT OUTPUT SPEAKER CARTRIDGE COMPARTMENT MACHINE SERIAL NUMBER PLATE SEE BASE OPTICAL READER ...

Страница 10: ...achine on a stable flat surface Make sure there is enough room for ventilation Keep the fax machine in a dust free place away from sources of excessive heat or humidity Do not expose it to direct sun light CONNECTING TO THE TELEPHONE LINE AND POWER SUPPLY CONNECT THE FAX MACHINE TO THE TELEPHONE LINE 1 Insert the plug on the cable for connecting it to the telephone line into the LINE socket on the...

Страница 11: ...or example LINGUA ENGLISH 2 To confirm the setting press the key The display shows a country of destination for exam ple CHOOSE COUNTRY ITALIA 3 To select the desired country press the keys The display shows for example CHOOSE COUNTRY U K To select a different country see the table below COUNTRY COUNTRY TO BE SELECTED Argentina AMERICA LATINA Australia AUSTRALIA Austria ÖSTERREICH Belgium BELGIUM ...

Страница 12: ...lay shows SET DATE TIME XX XX XX XX XX XX XX XX XX XX indicate the date and time shown on the display for the first time having connected the fax machine 3 To enter the new date and time e g 10 05 07 12 25 press the keys As each digit is entered the cursor will move to the next one 4 If you wish to move the cursor to digits to be modified press the keys 5 Then overwrite the digits with the correct...

Страница 13: ...e display shows SET DATE TIME XX XX XX XX XX XX XX XX XX XX indicate the current date and time 7 To display one of the options listed above press the keys 8 To confirm the setting press the key 9 If you have made a mistake or wish to abort the proce dure in progress press the key notE If you have chosen the SET DATE TIME option proceed as follows 1 Enter the new date and time e g 13 05 07 18 00 by...

Страница 14: ...ey The display shows MENU RECEPT SET UP 2 Press the keys until the display shows MENU INSTALLATION 3 Press the key The display shows INSTALLATION STATION NAME 4 Press the keys until the display shows INSTALLATION TEL LINE SETUP 5 Press the key The display shows TEL LINE SETUP LINE TYPE 6 Press the key The display shows LINE TYPE PUBLIC PSTN 7 To choose the other option LINE TYPE PRIVATE PBX press ...

Страница 15: ...name press the keys 10 To insert a character in the name move the cursor to the point where you want to insert the new character by pressing the keys 11 Then type the character you want to add 12 To delete incorrect characters move the cursor to the right of the incorrect character by pressing the keys 13 Then press the key 14 To delete the whole name hold down the key For example to enter the nam...

Страница 16: ...r the ink out message has been displayed the following message will appear BEWARE CARTRIDGE ALREADY USED THE CARTRIDGE MAY ONLY BE USED ONCE Remember only to use original cartridges see code printed at the end of the manual Non original or refilled cartridges are not to be used The use of such cartridges makes the product s guarantee null and void 6 To return the fax machine to its initial stand b...

Страница 17: ...OUT 1 EXIT 0 REPEAT Examine the print test sheet as follows 1 Check that the numbered scale is not broken at any point and that the black areas do not present any horizontal white lines if these conditions which confirm that the car tridge has been inserted correctly and is working properly are respected set the value 1 The fax machine returns to its initial stand by mode and is ready for use The ...

Страница 18: ... detailed description of all the transmission modes and how to program the phone book WHAT DOCUMENTS MAY BE USED For any type of tansmission the document has to be placed in the ADF CHARACTERISTICS OF THE ORIGINAL Width 210 mm Length min 105 mm max 600 mm Unit weight 70 90 gr m2 max 10 sheets For documents of different sizes from those specified above photocopy the original onto A4 sheets or anoth...

Страница 19: ...s in four different modes that you may access by carrying out the procedure described below These modes are manual reception automatic reception automatic reception with recognition of the type of call and reception with telephone answering device only model with a built in telephone answering device TO CHOOSE THE RECEPTION MODE 1 Press the key The display shows MENU RECEPT SET UP 2 Press the key ...

Страница 20: ...ee To program the phone book chapter Transmission and reception operations 3 To find the telephone number or name of the person you wish to call you can 1 Press the keys until the desired number or name appears on the display or 2 Press the key bearing the first letter of the name you are looking for The fax machine will search for the name in alphabetical order 4 To start dialling press the key O...

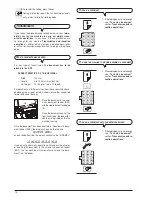
Страница 21: ...and resolution settings 100 NORMAL and TEXT respec tively It also shows the number of copies set 1 5 If you want to confirm these values press the key Otherwise skip to step 6 6 Press the key The display shows QUALITY HIGH 7 To view the other available option QUALITY NOR MAL press the keys TO TELEPHONE USING THE QUICKEST METHOD Do not place the document in the ADF 1 Press and hold down for more th...

Страница 22: ...the desired number by pressing the keys 15 If you only want to make one copy skip to the next step 16 To make the copy press the key The fax machine starts to save the document Having done this the fax machine starts copying notE If you want to abort the copy in progress press the key The fax machine will stop copying unload the document from the ADF and return to its initial stand by mode display...

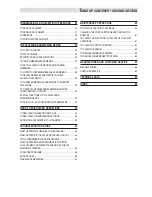
Страница 23: ...ETERS 42 MORE SOPHISTICATED OPERATIONS 43 OTHER USEFUL RECEPTION SETTINGS 43 OTHER USEFUL TRANSMISSION SETTINGS 50 RECEIVING A DOCUMENT IN POLLING MODE 53 TROUBLESHOOTING GUIDE 55 WHAT HAPPENS IF THERE IS A POWER FAILURE 55 WHAT HAPPENS IF THE PAPER OR INK HAS RUN OUT 55 IF THE TRANSMISSION IS UNSUCCESSFUL 55 WHAT HAPPENS WHEN A DOCUMENT IS PLACED IN THE AUTOMATIC DOCUMENT FEEDER WHILE THE FAX MAC...

Страница 24: ......

Страница 25: ...to be sent face down A Place the document against the right hand side of the feeder B see the mark printed on the fax machine s casing 3 Once the document has been inserted in the automatic docu ment feeder ADF the display shows on the top line DOCUMENT READY and on the bottom line the default contrast value NORMAL important If you do not perform any operation within about two minutes of inserting...

Страница 26: ...he console appear on the bottom line of the display TO SEND A DOCUMENT 1 Insert the document in the automatic document feeder ADF The display shows on the top line DOCUMENT READY and on the bottom line the default contrast value NOR MAL The initial resolution value is standard If you want change the contrast and resolution values as described previously 2 To dial the number of the correspondent to...

Страница 27: ...so you can ask him to press the start key on his fax machine after which you will hear the fax machine signal 4 To start sending press the key The message CONNECTING appears on the dis play If the document is sent correctly once this operation has been completed the display will show the message TX COMPLETED for a moment AUTOMATIC REDIAL If no connection is established due to line errors or becaus...

Страница 28: ...ds the procedure and the display shows the mes sages AUTOMATIC 00 on the first line AUTO MATIC on the base model and TX FROM MEMORY on the second line If you chose CONFIRM SETTINGS NO the fax allows you to modify the previous settings for example the correspondent s number or the time at which you want to send the document note If there is a power failure the transmission from the memory will be c...

Страница 29: ...itial stand by mode press the key 7 If you want to move back one function press the key note To activate reception with TAD mode you must first record the OUTGOING MESSAGE 1 see The Telephone Answer ing Device TO RECEIVE DOCUMENTS IN THE VARIOUS RECEPTION MODES MANUAL RECEPTION 1 When the telephone rings lift the handset to engage the line The display shows ON LINE 2 As soon as you hear the fax ma...

Страница 30: ...aved in position 01 the fax machine will display ALREADY PROGRAM 7 Dial your correspondent s telephone number or fax number To do this press the keys 8 To leave a space to correct typing mistakes or to enter characters or special symbols proceed as explained in All that is missing now is your name and fax number chapter How to get started quickly 9 To confirm the setting press the key The display ...

Страница 31: ...til the display shows PHONE BOOK EDIT 5 To confirm the setting press the key The display shows the number and the name associ ated with the first of the 100 available positions 00 99 saved previously 6 To find the telephone number or name you want to modify you can 1 Press the keys until the desired number or name appears on the display or 2 Press the key bearing the first letter of the name you a...

Страница 32: ...e transactions carried out transmission and reception the volume of documents handled and provides a lot of other useful information The fax machine prints the following reports Power failure report it is always and automatically printed after a power failure if there are documents in the memory Once normal operating conditions have been restored the fax machine will automatically print a report i...

Страница 33: ...IOUS SETT TX REPORT 7 Press the key The display shows TX REPORT FOR FAILED TX You can choose any of the following options TX RE PORT ALWAYS and TX REPORT NO TX REPORT FOR FAILED TX the fax machine will automatically print a report only after each failed trans mission TX REPORT ALWAYS the fax machine will automati cally print a report after each transmission irrespective of the result TX REPORT NO ...

Страница 34: ...etting press the key Having printed the report the fax machine automati cally returns to its initial stand by mode TO PRINT THE LIST OF RECEPTION SETUP PARAMETERS 1 Press the key The display shows MENU RECEPT SET UP 2 Press the key The display shows RECEPT SET UP RECEPTION MODE 3 Press the keys until the display shows RECEPT SET UP PRINT CONFIG 4 To confirm the setting press the key Having printed...

Страница 35: ...de the fax machine automatically prepares to receive when it is called by another fax machine to prevent documents sent to you from getting lost THE TAD CONSOLE Keys only present on model with a telephone an swering device To start playing new messages and memos If there are any messages or memos that you have not heard start with the memos from the first one you have not heard Momentarily to stop...

Страница 36: ...isplay shows SET ACCESS CODE 0 9 7 Enter the code for example 0001 pressing the keys The display shows SET ACCESS CODE 0 9 0001 8 To confirm the setting press the key 9 To return the fax machine to the initial stand by mode press the key 10 If you want to move back one function press the key TO CHANGE DELETE THE TAD ACCESS CODE 1 Press the key The display shows MENU RECEPT SET UP 2 Press the keys ...

Страница 37: ...if you are out and have selected the TAD FAX reception mode to inform the caller that the answering device cannot receive messages because its memory is full for example I m sorry but I can only receive faxes at the moment If you need to speak to me please call back later if you are in but have selected PHONE FAX mode to tell the caller not to hang up for example Please wait CALL TRANSFER MESSAGE ...

Страница 38: ...display shows TAD SET UP OGM 2 TO ERASE OUTGOING MESSAGE 2 1 Press the key The display shows MENU RECEPT SET UP 2 Press the keys until the display shows MENU TAD SET UP 5 Press the key The display shows OGM 1 PLAY 6 Press the keys until the display shows OGM 1 RECORD 7 Press the key The display shows LIFT HANDSET 8 Lift the handset The display shows TO RECORD 9 To start recording the message press...

Страница 39: ...ISTEN TO THE TRANSFER MESSAGE Play back the transfer message as you played back OUTGO ING MESSAGE 1 modifying the step 4 as follows Press the keys until the display shows TAD SET UP OGM 3 TO RECORD MEMOS As mentioned previously the telephone answering de vice may be used to record one or more memos which are handled in the same way as incoming messages 1 Press the key The display shows RECORD MEMO...

Страница 40: ...e key 2 Lift the handset Having played back the last message the fax machine emits two short beeps and returns automatically to the initial stand by mode The MESSAGES indicator LED stops blinking and will remain on steady TO DELETE MESSAGES AND MEMOS YOU HAVE ALREADY LISTENED TO You cannot delete a message or a memo until you have started listening to it Incoming messages and memos that have not b...

Страница 41: ...new messages to a remote location you can listen to them by op erating the TAD in the same way as in the To operate the telephone answering device from a remote location section below TO TRANSFER MESSAGES AND MEMOS TO A REMOTE TELEPHONE If you wish you can program the TAD to call you on a remote telephone at a given time to let you listen to any new messages received In addition to the time and nu...

Страница 42: ...f outgoing mes sage 1 programming 3 the TAD will stop immediately and confirm the recording To perform both the remote playback and programming functions you must Dial the fax number on the remote telephone The TAD will answer the call and play OUTGOING MESSAGE 1 Type the access code on the remote telephone keypad If the code is correct the TAD will confirm the operation by emitting a beep Choose ...

Страница 43: ...n ANNOUNCE ONLY YES press the keys 7 To confirm the setting press the key The display shows OGM 1 RECORD 8 To confirm the setting press the key The display shows RECORD OGM 1 LIFT HANDSET If you have already recorded OGM 1 the display will show the message PLAYING and the TAD will play it back If you have not recorded it the display will show the message OGM NOT RECORDED 9 To change the outgoing m...

Страница 44: ... RECEPT SET UP 2 Press the keys until the display shows MENU TAD SET UP 3 Press the key The display shows TAD SET UP ICM ON SPEAKER 4 Press the keys until the display shows TAD SET UP PRINT SET UP 5 To start printing press the key Once this operation has been completed the fax ma chine automatically returns to its initial stand by status ...

Страница 45: ...t to move back one function press the key TO RECEIVE A DOCUMENT THAT IS LONGER THAN THE PAPER SIZE USED If you receive a document that is longer than the paper size used you can have the surplus text printed by your fax machine on another sheet 1 Press the key The display shows MENU RECEPT SET UP 2 Press the keys until the display shows MENU FAX SET UP 3 Press the key The display shows FAX SET UP ...

Страница 46: ...ering service cen tre The fax machine is already set up to display the caller ID You may however set it up not to display it as follows 1 Press the key The display shows MENU RECEPT SET UP 2 Press the keys until the display shows MENU INSTALLATION 11 If you want to move back one function press the key NOTE If you choose the SURPLUS AUTOMATIC setting the fax machine will print the surplus text on a...

Страница 47: ... ple 4 RING VOLUME LEVEL 4 3 Press the key The display shows INSTALLATION STATION NAME 4 Press the keys until the display shows INSTALLATION TEL LINE SETUP 5 Press the key The display shows TEL LINE SETUP LINE TYPE 6 Press the keys until the display shows TEL LINE SETUP CALLER ID 7 Press the key The display shows CALLER ID YES 8 To view the other available option CALLER ID NO press the keys 9 To c...

Страница 48: ... 7 To return the fax machine to its initial stand by mode press the key 8 If you want to move back one function press the key TO ENABLE DISABLE RECOGNITION OF THE RING FREQUENCY In some countries local telephone companies offer the possibility of assigning the same telephone line two or more numbers corresponding to different users When an incoming call is received a different ring frequency will ...

Страница 49: ...SETUP LINE TYPE 6 Press the keys until the display shows TEL LINE SETUP FAX TEL TIMER 7 Press the key The display shows FAX TEL TIMER 20 SECS 8 To view the other available values FAX TEL TIMER 15 SECS FAX TEL TIMER 30 SECS or FAX TEL TIMER 40 SECS press the keys 9 To confirm your choice press the key 10 To return the fax machine to its initial stand by mode press the key 11 If you want to move bac...

Страница 50: ...isplay shows INSTALLATION STATION NAME 4 Press the keys until the display shows INSTALLATION TEL LINE SETUP 5 Press the key The display shows TEL LINE SETUP LINE TYPE 6 Press the keys until the display shows TEL LINE SETUP REMOTE CONTROL 7 Press the key The display shows REMOTE CONTROL YES 8 Press the key The display shows the code you set previously for example SET ACCESS CODE 0 9 8 9 To type the...

Страница 51: ...IST MODIFY NUMBER 6 To confirm the setting press the key The display shows the first number on the black list 7 To find the number you wish to modify press the keys 8 To confirm the setting press the key From this point on to change the number repeat the To set the black list procedure from step 6 TO DELETE THE BLACK LIST 1 Press the key The display shows MENU RECEPT SET UP 2 Press the key The dis...

Страница 52: ...fax machine outside the text area immediately below the top edge of the sheet or inside the text area slightly lower down than in the previous case Your fax machine is designed to send this information inside the text area To change the position 1 Press the key The display shows MENU RECEPT SET UP 2 Press the keys until the display shows MENU FAX SET UP 3 Press the key The display shows FAX SET UP...

Страница 53: ...turn the fax machine to its initial stand by mode press the key 11 If you want to move back one function press the key TO REGULATE THE SPEAKER VOLUME If the volume of the dialling tones and connection sig nals is too low or too high regulate it using the key 1 Press the key The display shows ON LINE 2 To raise or lower the volume of the speaker press the key The display shows the volume level set ...

Страница 54: ...s PBX FLASH NO 8 To view the other available option PBX FLASH YES press the keys 9 To confirm your choice press the key 10 To return the fax machine to its initial stand by mode press the key 11 If you want to move back one function press the key NOTE Having enabled the Flash function to switch from the private branch exchange PBX to the public line press the key before dialling the telephone or f...

Страница 55: ...program the phone book To do this 1 Press the key 2 Press the keys to find the desired number or 1 Press the key bearing the first letter of the name you are looking for The fax machine will search for the name in alphabetical order 5 Press the key The display shows VARIOUS SETT ECM 6 Press the key The display shows ECM YES 7 To view the other available option ECM NO press the keys 8 To confirm yo...

Страница 56: ...s the key The display shows TYPE TIME HH MM From this point on follow the procedure described in To make a transmission request polling recep tion from step 5 TO DELETE A POLLING RECEPTION THAT HAS BEEN SET 1 Press the key The display shows MENU RECEPT SET UP 2 Press the keys until the display shows MENU POLLING RX 3 Press the key The display shows POLLING RX NEW SETTING 4 Press the keys until the...

Страница 57: ...store it to its initial stand by mode if it is printing a report the fax machine will stop printing and display a series of prompts to enable you to restore it to its initial stand by mode if it is receiving a document it will stop printing and start to save the document received The display will show the message RX IN MEMORY Having saved the document the display shows the mes sage DOC IN MEMORY A...

Страница 58: ...eption Resume transmission of the pages indicated in the report 06 LINE BUSY The line is busy Retry when the line is free 07 DOCUMENT TOO LONG The document to be sent is too long The time taken to send it exceeds the allowed limits Split up the document to be sent 01 and 08 CHECK THE DOCUMENT The optical reader cannot read the document Remove the document from the ADF and reinsert it Then try conn...

Страница 59: ... negative effect on the printing quality clean the print cartridge see Cleaning the print cartridge and testing the nozzles chapter Maintenance operations CHECK DOCUMENT PRESS I The document is not being fed correctly replace the docu ment on the ADF and press the key to restore the fax machine s normal operation CHECK PAPER PRESS I The paper in the feeder has run out add some more and press to cl...

Страница 60: ...ter Maintenance operations PHONE BOOK EMPTY You are trying to modify delete a fax or telephone number from the phone book but the phone book is empty PHONE BOOK FULL You are trying to store a fax or telephone number in the phone book but the phone book is full delete at least one telephone or fax number from the phone book POLL RETRY NNN You set polling reception and the connection was not estab l...

Страница 61: ...press the key again to resume the conversation with the correspondent NEW PRINT CART 1 YES 0 NO You have installed a disposable print cartridge for the first time or you have removed and reinstalled it select the rel evant answer If you answer yes but the print cartridge is not new the fax machine will not detect the out of ink condition ON LINE You have engaged the line by lifting the handset of ...

Страница 62: ...been replaced correctly on a sheet that it has loaded automatically If the print quality of the numbered scale is not satisfactory see Insert the print cartridge in the How to get started quickly chapter If you replaced the cartridge because of a deterioration in print quality proceed as follows 1 Press the key until the display shows MENU RECEPT SET UP 2 Press the keys until the display shows MEN...

Страница 63: ...CLEAN CAR TRIDGE YES press the keys 7 Press the key The fax machine resets the cartridge and tests the noz zles and then prints out the result of the diagnostic test To interpret the diagnostic test result correctly see In sert the print cartridge in the How to get started quickly chapter NOTE The procedure may be aborted at any time if desired by pressing the key NOTE If the quality of the test r...

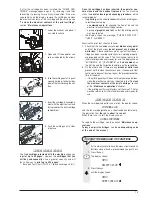
Страница 64: ...icated by the arrow 3 Release the print cartridge by pressing the lever as indicated by the arrow 4 Take the print cartridge out of its compartment 5 Clean the electrical contacts us ing a slightly damp cloth Warning Do not touch the nozzles 6 Clean the electrical contacts of the print cartridge carriage with a slightly damp cloth 7 Insert the print cartridge in its compartment with the electrical...

Страница 65: ... or sheet of paper 7 Place one end of the roller on the pin situated on the left hand side of the fax machine see fig 7 of procedure To clean the optical reader 8 Engage the roller by pressing the lever see fig 8 of proce dure To clean the optical reader 9 Close the operator console and put the handset back on its support NOTE To check whether the optical reader is clean make a copy of a blank she...

Страница 66: ...o azionista Gruppo Telecom Italia Direzione e coordinamento di Telecom Italia S p A Via Jervis 77 10015 IVREA TO ITALY CUSTOMER SERVICE If the fax machine is not working as it should or you want to ask the manufacturers something call the number indicated on the Warranty Card ...

Страница 67: ...rm storage 5 95 transport CHARACTERISTICS OF OPTICAL READER Scanning method CIS Scanning resolution Horizontal 8 pixel mm Vertical STANDARD 3 85 lines mm Vertical FINE 7 7 lines mm TRANSMISSION CHARACTERISTICS Transmission speed ca 7s 14400 bps Capacity of document feeders Automatic feeder ADF 10 sheets A4 70 90 gr m2 RECEPTION CHARACTERISTICS Printing system Printing on plain paper bubble ink jet...

Страница 68: ... ECM Error Correction Mode 52 Electricalcontacts print cartridge carriage 61 Environment environmental recycling 3 Environmental recycling to dispose of our devices correctly 3 Error codes 55 56 Error LED indicator 57 I Installationandsetupparameters abouttheinstallationandsetupparameters 4 settingsomeparameters 9 L Linecharacteristics to switch from a public line to a private line 12 Line signals...

Страница 69: ...ion 17 27 with recognition of the type of call 27 manual reception 17 27 reception in PHONE FAX mode 18 reception with telephone answering device 17 recognition of the ring frequency 46 silentreception 44 surplus text 43 tochangethelengthoftheacousticsignal 47 to change the number of rings 45 to change the remote control code 48 to change the ring volume 45 to change the silence lapse 47 to choose...

Страница 70: ...essage2 36 tolistentothetransfermessage 37 to operate the TAD from a remote location 40 to print the TAD configuration parameters 42 to record memos 37 to record outgoing message 1 35 to record outgoing message 2 36 to record the transfer message 37 to set the TAD access code 34 totransfermessagesandmemos 39 to turn on the TAD 33 To delete the black list 49 To modify the black list 49 To operate t...

Страница 71: ... voltage fluctuations and flicker in low voltage supply systems for equipment with rated current up to and including 16A EN 55024 A1 2002 Electromagnetic Compatibility Information technology equipment Immunity characteristics Limits and methods of measurement EN 60950 1 A1 2004 Safety of Information Technology Equipment including electrical business equipment Moreover the product is in compliance ...

Страница 72: ......

Страница 73: ......

Страница 74: ......

Страница 75: ...g wood All consumables are manufactured in such a way as to limit the environmental impact and conform to the regulations in force Olivetti has banned the use of a number of hazardous substances chromium cadmium mercury lead and others in the manufacture of its products Olivetti consumables conform to the CONTROL OF POLLUTION FROM ELECTRONIC INFORMATION PRODUCTS SJ T11363 2006 CHINA RoHs regulatio...

Страница 76: ...380541H ...

Отзывы: