background image

Section 5  OTHER CONVENIENT FUNCTIONS

5-29

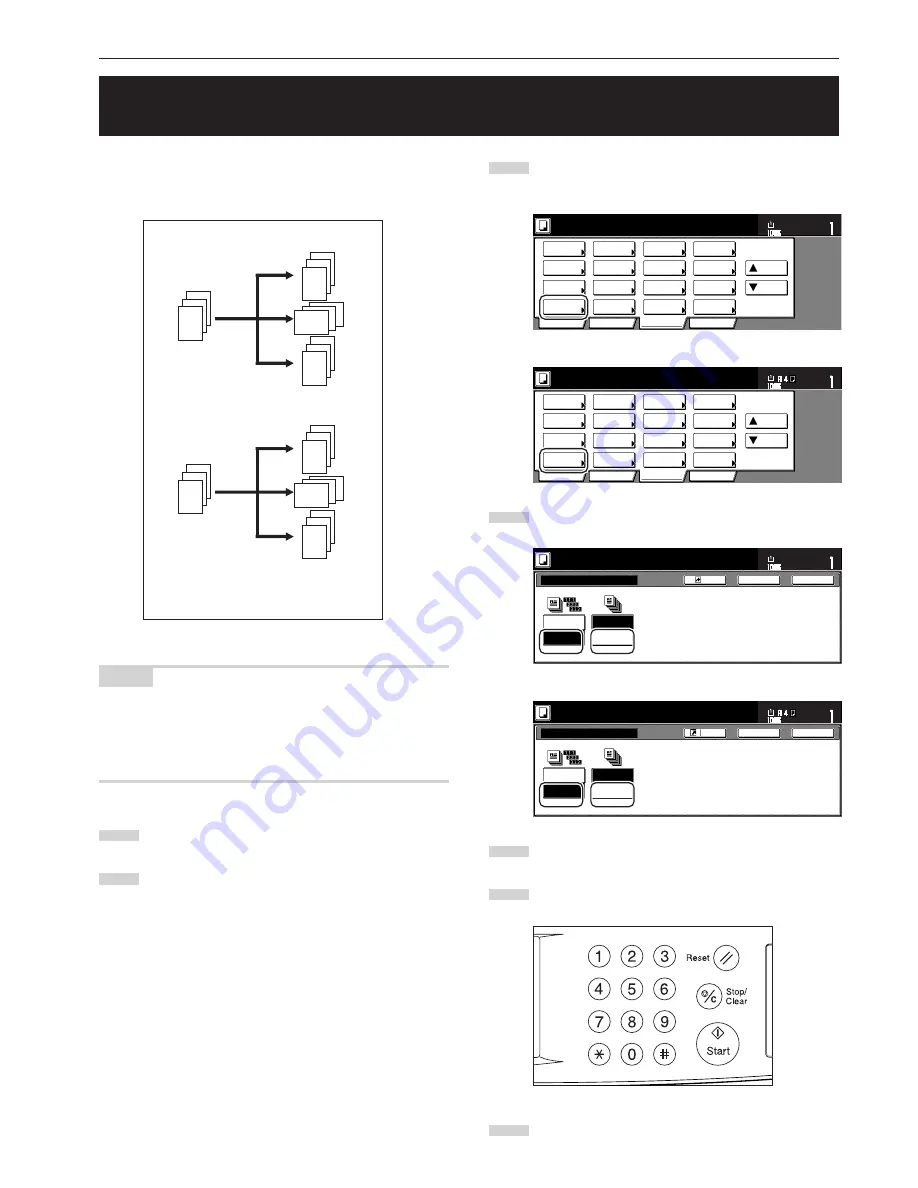
12. Automatic sorting of copy sets without the Document Finisher

[Sort/Finished mode]

Since copying in this mode is performed after multiple originals are
scanned and memorized, copies can be sorted into the required
number of sets even without the optional Document Finisher.

NOTES

• If you do not have paper of the same size but different orientations

available for paper feed, copies will be ejected without being
“sorted” in this way.

• You can also select whether or not the Sort mode will be the default

setting in the initial mode. (See “Sort mode ON/OFF” on page 7-77.)

1

 Set the originals to be copied.

2

Touch the “Function” tab. The content of the “Function” tab
will be displayed.

3

2

1

3

2

1

3

2

1

3

2

1

1

1

1

3

3

3

2

2

2

3

2

1

3

Touch the “Sort/Finished” key. The “Sort/Finished” screen will
be displayed.

Inch specifications

2 sided/
Separation

Select
paper

Combine

Reduce
/Enlarge

Margin/
Centering

Forms
Overlay

Page #

Function

Basic

User choice

Program

Cover
Mode

Booklet

Sort/
Finished

Border
Erase

Exposure
mode

Orig.image
quality

Ready to copy.

Select
orig. size

Auto
Selection

Batch
scanning

Up

Down

Set

Paper size

11x8

1

/

2

"

Metric specifications

Select 
paper

2-sided/
Split

Merge copy

Reduce/
Enlarge

Margin/
Imag. shift

Page
numbering

Function

Basic

User choice

Program

Cover 
Mode

Booklet

Erase 
Mode

Exposure
mode

Image 
quality

Sort/
Finished

Ready to copy.

Select 
size orig.

Auto
selection

Large # of
originals

Form 
overlay

Up

Down

Set

Paper size

4

Touch the “Sort:ON” key.

Inch specifications

Offset

Sort

Sort/Finished

None

1 set

Register

Ready to copy.

Set

Paper size

Back

Close

11x8

1

/

2

"

Sort:OFF

Sort:ON


Metric specifications

Sort:Off

Sort:On

G r o u p

S o r t

Sort/Finished

None

1 set

Back

Close

Ready to copy.

Register

Set

Paper size


5

Touch the “1 set” key.

6

Use the keypad to set the number of copies to be made.

7

Press the [Start] key.
Copying will start.

(when there is paper loaded of the same
size but different orientation)

When “Sort:ON” and “On” [“1 set”] are
selected

When “Sort:OFF” and “On” [“Output each
page”] are selected

Содержание d-Copia 300

Страница 1: ...Copier Operation Guide Please read the operation guide before using the copier Keep it close to the copier for easy reference d Copia 300 d Copia 400 d Copia 500...

Страница 2: ...R is a U S registered mark The auto shut off time setting is between 15 and 120 minutes in the areas corresponding to the Swiss Energy 2000 Program area Your attention is drawn to the following action...

Страница 3: ...rally indicated messages by listing that for the inch version followed in brackets by the corresponding information for the metric version However when a message is essentially the same or when the di...

Страница 4: ......

Страница 5: ...the basic procedures required to make simple copies Section 5 OTHER CONVENIENT FUNCTIONS This section contains explanations on using the various convenient functions of this copier Section 6 DOCUMENT...

Страница 6: ...e from books Book erase mode 5 11 7 Fitting the image of either two or four originals onto a single copy page Combine Merge Copy modes 5 13 1 2 in 1 5 13 2 4 in 1 5 13 8 Printing page numbers on copie...

Страница 7: ...Checking the total counter and printing out the counter report 7 92 7 Box management default settings 7 93 1 Box settings 7 93 2 Accessing the box management default settings 7 93 3 Making box manage...

Страница 8: ...pes of originals 2 sided copy modes Page 5 1 5 Copying each image of open faced books etc or 2 sided originals onto separate sheets Page separation Split copy modes Page 5 4 6 Creating a margin on the...

Страница 9: ...aking mirror image copies Mirror image mode Page 5 39 21 Making a test copy prior to large volume copying Proof mode Page 5 40 22 Making more of the same copies after a copy job is finished Repeat cop...

Страница 10: ...nt Copy management mode Page 7 1 31 Changing the language used in the touch panel Language selection function Page 7 102 32 A full range of optional equipment is available Document Processor Page 8 1...

Страница 11: ...vii Printer Kit Page 8 12 Printer scanner Kit Page 8 12 Fax Kit Page 8 12...

Страница 12: ...ime of no activity that must pass before Low Power Mode is activated may be lengthened See 5 Energy saving modes on page 4 11 and Auto low power time on page 7 47 for more information Off Mode Only wh...

Страница 13: ...ntion to or incorrect compliance with the related points Symbols The m symbol indicates that the related section includes safety warnings Specific points of attention are indicated inside the symbol G...

Страница 14: ......

Страница 15: ...ove these labels Section 1 IMPORTANT PLEASE READ FIRST Label 3 Moving parts inside May cause personal injury Do not touch moving parts Label 2 Do not incinerate toner and toner container Dangerous spa...

Страница 16: ...he plastic may cling to their nose and mouth causing suffocation INSTALLATION PRECAUTIONS Environment CAUTION Avoid placing the copier on or in locations which are unstable or not level Such locations...

Страница 17: ...water flower vases flower pots cups etc on or near the copier This of situation presents a danger of fire or electrical shock should they fall inside DO NOT remove any of the covers from the copier as...

Страница 18: ...he toner container or the waste toner box Other precautions After use ALWAYS dispose of the toner container and the waste toner box in accordance with Federal State and Local rules and regulations Sto...

Страница 19: ...rdous radiation exposure This label is attached to the laser scanner unit inside the machine and is not in a user access area The labels shown below is attached on the right side of the machine DANGER...

Страница 20: ...only functional switches and are not suitable for isolating the equipment from the power source VORSICHT Der Netzstecker ist die Hauptisoliervorrichtung Die anderen Schalter auf dem Ger t sind nur Fu...

Страница 21: ...ts and methods of measurement for radio interference characteristics of information technology equipment EN55022 Class B Limits for harmonic currents emissions for equipment input current 16A per phas...

Страница 22: ...1 8...

Страница 23: ...t originals here for copying Place originals face down with the edges aligned with the size scales on the left and rear sides of the platen 6 Original size scales Be sure to align the original with th...

Страница 24: ...shaft Pull and push back in after toner container replacement or when copy images become soiled with toner Front cover Open to replace the toner container or waste toner box Power switch Turn ON I bef...

Страница 25: ...e is in the printer operation mode The lamp to the left of the key will either light green or orange or will flash one of those colors depending upon the status of the machine See page 9 3 Scanner key...

Страница 26: ...clear function will automatically engage and the copier will return to the same settings as those after warm up initial mode settings However the copy exposure mode and the image quality mode will no...

Страница 27: ...Sort Off Sort On Basic User choice Program Function 11x81 2 81 2x11 11x81 2 11x81 2 11x81 2 Recycled 3 6 5 0 2 1 8 9 7 4 Merge copy AMS Reduce Enlarge APS Image quality Reduce Enlarge Exposure mode Au...

Страница 28: ...the original image at its actual size 100 Sort OFF key Touch this key when you want to make copies without sorting them Sort ON key Touch this key when you want to make copies in the sort mode Sort Fi...

Страница 29: ...ck key Touch this key when you want to return the settings for the currently selected mode back to their previous values Close key Touch this key when you want to return to the previous screen Inch sp...

Страница 30: ...Section 2 NAMES OF PARTS 2 8...

Страница 31: ...aper size and type on page 7 86 respectively Among the special paper that can be use with this copier there is a wide range in paper quality and construction especially in those types of paper noted b...

Страница 32: ...e 3 Hold the length adjustment plate and move it to align with the required paper length 4 Set the paper flush against the left hand wall of the drawer cassette IMPORTANT Make sure that there are no f...

Страница 33: ...5 sheets Standard paper 120 g m2 130 sheets Standard paper 160 g m2 100 sheets IMPORTANT When copying onto OHP transparencies be sure to fan through them a few times to separate the sheets before sett...

Страница 34: ...are wide open the flap and set the envelopes with the copy side facing upward and the flap facing away from the direction of insertion Then slide the envelopes into the slot along the insert guides as...

Страница 35: ...Page 5 9 Making copies with clean edges Page 5 11 Fitting the image of either two or four originals onto a single copy page Page 5 13 Printing page numbers on the copies Page 5 16 Overlaying one imag...

Страница 36: ...osure level selected automatically It is also possible for you to adjust the copy exposure by touching the Exposure Mode key to access the Exposure Mode screen Copy exposure adjustment can then be per...

Страница 37: ...hoto mode on page 7 74 Manual exposure adjustment text mode on page 7 75 and Manual exposure adjustment photo mode on page 7 76 Inch specifications Metric specifications 7 Setting the number of copies...

Страница 38: ...ction and then press the Start key to resume copying If ejected copies come out curled or are otherwise not stored cleanly remove the paper from the drawer cassette or the multi bypass tray whichever...

Страница 39: ...he copying procedure 1 Auto magnification selection mode With this mode the original image is enlarged reduced automatically according to the selected paper size IMPORTANT If you use this mode most of...

Страница 40: ...tio to the desired setting The desired magnification ratio can also be entered directly by touching the keys Keys key and then using the keypad Inch specifications Reduce Enlarge Standard Zoom Ready t...

Страница 41: ...x81 2 Recycled Metric specifications Merge copy AMS Reduce Enlarge APS Image quality Reduce Enlarge Exposure mode Auto Exposure Ready to copy Set Paper Size Bypass Colour Recycled Plain Plain Plain So...

Страница 42: ...1x17 51 2x81 2 81 2x14 81 2x11 Metric specifications Reduce Enlarge Standard Zoom Ready to copy Back Register XY Zoom Close Keys AMS Set Paper size 100 25 400 100 100 400 200 141 127 106 90 75 70 50 2...

Страница 43: ...copying is useful if during one copy job you want to copy other originals at different settings Once the rush job is completed the interrupted copy job can be resumed at the same settings as before 1...

Страница 44: ...in Plain Plain Sort Finished Sort Off Sort On Basic User choice Program Function Ready to copy Jobreservation Set Paper Size Job resrv finished 4 Press the Start key Scanning of the originals will sta...

Страница 45: ...will engage and cause the copier to automatically enter the Low power mode The factory default setting is for 15 minutes Auto sleep function If no operation is performed on the copier for a designated...

Страница 46: ...Section 4 BASIC OPERATION 4 12...

Страница 47: ...aced books etc or 2 sided originals 1 Making 2 sided copies from a 2 sided original With this mode a 2 sided original is copied and the front and back sides of the copy paper are used so that the copy...

Страница 48: ...Orig image quality Ready to copy Select orig size Auto Selection Batch scanning Up Down Set Paper size 11x81 2 Metric specifications Select paper 2 sided Split Merge copy Reduce Enlarge Margin Imag sh...

Страница 49: ...ster Original Left Right binding Top binding Left Right binding Top binding Back Paper s Register Original Finished Left binding Right binding d d BookR Book BookR Duplex ed Ba Che Se sid copy Open fr...

Страница 50: ...iginals the image will be enlarged or reduced to fit the size of the copy paper 2 Page separation Split copy from 2 sided originals With this mode the two sides of a 2 sided original are each copied o...

Страница 51: ...n faced originals Metric specifications for 1 sided or 2 sided originals for open faced originals 7 Press the Start key Scanning of the originals will start If you set the originals in the optional Do...

Страница 52: ...rgin can be set to any 1 8 increment between 1 8 and 3 4 A setting of 0 will leave no margin space Metric specifications When you are making 2 sided copies the margin positions and widths can be selec...

Страница 53: ...ift None Margin Image shift Front page Left Top Back page margin Check direction Check direction of original Auto 7 If you want to create a margin on the back side of the copies that lines up with tha...

Страница 54: ...ooklet Erase Mode Exposure mode Image quality Sort Finished Ready to copy Select size orig Auto selection Large of originals Form overlay Up Down Set Paper size 4 Touch the Centering Imag shift key In...

Страница 55: ...vert Mirror Modify Copy Proof Copy Memo pages Orig set direction Ready to copy Up Down Set Paper size Eco Print Auto Rotation Function Basic User choice Program OHP backing 11x81 2 Metric specificatio...

Страница 56: ...lly If you set an original on the platen a message will appear telling you to set the next original In this case go to the next step 8 Replace the first original with the next one and press the Start...

Страница 57: ...nch specifications With this mode you can make clean copies even from thick books The width of the outside border to be erased can be set to any 1 8 increment between 1 8 and 3 4 The width of the cent...

Страница 58: ...t Paper size 4 Touch the Sheet Erase Border erase key or the Book Erase key as appropriate The screen to set the outside border and the center area will be displayed Inch specifications Border Erase E...

Страница 59: ...in 1 Use this mode when you want to copy two originals onto one sheet This mode can also be used in conjunction with the 2 sided copy modes in order to copy four originals onto one sheet When setting...

Страница 60: ...t orig size Auto Selection Batch scanning Up Down Set Paper size 11x81 2 Metric specifications Select paper 2 sided Split Merge copy Reduce Enlarge Margin Imag shift Page numbering Function Basic User...

Страница 61: ...ll start automatically If you set an original on the platen a message will appear telling you to set the next original In this case go to the next step 8 Replace the first original with the next one a...

Страница 62: ...you want to use The screen to make settings for that style will be displayed Inch specifications None Page Register Page can be added on bottom of copy Ready to copy Set Paper size Back Close 11x81 2...

Страница 63: ...r 7 Touch the Close key The touch panel will return to the screen in step 5 8 If you want the first page number that is printed to be something other than 1 touch the Setting start Setting Start page...

Страница 64: ...k Edge Left top corner 13 Touch the key or the key to select counting from the final copy how many pages you do NOT want to have page numbers printed on Inch specifications Last page Manual Page Setti...

Страница 65: ...r Check direction of original top side keys Metric specifications Auto Manual Setting denominator Check direction Check direction of original Back Close Ready to copy Set Paper size Back Edge Left top...

Страница 66: ...orig Auto selection Large of originals Form overlay Up Down Set Paper size 3 Touch the On key The screen to set the shading level of the form image will be displayed Inch specifications On Off Forms O...

Страница 67: ...Form 004 Form 003 Form 002 Form 001 Back Close Up Down 11x81 2 11x81 2 81 2x11 11x81 2 11x81 2 Metric specifications Back Close Form selection Form Scan form once The arrow means direction of registe...

Страница 68: ...Document Finisher with Center Bind Fold Unit is installed on your copier you will be able to select center binding stapling and folding Only A4R B4 and A3 size copy paper can be center folded and stap...

Страница 69: ...hing Off None Stitching Front cvr Saddle Stitch None Booklet 1 sided 2 sided Left Right 2 sided Top Bottom Open from left Open from right Open from top Register Set Paper size Back Close 11x81 2 Origi...

Страница 70: ...ch specifications Pape Set 100 Saddle Stitch Back Close Off Bind Fold 81 2x11 2 sided mode Metric specifications Duplex Mode Saddle Stitch Bind Fold Back Close Set Paper size Off 9 If you want to add...

Страница 71: ...ll start automatically If you set an original on the platen a message will appear telling you to set the next original In this case go to the next step 12 Replace the first original with the next one...

Страница 72: ...ill be able to select center binding stapling and folding Only 8 1 2 x 11 and 11 x 17 size copy paper can be center folded and stapled Metric specifications If the optional Document Finisher with Cent...

Страница 73: ...Press Start key Register Set Paper size Back Close 11x81 2 Copy front Off None Saddle Stitch Book Right Book Left Open from right Open from left Original Finishing Check direction Set the book origin...

Страница 74: ...e you have finished scanning all of the originals touch the Scanning finished key Copying will start 7 Touch the Bind Fold key It is possible for you to center staple and fold up to 10 copy sheets 40...

Страница 75: ...n Centering Forms Overlay Page Function Basic User choice Program Cover Mode Booklet Sort Finished Border Erase Exposure mode Orig image quality Ready to copy Select orig size Auto Selection Batch sca...

Страница 76: ...t of the next portion of the Function tab will be displayed 2 Touch the Auto Rotation key The Auto Rotation screen will be displayed Inch specifications Invert Mirror Modify Copy Proof Copy Memo pages...

Страница 77: ...ct separately whether you want both sides or only one side of both the front and back covers to be copied onto or to have either or both of them left completely blank Select also whether or not you ev...

Страница 78: ...d paper cassette No cover Back Close Ready to copy Register Set Paper size 5 Select the desired settings for the front cover Inch specifications Rear cover No cover Cover Blank Front copy 2 sided copy...

Страница 79: ...ll start automatically If you set an original on the platen a message will appear telling you to set the next original In this case go to the next step 9 Replace the first original with the next one a...

Страница 80: ...rder Erase Exposure mode Orig image quality Ready to copy Select orig size Auto Selection Batch scanning Up Down Set Paper size 11x81 2 Metric specifications Select paper 2 sided Split Merge copy Redu...

Страница 81: ...ns of the scan area will be displayed 8 Based on the left rear corner of the platen being a setting of 0 touch the key or the key to change the dimensions of the scan area to the desired setting In me...

Страница 82: ...onto the transparency but the backing sheet will be left blank The asterisk in the illustration indicates the transparencies 1 Set the originals to be copied 2 Set the transparency film on the multi...

Страница 83: ...c OHP backing king Insert a blank paper between piece of OHP film or copy to a OHP back paper Place the OHP film in the bypass 11x81 2 Register Metric specifications None Copy Back Register Close Read...

Страница 84: ...cifications Invert Mirror Modify Copy Proof Copy Memo pages Orig set direction Ready to copy Up Down Set Paper size Eco Print Auto Rotation Function Basic User choice Program OHP backing 11x81 2 Metri...

Страница 85: ...direction Ready to copy Up Down Set Paper size Eco Print Auto Rotation Function Basic User choice Program OHP backing 11x81 2 Metric specifications Invert Mirror Modify copy Test copy Memo pages Orig...

Страница 86: ...oice Program OHP backing 11x81 2 Metric specifications Invert Mirror Modify copy Test copy Memo pages Orig set direction Ready to copy Up Down Set Paper size Eco Print Auto Rotation Function Basic Use...

Страница 87: ...y 100 APS Output Rear 1 sided Job130 11x81 2 11x81 2 Metric specifications Change Preset Cancel Original Count set Check test copy To stop and retry press Cancel key To continue to print press Start k...

Страница 88: ...t the originals to be copied 2 Touch the Function tab The content of the Function tab will be displayed 3 Touch the Down key The content of the next portion of the Function tab will be displayed 4 Tou...

Страница 89: ...t 2 Printing out with the repeat copy mode Once you press the Repeat Copy key the Modify copy list will be displayed so that you can verify the copy jobs that are registered for repeat copying It is p...

Страница 90: ...when you registered the copy job for repeat copying the code input screen will be displayed In this case go to the next step If you did NOT designate a security code when you registered the copy job...

Страница 91: ...you have finished checking the content of the copy job touch the Close key The touch panel will return to the screen in step 2 6 If you want to check the contents of another registered copy job repea...

Страница 92: ...ou really want to delete Yes No Stop 117 If you selected Yes the selected copy job will be canceled and the touch panel will return to the screen in step 2 If you selected No the touch panel will retu...

Страница 93: ...Merge copy Reduce Enlarge Margin Imag shift Page numbering Function Basic User choice Program Cover Mode Booklet Erase Mode Exposure mode Image quality Sort Finished Ready to copy Select size orig Aut...

Страница 94: ...rint screen will be displayed Inch specifications Invert Mirror Modify Copy Proof Copy Memo pages Orig set direction Ready to copy Up Down Set Paper size Eco Print Auto Rotation Function Basic User ch...

Страница 95: ...r Modify Copy Proof Copy Memo pages Orig set direction Ready to copy Up Down Set Paper size Eco Print Auto Rotation Function Basic User choice Program OHP backing 11x81 2 Metric specifications Invert...

Страница 96: ...esent setting End No registration Metric specifications Select program number No registration No registration No registration No registration No registration No registration No registration Register p...

Страница 97: ...ete Change name File A File B List A Catalog B Catalog C Catalog D Basic User choice Function Program Catalog A Ready to copy Set Paper size 3 Touch the program key 1 8 for which you want to change th...

Страница 98: ...delete lnch specifications Select the number of program to delete No registration Delete registration End File A File B List A Catalog B Catalog C Catalog D Catalog A Metric specifications Select the...

Страница 99: ...ice Program Cover Mode Booklet Sort Finished Border Erase Exposure mode Orig image quality Ready to copy Select orig size Auto Selection Batch scanning Up Down Set Paper size 11x81 2 Metric specificat...

Страница 100: ...Register No 1 Register this selecting mode OK YES NO If you selected Yes the selected function will be registered under the registration key If you selected No the touch panel will return to the scree...

Страница 101: ...key The Register screen will be displayed lnch specifications None Solid Dotted Borders Combine None Layout Border line Set Paper size Ready to copy Register Back Close 11x81 2 Rear Check direction L...

Страница 102: ...e deleted from on the right side of the touch panel Inch specifications AMS Reduce Enlarge APS Orig image quality Reduce Enlarge Exposure mode Auto Exposure Ready to copy Set Paper Size Bypass Color P...

Страница 103: ...e front cover and the middle insert originals A and C as well as for the back cover will be set on the multi bypass and that there is plain copy paper loaded in drawer cassette No 1 Step 1 Accessing t...

Страница 104: ...page Print from rear page 5 Touch the On key Touch the Close key The touch panel will return to the screen in step 4 Inch specifications Ready to Job build Place originals then press Start key Modify...

Страница 105: ...n Plain Scan next original s Place the originals and press start key Press Scanning finished key when starting copy 12 Set the second originals B to be copied Press the Start key Scanning of the origi...

Страница 106: ...key Leaving the back side of the original blank will allow the next copy to start on the front side of the next page Inch specifications Select paper 1 sided 2 sided copy Back Edge 1 sided 2 sided 2 s...

Страница 107: ...rom Rear page 11x81 2 Metric specifications Scan next original s Place the originals and press start key Press Scanning finished key when starting copy Select paper 1 sided 2 sided Copy Back Edge 1 si...

Страница 108: ...Bypass Plain Colour Plain Plain Plain 2 Specifying the type of originals This procedure specifies the type of originals being copied between 1 sided 2 sided and open faced 1 With the content of the B...

Страница 109: ...on Check direction of original top side Ready to Job build Place originals then press Start key Close Back Set Rear Left top corner Metric specifications 1 sided 2 sided Copy 1 sided Copy 2 sided Copy...

Страница 110: ...ey the Saddle Stitch Center Staple key or the Punch mode key as appropriate Follow the instructions on the right side of the touch panel and verify the direction in which the originals were set Inch s...

Страница 111: ...wrong incorrect copy will result Ready to Job build Set original Press Start key Close Back Set Back Edge Left top corner Check direction Check direction of original IMPORTANT If the designation for t...

Страница 112: ...ld Set original Press Start key Close Back Set 3 Touch the Close key The touch panel will return to the screen in step 1 9 Turning the eco print mode ON This procedure allows you to turn the eco print...

Страница 113: ...Then in the resulting screen touch the Select orig size Select size orig key The Select original size Select size original screen will be displayed Inch specifications Border Erase Auto Modify Copy Se...

Страница 114: ...ytime You can set a password to secure saved document 3 Touch the Close key The touch panel will return to the screen in step 1 Selecting the margin mode or the centering image shift mode This procedu...

Страница 115: ...t size orig None None Page numbering Margin Imag shift 2 sided Copy Left Finished page 0 Basic Quality Edit Job Build Step1 End Ready to Job build Set original Press Start key Set Insert blank page Pr...

Страница 116: ...Section 5 OTHER CONVENIENT FUNCTIONS 5 70...

Страница 117: ...ience This is useful for example for registering business forms and the like that are frequently used my many people The data that you register here will be stored permanently until the procedure to d...

Страница 118: ...hrough 6 7 Touch the End key The touch panel will return to the contents of the Basic tab 2Checking registered forms and changing form names Perform the following procedure when you want to verify the...

Страница 119: ...egistered form repeat steps 3 through 5 6 Touch the Close key once again The touch panel will return to the screen in step 2 Touch the End key The touch panel will return to the contents of the Basic...

Страница 120: ...uch the Close key The touch panel will return to the screen in step 2 Touch the End key The touch panel will return to the contents of the Basic tab 3 Shared data box 1Storing documents in the box Per...

Страница 121: ...Press the Start key Scanning of the documents will start Once all of the documents have been completely scanned the touch panel will return to the screen in step 3 If you want to register another docu...

Страница 122: ...of stored documents the size of the original documents or the date and time they were stored in the shared data box or when you want to print out the first page of those document in order to check the...

Страница 123: ...d documents touch the Print from 1st Head Print key If you want to change the name of the selected documents touch the Change doc name key and then enter the new name Inch specifications Check Correct...

Страница 124: ...Job 002 Job 001 1 1 1 1 1 25 10 01 25 10 01 25 10 01 25 10 01 25 10 01 Document data box Metric specifications Up Delete Close Down Box editing Document Management Shared Data Box Order of indication...

Страница 125: ...003 IJKL_0200003 008 EFGH_0000102 013 ABCD_0200101 018 UVWX_0200106 004 MNOP_0000004 009 IJKL_0000103 014 EFGH_0200102 019 ABCD_050010 005 QRST_0000005 010 MNOP_0000104 015 IJKL_0200103 020 EFGH_05001...

Страница 126: ...y Print Box Form box Document registr Document printing Document printing Document registr Form registr Box Editing Box Editing Box Editing 6 Touch the Select orig size Select size orig key the Select...

Страница 127: ...ations Stop Enter Clear Enter key 007 Box Name ABCDEFG Password Enter password Refer to 7 Registering a password for a box on page 6 18 for information on registering the password 4 Select the documen...

Страница 128: ...specifications 001 ABCD_0000001 006 UVWX_0000006 011 QRST_0000105 016 MNOP_0200104 002 EFGH_0000002 007 ABCD_0000101 012 UVWX_0000106 017 QRST_0200105 003 IJKL_0200003 008 EFGH_0000102 013 ABCD_020010...

Страница 129: ...n touch the Enter key The Document printing screen or the Box editing screen as appropriate will be displayed Inch specifications 001 ABCD_0000001 006 UVWX_0000006 011 QRST_0000105 016 MNOP_0200104 00...

Страница 130: ...f you want to print out the first page of the selected documents touch the Print from 1st Head print key If you want to change the name of the selected documents touch the Change doc name key and then...

Страница 131: ...104 002 EFGH_0000002 007 ABCD_0000101 012 UVWX_0000106 017 QRST_0200105 003 IJKL_0200003 008 EFGH_0000102 013 ABCD_0200101 018 UVWX_0200106 004 MNOP_0000004 009 IJKL_0000103 014 EFGH_0200102 019 ABCD_...

Страница 132: ...ABCD_0200101 018 UVWX_0200106 004 MNOP_0000004 009 IJKL_0000103 014 EFGH_0200102 019 ABCD_0500101 005 QRST_0000005 010 MNOP_0000104 015 IJKL_0200103 020 EFGH_0500102 Box editing Select box No Cancel B...

Страница 133: ...played Enter the registered password with the keypad and then touch the Enter key Inch specifications Stop Enter Clear Enter by key 007 Password Enter password Metric specifications Stop Enter Clear E...

Страница 134: ...its number using the keypad Then touch the Enter key The Box editing screen will be displayed Inch specifications 001 ABCD_0000001 006 UVWX_0000006 011 QRST_0000105 016 MNOP_0200104 002 EFGH_0000002 0...

Страница 135: ...32 WED 15 33 WED 15 34 WED 15 35 WED 15 37 001 005 007 Box ABCDEFGHIJK 5 Use the keypad to enter the new password for that box and then touch the Enter key The new password will be registered and the...

Страница 136: ...receive fax data are displayed just like any other copy job These print jobs can be verified just like copy jobs by checking the Print status screen A icon under the Job heading indicates a copy job...

Страница 137: ...status Move behind Cancel Delete interrupt print Check Rev details Registration Copy Printer Copy Fax Input source 2 Display of the output management functions Press the Job Queue key The Print status...

Страница 138: ...revise details screen enabling you for example to check the contents of or change the number of copies to be made for the currently selected highlighted job This is only available when the optional Ha...

Страница 139: ...r all department ID codes as a whole or by each individual department Set copy limits to any 1 page increment up to 999 999 Clear the copy counts for all department ID codes at one time or for each in...

Страница 140: ...sponding ID code Change restrictions for use Perform this procedure when you want to change the restrictions for using the copier under each department ID code Check all departments Perform this proce...

Страница 141: ...eypad to enter the 4 digit management code The factory default management code for 30 cpm copiers is 3000 for 40 cpm copiers is 4000 and for 50 cpm copiers is 5000 If the entered management code match...

Страница 142: ...cations Close Each Mgt Total Management total Managem Total Default setting Register Sett Management Def Set Management edit Off On Management code menu Management 3 Touch the Register key The New reg...

Страница 143: ...Inch specifications End Stop Name to display 1st Sales Dept Limit 32 letters including AllDel Del prev 1 2 3 4 5 6 7 8 9 0 q w e r t y u i o p a s d f g h j k l z x c v b n m Capital Num Sym Space Let...

Страница 144: ...ng item Copy limitation Printer limitation On No limit Output limitation No limit Scanner limitation No limit Fax Transm Limitation No limit Metric specifications Job cancel 0007 1st Sales Dept Defaul...

Страница 145: ...agement setting See Copy Printer output management on page 7 30 The following settings are available If All is selected as the Copy Printer output management setting All is the factory default setting...

Страница 146: ...nt edit 2 Select Copy limitation under the Setting item column on the left side of the touch panel and then touch the Change key The Copy limitation screen will be displayed Inch specifications Close...

Страница 147: ...efault setting Management Management edit 2 Select Printer limitation under the Setting item column on the left side of the touch panel and then touch the Change key The Printer limitation screen will...

Страница 148: ...14 00000015 00000016 00000017 001 010 1st Sales Dept 2nd Sales Dept 3rd Sales Dept 4th Sales Dept 5th Sales Dept 6th Sales Dept 7th Sales Dept Close Department Default setting Management Management ed...

Страница 149: ...se on page 7 20 Inch specifications Up Down Order of indication Mgt Inf correction Delete Register Limit in use 01 02 0001 0014 00000015 00000016 00000017 001 010 1st Sales Dept 2nd Sales Dept 3rd Sal...

Страница 150: ...ransmitted under the corresponding department ID code when the optional Fax Kit is installed in your copier NOTE This setting will only be available when On is selected as the Fax function management...

Страница 151: ...u want to set the maximum number of copies that can be made under the corresponding department ID code NOTES This setting will only be available when On is selected as the Copier function management O...

Страница 152: ...Management edit New register Copy limitation All No limit Counter limit Is not permited Clear 999 999 1 999 999 Limited value 5 Touch the Close key The touch panel will return to the screen in step 2...

Страница 153: ...ng privileges completely touch the Is not permitted key and proceed to step 5 Inch specifications Close Back Management code menu Management edit New register Printer limit All No limit Counter limit...

Страница 154: ...nagement Metric specifications Close Each Mgt Total Management total Managem Total Default setting Register Sett Management Def Set Management edit Off On Management code menu Management 3 Select the...

Страница 155: ...n See 2 Accessing the copy management menu screen on page 7 3 Inch specifications Default setting Copy default Machine default Language Management End BOX Management Bypass setting Document Management...

Страница 156: ...of indication key and then touch the Sort by code key and select either 1 9 or 9 1 or the Sort by Name key and select either A Z or Z A as appropriate 4 Select ID code under the Setting item column o...

Страница 157: ...department name then enter the new name Inch specifications End Stop Name to display 1st Sales Dept Limit 32 letters including AllDel Del prev 1 2 3 4 5 6 7 8 9 0 q w e r t y u i o p a s d f g h j k...

Страница 158: ...gement Def Set Management edit Off On Management code menu Management 3 Select the department ID code for which you want to change the restrictions and then touch the Limit in use key The Limit in use...

Страница 159: ...whole print out a copy management report and clear the copy counts for all of the registered department ID codes 1 Access the copy management menu screen See 2 Accessing the copy management menu scre...

Страница 160: ...f any of the Total size 1 through Total size 5 settings is selected under the copy management default settings the total size report will also be printed out 4 To clear all of the copy counts touch th...

Страница 161: ...f Set Management edit Off On Management code menu Management 3 Select the department ID code for which you want to check the copy counts and then touch the Total key Inch specifications Up Down Order...

Страница 162: ...clear all of the copy counts for that ID code touch the Counter clear key Inch specifications Close Each Management Total Default setting Management code menu 0007 1st Sales Dept Counter clear Number...

Страница 163: ...et Management edit Off On Management code menu Management 3 Touch the Close key 6 Changing the copy management default settings Perform the following procedure when you want to change the default sett...

Страница 164: ...OFF Perform the following procedure when you want to turn copy management ON or OFF for the copier functions of this machine 1 Select Copy management under the Setting item column on the left side of...

Страница 165: ...On Copy Printer output mgt All Scanner Managem On Metric specifications Close Change Value Setting item Default setting Management code menu Managem Def Set Managem Def Set Copy management Print manag...

Страница 166: ...or report On Others mgt Reg print On Copy Printer output mgt All Scanner Managem On 2 To have a printer error report printed out touch the On key If you do not want the printer error report printed ou...

Страница 167: ...Others Mgt Reg print On Copy Printer output mgt All Scanner Managem On Metric specifications Close Change Value Setting item Default setting Management code menu Managem Def Set Managem Def Set Copy m...

Страница 168: ...r output mgt All Scanner Managem On Metric specifications Close Change Value Setting item Default setting Management code menu Managem Def Set Managem Def Set Copy management Print managem On On Print...

Страница 169: ...Printer output mgt All Scanner Managem On Metric specifications Close Change Value Setting item Default setting Management code menu Managem Def Set Managem Def Set Copy management Print managem On On...

Страница 170: ...x11 No specif Total size 3 81 2x11 No specif Metric specifications Close Change Value Setting item Default setting Management code menu Managem Def Set Managem Def Set Scanner Managem Fax Management O...

Страница 171: ...fications Close Change Value Setting item Default setting Management code menu Managem Def Set Managem Def Set Scanner Managem Fax Management On On Excess of limit Setting You cannot use Def Val of co...

Страница 172: ...ent code menu Managem Def Set Managem Def Set Scanner Managem Fax Management On On Excess of limit Setting You cannot use Def Val of coun limit 999999 Total size 1 A3 No specif Total size 2 B4 No spec...

Страница 173: ...Setting Unable to use Def Val of coun limit 999999 Total size 1 81 2x11 No specif Total size 2 81 2x11 No specif Total size 3 81 2x11 No specif Metric specifications Close Change Value Setting item D...

Страница 174: ...e Select paper type Paper size Paper type With no specif A4 6 Touch the key that corresponds to the desired paper type and then touch the Close key Inch specifications Close Back Select paper type Man...

Страница 175: ...egistered department ID code is entered an error alarm will sound Enter the correct ID code If you enter your department ID code and touch the Each Mgt Total key you can check the copy counts for your...

Страница 176: ...entation for uninterrupted copying To enable this function it is necessary to turn the related setting On In order to prevent a drawer cassette that holds a different type of paper from being switched...

Страница 177: ...ime For more detailed information on the Low power mode see page 4 11 Sets the location for the ejection of finished copies This setting will only be displayed when the optional Document Finisher Buil...

Страница 178: ...e the auto sleep function automatically engage and turn the copier OFF O if no operation is performed on the copier for a designated amount of time If auto sleep interferes with your copying operation...

Страница 179: ...m copiers is 3000 for 40 cpm copiers is 4000 and for 50 cpm copiers is 5000 Inch specifications Enter the administrator number Close Metric specifications Enter the administrator number Close 4 If the...

Страница 180: ...fault setting Counter Metric specifications Machine default Auto cassette switching Paper size 1st cassette Paper size 2nd cassette Paper size 3rd cassette Paper size 4th cassette On All types of pape...

Страница 181: ...g Paper size 1st cassette Paper size 2nd cassette Paper size 3rd cassette Paper size 4th cassette On All types of paper Auto Centimeter Auto Centimeter Auto Centimeter Auto Centimeter Up Down Change C...

Страница 182: ...fault setting Counter Metric specifications Machine default Paper type 1st cassette Paper type 2nd cassette Paper type 3rd cassette Paper type 4th cassette Select paper type 2sided Plain Plain Plain P...

Страница 183: ...te Select paper type 2sided Plain Plain Plain Plain Up Down Change Close Default setting Default menu Setting mode Default setting Counter 3 Select one of the custom paper type settings Custom 1 throu...

Страница 184: ...ications Machine default Sleep mode changing time Low power mode chng time Select COPY output mode Select FAX output mode Select main mode 60 Minute 15 Minute Inner tray Inner tray COPY Mode Up Down C...

Страница 185: ...nner tray Inner tray Copy mode Default menu Down Change Setting mode Up Default setting Counter Metric specifications Machine default Sleep mode changing time Low power mode chng time Select COPY outp...

Страница 186: ...ct the main mode 60 Minute 15 Minute Inner tray Inner tray Copy mode Default menu Down Change Setting mode Up Default setting Counter Metric specifications Machine default Sleep mode changing time Low...

Страница 187: ...X output mode Select the main mode 60 Minute 15 Minute Inner tray Inner tray Copy mode Default menu Down Change Setting mode Up Default setting Counter Metric specifications Machine default Sleep mode...

Страница 188: ...default Close Default setting Sleep mode changing time Low power mode chng time Select Copy output mode Select FAX output mode Select the main mode 60 Minute 15 Minute Inner tray Inner tray Copy mode...

Страница 189: ...Key sound ON OFF Silent mode Date Time Time difference Management code change Default setting Counter On On 2001 10 30 14 02 GMT 08 00 5000 Default menu Down Change Setting mode Up Machine default Cl...

Страница 190: ...d Inch specifications Key sound ON OFF Silent mode Date Time Time difference Management code change Default setting Counter On On 2001 10 30 14 02 GMT 08 00 5000 Default menu Down Change Setting mode...

Страница 191: ...n On 2001 10 30 14 02 GMT 08 00 5000 Default menu Down Change Setting mode Up Machine default Close Metric specifications Machine default Key sound ON OFF Silent mode Date Time Time difference Change...

Страница 192: ...sound ON OFF Silent mode Date Time Time difference Management code change Default setting Counter On On 2001 10 30 14 02 GMT 08 00 5000 Default menu Down Change Setting mode Up Machine default Close...

Страница 193: ...the touch panel and then touch the Change key The Management code change Change MGMT code with screen will be displayed Inch specifications Key sound ON OFF Silent mode Date Time Time difference Mana...

Страница 194: ...r mode Default menu Down Change Setting mode Up Machine default Close Metric specifications Machine default Date Time Time difference Change MGMT code with Auto sleep Energy Saver key setting 30 10 01...

Страница 195: ...ment code change Auto sleep Energy Saver key setting Default setting Counter 2001 10 30 14 02 GMT 08 00 5000 On Low power mode Default menu Down Change Setting mode Up Machine default Close Metric spe...

Страница 196: ...whether the copier will automatically select the same size of copy paper as the original once an original is set APS auto paper selection mode or whether the drawer cassette selected Default drawer De...

Страница 197: ...he overall exposure level for scanning with OCR Optical Character Recognition software when using the optional scanner functions of this copier Adjusts the median exposure value when the text photo mo...

Страница 198: ...keys through the Register key Changes the order of the main functions and modes that are displayed in the Basic and the User choice tabs in order to make the display more appropriate to the way you u...

Страница 199: ...enter the 4 digit management code The factory default setting for 30 cpm copiers is 3000 for 40 cpm copiers is 4000 and for 50 cpm copiers is 5000 Inch specifications Enter the administrator number Cl...

Страница 200: ...Inch specifications Copy default Default setting Exposure mode Exposure steps Original image quality Eco Print Background exp adj Manual 1 step Text Photo Off Standard Default menu Down Change Settin...

Страница 201: ...ting Exposure mode Exposure steps Original image quality Eco Print Background exp adj Manual 1 step Text Photo Off Standard Default menu Down Change Setting mode Up Close Default setting Counter Metri...

Страница 202: ...etting Exposure mode Exposure steps Original image quality Eco Print Background exp adj Manual 1 step Text Photo Off Standard Default menu Down Change Setting mode Up Close Default setting Counter Met...

Страница 203: ...setting Exposure mode Exposure steps Original image quality Eco Print Background exp adj Manual 1 step Text Photo Off Standard Default menu Down Change Setting mode Up Close Default setting Counter Me...

Страница 204: ...sure steps Original image quality Eco Print Background exp adj Manual 1 step Text Photo Off Standard Default menu Down Change Setting mode Up Close Default setting Counter Metric specifications Copy d...

Страница 205: ...pe APS Default drawer Drawer for cover paper Default magnification APS Off 1st paper Bypass Manual Up Change Close Default setting Default menu Setting mode Down Default setting Counter Metric specifi...

Страница 206: ...r paper Default mode APS Off 1st paper Bypass Manual Up Change Close Default setting Default menu Setting mode Down Default setting Counter 3 Touch the On key and then touch the key that corresponds t...

Страница 207: ...fault drawer Drawer for cover paper Default magnification APS Off 1st paper Bypass Manual Up Change Close Default setting Default menu Setting mode Down Default setting Counter Metric specifications C...

Страница 208: ...cover paper Default magnification APS Off 1st paper Bypass Manual Up Change Close Default setting Default menu Setting mode Down Default setting Counter Metric specifications Copy default Select paper...

Страница 209: ...e displayed Inch specifications Copy default Select paper Select paper type APS Default drawer Drawer for cover paper Default magnification APS Off 1st paper Bypass Manual Up Change Close Default menu...

Страница 210: ...adj Text Manual exp adj Photo Standard Standard Standard Standard Standard Default menu Down Setting mode Up Close Default setting Counter Metric specifications Default setting Counter Copy default Up...

Страница 211: ...fault setting Auto exposure adj Auto Auto exposure adj OCR Manual exp adj Mixed Manual exp adj Text Manual exp adj Photo Standard Standard Standard Standard Standard Default menu Down Setting mode Up...

Страница 212: ...Manual exp adj Text Manual exp adj Photo Standard Standard Standard Standard Standard Default menu Down Setting mode Up Close Default setting Counter Metric specifications Default setting Counter Cop...

Страница 213: ...Manual exp adj Text Manual exp adj Photo Standard Standard Standard Standard Standard Default menu Down Setting mode Up Close Default setting Counter Metric specifications Default setting Counter Cop...

Страница 214: ...Manual exp adj Text Manual exp adj Photo Standard Standard Standard Standard Standard Default menu Down Setting mode Up Close Default setting Counter Metric specifications Default setting Counter Cop...

Страница 215: ...ort Auto Rotation Default margin width Default erase width Preset limit Sort On Rotate Left 1 4 0 Border 1 4 Center 1 4 999 Set Default menu Down Setting mode Up Close Metric specifications Default se...

Страница 216: ...Auto Rotation Default margin width Default erase width Preset limit Sort On Rotate Left 1 4 0 Border 1 4 Center 1 4 999 Set Default menu Down Setting mode Up Close Metric specifications Default settin...

Страница 217: ...fault erase width Preset limit Sort On Rotate Left 1 4 0 Border 1 4 Center 1 4 999 Set Default menu Down Setting mode Up Close Metric specifications Default setting Counter Copy default Sort Auto Rota...

Страница 218: ...n Default margin width Default erase width Preset limit Sort On Rotate Left 1 4 0 Border 1 4 Center 1 4 999 Set Default menu Down Setting mode Up Close Metric specifications Default setting Counter Co...

Страница 219: ...ault Change Default setting Sort Auto Rotation Default margin width Default erase width Preset limit Sort On Rotate Left 1 4 0 Border 1 4 Center 1 4 999 Set Default menu Down Setting mode Up Close Met...

Страница 220: ...nge Default setting Preset limit Modify Copy Display register key Customize Main function Customize Add function 999 Set On Off On Default menu Down Setting mode Up Close Metric specifications Default...

Страница 221: ...Inch specifications Default setting Counter Copy default Change Default setting Preset limit Modify Copy Display register key Customize Main function Customize Add function 999 Set On Off On Default...

Страница 222: ...ic specifications Default setting Counter Copy default Preset limit Modify copy Display Register key Customize Main function Customize Add function 999 Set On Off On Up Down Change Close Default setti...

Страница 223: ...c specifications Default setting Counter Copy default Preset limit Modify copy Display Register key Customize Main function Customize Add function 999 Set On Off On Up Down Change Close Default settin...

Страница 224: ...ntimeter or Inch as well and then go directly to step 5 If you want to select a custom paper size touch the Input size and then go to the next step Inch specifications Bypass setting Paper size Unit P...

Страница 225: ...r Inch Others Standard Default setting Counter A4 Back Close Metric specifications Bypass setting Paper size Unit Paper type Plain Select paper type Auto Detection Input size Centimeter Inch Others St...

Страница 226: ...nvelope C4 81 2x13 Default setting Counter Select size Back Close ISO B5 Comm 9 MO Comm 10 OUFUKU HAGAKI YOUKEI 2 8 K 16 K YOUKEI 4 EX 6 Touch the Select paper type key The Select paper type screen wi...

Страница 227: ...ey The corresponding setting screen will be displayed Inch specifications Register orig size Original size custom 1 Original size custom 2 Original size custom 3 Original size custom 4 2x2 2x2 2x2 2x2...

Страница 228: ...fault setting Counter Metric specifications Default setting Copy default Machine default Language Management End Hard Disk Management Bypass setting Document Management Register orig size Print report...

Страница 229: ...multi bypass tray to execute drum refreshing Inch specifications Cancel Orig page Count Set 1 sided Now drum refreshing Output Inner tray 11x81 2 Metric specifications Cancel Original Count Set 1 side...

Страница 230: ...Register orig size Print report Counter check User Adjustment Default setting Counter 3 The total number of copies and printouts made will be displayed If you want to print out a counter report touch...

Страница 231: ...password for any of these boxes you will need to enter the registered password in order to print out or delete any documents that are stored win that box This procedure will allow you to select the le...

Страница 232: ...uch panel will return to the contents of the Basic tab 3 Use the keypad to enter the 4 digit management code The factory default setting for 30 cpm copiers is 3000 for 40 cpm copiers is 4000 and for 5...

Страница 233: ...diting key under Synergy Print Box The Box editing screen will be displayed Inch specifications Document Management Document Management Close Shared Data Box Synergy Print Box Form box Print the list...

Страница 234: ...ear Metric specifications Password Enter key Password Back Close Default settund Document Management Box editing 007 Enter new password Clear NOTES The password can be between 1 and 8 digits long If y...

Страница 235: ...period key and then touch key or the key to change the displayed save time to the desired setting Inch specifications Document data saving term Back Close Set saving term for documents in Synergy Pri...

Страница 236: ...to enter the 4 digit management code The factory default setting for 30 cpm copiers is 3000 for 40 cpm copiers is 4000 and for 50 cpm copiers is 5000 If the entered code matched the registered one the...

Страница 237: ...ete invalid data Delete invalid deta from the HDD Item Free Space Capacity 18 569 MB 19 092 MB Setting mode Metric specifications HDD management mode On Close HDD management Default setting Delete inv...

Страница 238: ...Counter check User Adjustment Default setting Counter Metric specifications Default setting Copy default Machine default Language Management End Hard Disk Management Bypass setting Document Managemen...

Страница 239: ...utput Cancel Metric specifications Original Count set 1 sided Sort AMS Printing report Output Cancel Plain 1 sided top rear Inner tray NOTE If you want to cancel print out of the corresponding report...

Страница 240: ...played Inch specifications Default setting Copy default Machine default Language Management End BOX Management Bypass setting Document Management Register orig size Print report Counter check User Adj...

Страница 241: ...int 7 r and R keys Touch these keys when you want to move the cursor 8 Del prev key Touch this key when you want to delete the character to the left of the cursor 9 Stop key Touch this key when you wa...

Страница 242: ...ou want to delete the character to the left of the cursor 0 Stop key Touch this key when you want to cancel character input and return to the previous screen End key Touch this key when you want to re...

Страница 243: ...Q W E R T Y U I O P l A S D F G H J K L Z X C V B N M Capital Symbol 1 Symbol 2 Space Letter 3 Touch the b c d and e keys in that order on the keyboard Inch specifications End Stop Name to display Ab...

Страница 244: ...Section 7 COPIER MANAGEMENT FUNCTIONS 7 106...

Страница 245: ...the leading edge Transparency films Carbon paper and extremely creased or folded originals originals of sort material such as vinyl Non square originals wet originals originals with adhesive tape or...

Страница 246: ...11 A4R or larger pull out the support extension IMPORTANT Do not set originals exceeding the limit indicated on the sticker attached on the rear original insertion guide Setting more originals than s...

Страница 247: ...the originals all copied onto one single size of copy paper filing IMPORTANT You can set up to 30 originals in the Document Processor in this mode Inch specifications Only 11 x 8 1 2 and 11 x 17 or 8...

Страница 248: ...r Off 1st pg orig Able to scan mix size originals at one time using Document processor and copy them in unified paper size Auto selection Electronic Filing Register Set Paper size Back Close 11x81 2 8...

Страница 249: ...urposes optional For more detailed information refer to the Operation Guide for the Document Finisher IMPORTANT If copies come out curled or are tacked unevenly turn the paper in the drawer cassette o...

Страница 250: ...an individual original stacked together in one set 1 Touch the Sort Finish key The Sort Finished screen will appear Inch specifications 2 sided Separation Select paper Combine Reduce Enlarge Margin Ce...

Страница 251: ...p corner Check direction Check direction of original top side Set Paper size 11x81 2 Metric specifications Sort Off None Output each page Sort On Group Sort Staple Staple Mode Punch Punch Mode Back Re...

Страница 252: ...le Staple mode Punch Punch mode Back Register Close Sort Finished Ready to copy Rear Left top corner Check direction Check direction of original top side Set Paper size 11x81 2 Metric specifications S...

Страница 253: ...ent Finisher For more information on the corresponding procedures refer to 4 Document Finisher on page 8 5 of this guide Stacking mode If the number of copies to be made in the Non sort mode is set to...

Страница 254: ...r 4 Hold the staple holder in one hand and the new staple cartridge in the other and insert the new staple cartridge making sure the direction of insertion is correct The arrow on the staple cartridge...

Страница 255: ...the optional printer function the paper eject point can be changed according to the used function making it easier to sort paper Copied paper can be ejected to the Job Separator upper section See Cop...

Страница 256: ...ed this copier can be used as a printer For more detailed information see the printer s Operation Guide Since the network board is equipped this copier can also be used as a network printer allowing a...

Страница 257: ...use is out of order and cannot be used Contact your service representative immediately Continue copying using another drawer cassette No paper that can be used in the selected mode is loaded Check the...

Страница 258: ...capacity for scanning originals are shown below Number of originals that can be scanned Standard memory 64MB approximately 322 pages When the optional Hard Disk is installed 20GB approximately 70 000...

Страница 259: ...r to the Operation Guide for your Document Finisher and dispose of the waste hole punch chads The hole punch chad container in the optional Document Finisher is not set properly Refer to the Operation...

Страница 260: ...eft cover1 2 Remove paper 3 Close cover JAM 30 Paper misfeed Careful for Drum Inch specification Metric specification WARNING High voltage is present in the charger section Take sufficient care when w...

Страница 261: ...Metric specifications 1 Open left cover1 2 Remove paper 3 Close cover JAM 30 Paper misfeed Careful for Drum NOTE The drum area inside the copier is extremely sensitive to dirt and damage When removin...

Страница 262: ...or Drum NOTE The drum area inside the copier is extremely sensitive to dirt and damage When removing the jammed paper be sure not to touch the drum area that is located inside the machine with your ha...

Страница 263: ...Main switch off on APS Bypass Colour Recycled Plain Plain Plain 1 Sided Sort 9 When the optional Fax Kit is installed the message below appears Perform the appropriate action by following the message...

Страница 264: ...ht the green knob 6 Remove paper 7 Close the cover Metric specifications Paper misfeed 1 Remove paper in bypass 2 Open left cover 1 3 Remove paper 4 Open front cover if you can not remove paper 5 Turn...

Страница 265: ...ion 8 Remove the misfed paper If the misfed paper cannot be removed go to the next step 9 Pull out the internal tray 10 Open the internal tray cover to remove the misfed paper 11 If the paper has been...

Страница 266: ...Raise reverse unit up 3 Turn dial left 4 Remove original s 5 Close Document processor JAM 73 1 If the original is on the original table remove it 2 Open the Document Processor original cover 3 If the...

Страница 267: ...d 1 Remove any paper in output part of Finisher 2 Put Finisher tray down 3 Remove any paper 4 Set tray back JAM 84 1 Put inner tray of Finisher down 2 Remove any paper 3 Remove output tray open left c...

Страница 268: ...fed paper 8 Install the tray 9 Close the left cover 1 4 4 4 4 4Misfed in Document Finisher optional JAM 80 to 89 If a misfeed has occurred in the Document Finisher remove the misfed paper referring to...

Страница 269: ...he originals set correctly Is the copier in the auto exposure mode Is the copier in the manual exposure mode Is the add toner message displayed Is paper wet Procedure Connect the plug to an AC outlet...

Страница 270: ...rm the auto exposure adjustment Adjust the exposure to the correct degree using the copy exposure adjustment keys To change the overall exposure perform the exposure adjustment for the each copy quali...

Страница 271: ...r this purpose Cleaning the platen Lift open the original cover Wipe the platen with a soft cloth dampened with alcohol or a mild detergent Never use thinner or other organic solvents for this purpose...

Страница 272: ...sh from left to right several times along with the separator 5 Close the left cover 1 Cleaning the transfer roller 1 Open the front cover 2 Remove the cleaning brush 3 Pull up the left cover 1 handle...

Страница 273: ...c User choice Program Function 11x81 2 81 2x11 11x81 2 11x81 2 11x81 2 Recycled Add toner to resume copying Adding toner Metric specifications Merge copy AMS Reduce Enlarge APS Image quality Reduce En...

Страница 274: ...ontainer and insert the toner container along the rail of the copier 7 Hold the toner container by hands and fully insert it into the copier 8 Remove the waste toner box 9 Close the opening of the was...

Страница 275: ...force or pull it out completely 16 Remove the cleaning brush 17 Pull up the left cover 1 handle to open the left cover 1 11 Attach the grid cleaner to the machine body aligning with the notches 12 Ge...

Страница 276: ...19 Close the front cover and left cover 1 NOTE To keep the best copying quality perform cleaning of steps 15 and 18 described above periodically approximately once a month in addition to the time of t...

Страница 277: ...om 3 5 seconds 11 x 8 1 2 A4 Zoom ratio Any ratio between 25 and 400 in increments of 1 Alternatively standard ratios Standard amount of memory 64 MB Resolution Reading 600 x 600 dpi Writing 600 x 600...

Страница 278: ...W x 25 2 5 D x 29 1 3 H 585 mm W x 646 mm D x 745 mm H Weight Approx 165 lbs Approx 82 kg Noise emission 70dB A Required space 23 W x 25 2 5 D 585 mm W x 646 mm D Optional equipment Document Processo...

Страница 279: ...the Low Power mode at time of purchase 15 minutes Transition time to the Off and Sleep modes at time of purchase 60 minutes Duplex 2 sided copying Comes as standard equipment Paper feed Recycled pape...

Страница 280: ...ls refer to the Operation Guide for the corresponding optional unit Available optional units The following optional units can be installed on your copier Document Processor Original Cover Document Tra...

Страница 281: ...e quantity of copies It can also sorts multiple copies into sets by shifting the eject position Paginated copies can be stapled too Job Separator When using the optional printer function the paper eje...

Страница 282: ...nal size selection auto selection Original size selection custom original size Same size 100 1 1 copying XY zoom mode Auto magnification selection mode Zoom mode Paper selection Original set direction...

Страница 283: ...35 11 13 10 10 14 14 14 09 12 12 10 10 15 15 35 16 21 21 02 12 12 22 10 10 10 10 10 04 08 23 23 35 18 11 13 21 21 02 02 02 09 12 12 22 10 10 10 10 10 04 23 23 35 18 11 13 04 04 05 05 06 06 07 07 06 06...

Страница 284: ...10 14...

Страница 285: ...r roller 10 2 Combine Merge Copy modes 5 13 COPIER MANAGEMENT 7 1 Copy default settings 7 58 Copy eject location machine default setting 7 48 Copy limit copy default setting 7 81 Copy management mode...

Страница 286: ...wer cassette No 1 No 4 machine default setting 7 43 Paper type auto paper selection mode copy default setting 7 68 Paper type drawer cassette No 1 No 4 machine default setting 7 44 Photo mode 4 3 Prec...

Страница 287: ...W Warm up 4 1 Waste Toner Box 10 3 When paper misfeeds 9 4 X XY zoom mode 4 8 Z Zoom mode 4 6...

Страница 288: ...506617D ENG...

Отзывы: