Section 4 BASIC OPERATION
4-2
4. Selecting the paper size
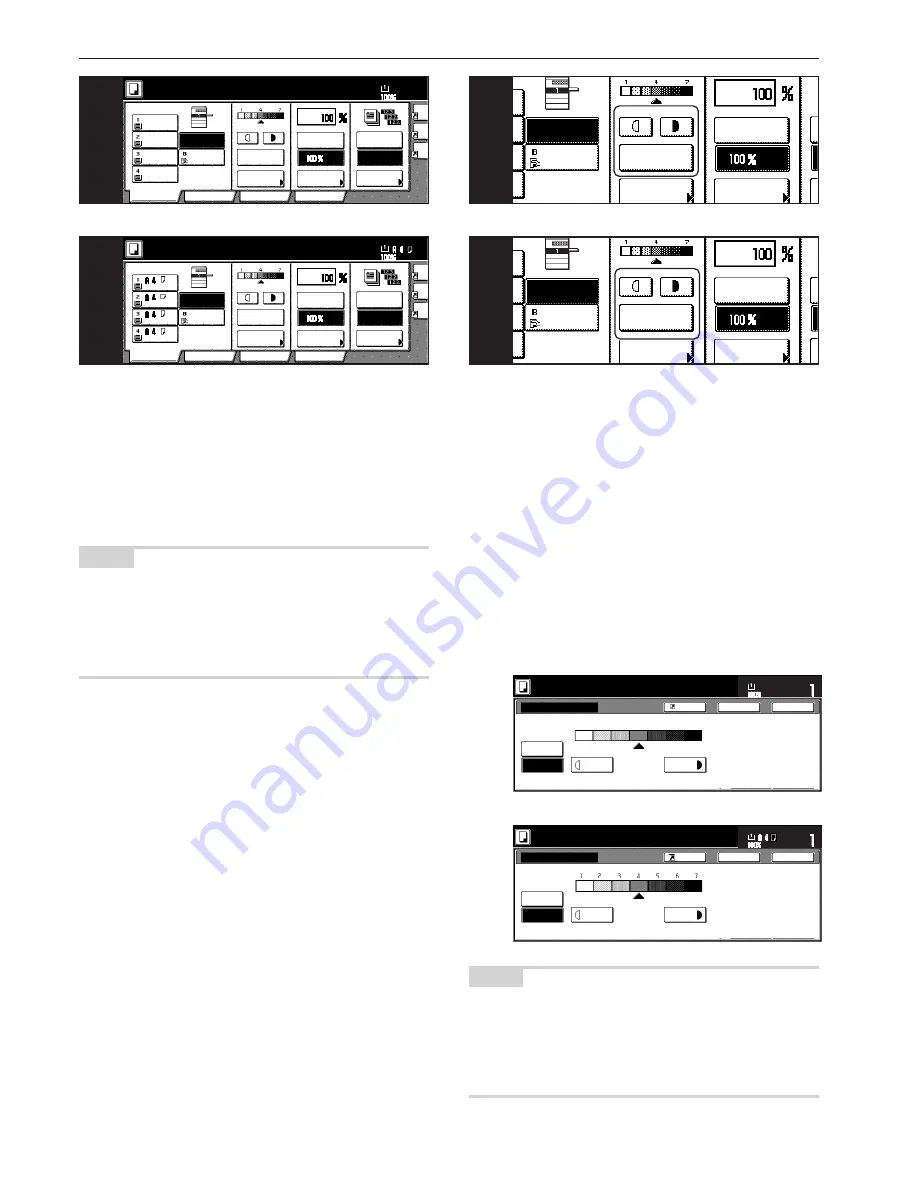
When the “APS” key is highlighted on the touch panel, copy paper of
the same size as the original will be automatically selected. In order to
copy the original onto a different size of paper without changing the
size of the image, touch the paper size key that corresponds to the
paper size that you want to use.
NOTES
• You can stop the copier from automatically selecting the paper size.
(See “Paper selection” on page 7-67.)
• It is also possible for you to specify one drawer[cassette] that will be
selected automatically regardless of the size of paper loaded in that
drawer[cassette].
(See “Default drawer[cassette]” on page 7-69.)
Inch specifications
Metric specifications
Inch specifications
Metric specifications
5. Adjusting the copy exposure
Adjustment of the copy exposure is generally accomplished manually.
If you want to make the exposure darker, touch the right exposure
adjustment key to move the arrow under the exposure scale to the
right; If you want to make the exposure lighter, touch the left exposure
adjustment key to move the arrow under the exposure scale to the
left.
If you want the copy exposure to be adjusted automatically, touch the
“Auto Exposure” key until it is highlighted. The contrast of the original
will be detected and the most suitable exposure level selected
automatically.
* It is also possible for you to adjust the copy exposure by touching
the “Exposure Mode” key to access the “Exposure Mode” screen.
Copy exposure adjustment can then be performed in this screen
using the same methods as above.
Inch specifications
Ready to copy.
Set
Paper Size
Back
Close
Exposure Mode
Exposure Mode
Darker
Lighter
Manual
Auto
Register
11x8
1
/
2
"
1
2
3
4
5
6
7
Metric specifications
Ready to copy.
Back
Close
Exposure mode
Exposure mode
Darker
Lighter
Manual
Auto
Register
Set
Paper size
NOTES
• It is possible for you to make adjustments to the auto exposure
mode if the overall copies come out too dark or too light.
(See “Auto exposure adjustment” on page 7-72.)
• It is also possible for you to change the default setting for the copy
exposure to the auto exposure mode.
(See “Exposure mode” on page 7-62.)
AMS
Reduce
/Enlarge
APS
Exposure
mode
Auto
Exposure
Bypass
Color
Plain
Plain
Plain
11x8
1
/
2
"
8
1
/
2
x11"
11x8
1
/
2
"
11x8
1
/
2
"
Recycled
5
AMS
Reduce/
Enlarge
APS
Exposure
mode
Auto
Exposure
Bypass
Colour
Recycled
Plain
Plain
Plain
5
Com
AMS
Reduce
/Enlarge
APS
Ori
qua
Re
/En
Exposure
mode
Auto
Exposure
Ready to copy.
Set
Paper Size
Bypass
Color
Plain
Plain
Plain
Sort/
Finished
Sort:Off
Sort:On
Basic
User choice
Program
Function
11x8
1
/
2
"
8
1
/
2
x11"
11x8
1
/
2
"
11x8
1
/
2
"
11x8
1
/
2
"
Recycled
4
Me
AMS
Reduce/
Enlarge
APS
Ima
qua
Re
En
Exposure
mode
Auto
Exposure
Ready to copy.
Set
Paper Size
Bypass
Colour
Recycled
Plain
Plain
Plain
Sort/
Finished
Sort:Off
Sort:On
Basic
User choice
Program
Function
4
Содержание d-Copia 300
Страница 4: ......
Страница 11: ...vii Printer Kit Page 8 12 Printer scanner Kit Page 8 12 Fax Kit Page 8 12...
Страница 14: ......
Страница 22: ...1 8...
Страница 30: ...Section 2 NAMES OF PARTS 2 8...
Страница 46: ...Section 4 BASIC OPERATION 4 12...
Страница 116: ...Section 5 OTHER CONVENIENT FUNCTIONS 5 70...
Страница 244: ...Section 7 COPIER MANAGEMENT FUNCTIONS 7 106...
Страница 284: ...10 14...
Страница 287: ...W Warm up 4 1 Waste Toner Box 10 3 When paper misfeeds 9 4 X XY zoom mode 4 8 Z Zoom mode 4 6...
Страница 288: ...506617D ENG...


