Section 3 PREPARATIONS
3-3
5
Set the supplied paper size sheet so that the size of the
paper loaded can be checked by looking at the front of the
drawer[cassette].
6
Gently push the drawer[cassette] back in.
NOTE
Before leaving the copier in disuse for a prolonged period of time,
remove the paper from the drawer(s)[cassette(s)] and seal it in its
original packaging to protect from moisture. Also, when storing paper
in a high temperature and high humidity environment, seal it in a
moisture-proof bag.
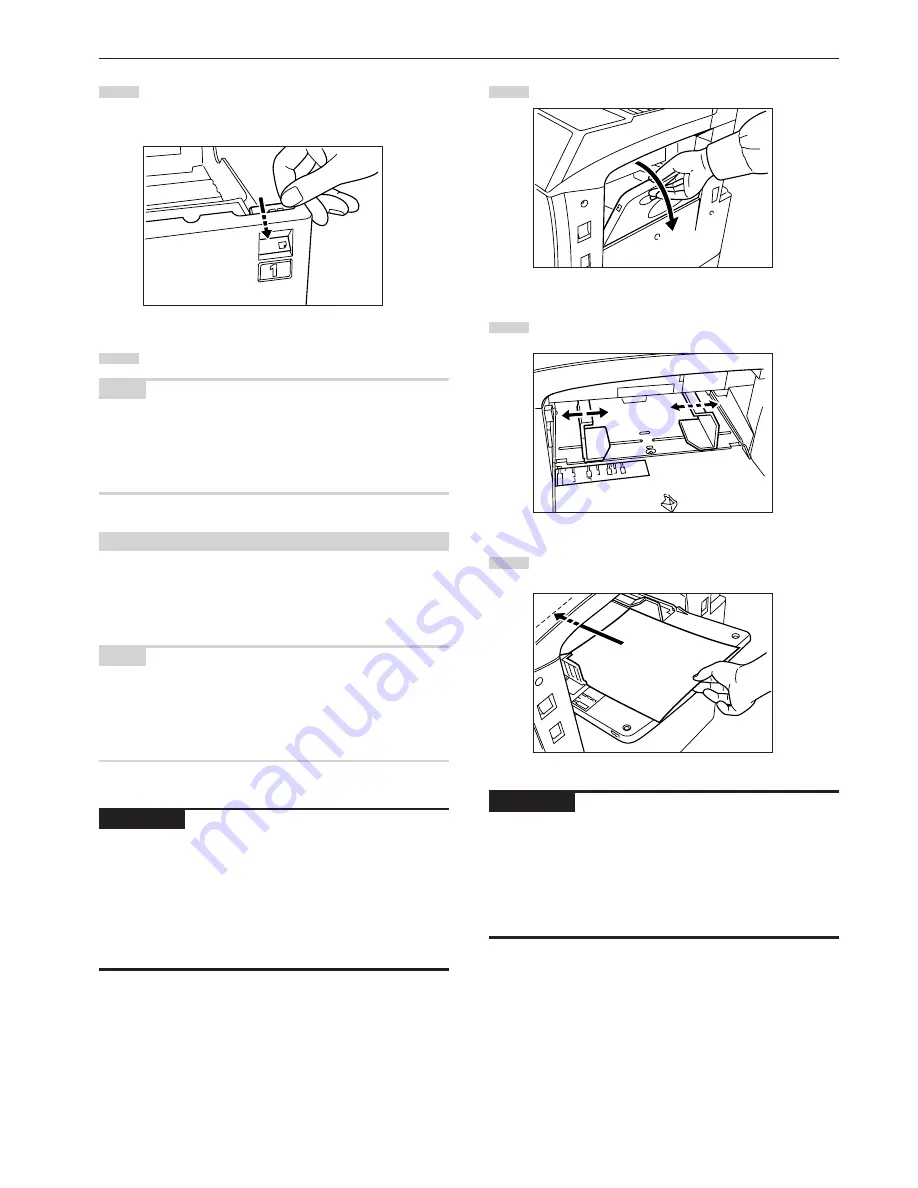
(3) Loading paper into the multi-bypass tray
Up to 200 sheets of standard copy paper (75 g/m
2
– 80 g/m
2
), of a
size between 11" x 17" [A3] and 5
1/2
" x 8
1/2
" [A6R] can be set on the
multi-bypass tray at one time. When copying onto special paper, be
sure to use the multi-bypass tray.
NOTE
The types of special paper and the number of sheets that can be
loaded in the multi-bypass tray are:
• Transparencies: 25 sheets
• Standard paper (120 g/m
2
): 130 sheets
• Standard paper (160 g/m
2
): 100 sheets
IMPORTANT!
• When copying onto OHP transparencies, be sure to fan through
them a few times to separate the sheets before setting them on the
multi-bypass tray.
• When copying onto non-standard size paper, perform the procedure
in “(1) Paper size and type” on page 7-86 and select the paper size.
• When setting special paper such as OHP transparencies and thick
paper on the multi-bypass tray, the type of paper must be specified
under “(1) Paper size and type” on page 7-86.
1
Open the multi-bypass tray.
2
Adjust the insert guides to the size of the paper to be loaded.
3
Insert the paper along the guides as far as it will go.
IMPORTANT!
• When you are setting paper onto the multi-bypass tray, make sure
that the side facing upward when the package is opened is the side
that is facing upward on the multi-bypass tray as well. In addition, if
the leading edge of the paper is curled at all, straighten it out before
setting it on the multi-bypass tray.
• ALWAYS straighten out curled paper before setting it on the multi-
bypass tray.
Содержание d-Copia 300
Страница 4: ......
Страница 11: ...vii Printer Kit Page 8 12 Printer scanner Kit Page 8 12 Fax Kit Page 8 12...
Страница 14: ......
Страница 22: ...1 8...
Страница 30: ...Section 2 NAMES OF PARTS 2 8...
Страница 46: ...Section 4 BASIC OPERATION 4 12...
Страница 116: ...Section 5 OTHER CONVENIENT FUNCTIONS 5 70...
Страница 244: ...Section 7 COPIER MANAGEMENT FUNCTIONS 7 106...
Страница 284: ...10 14...
Страница 287: ...W Warm up 4 1 Waste Toner Box 10 3 When paper misfeeds 9 4 X XY zoom mode 4 8 Z Zoom mode 4 6...
Страница 288: ...506617D ENG...


