


4
12
C
14
13
11
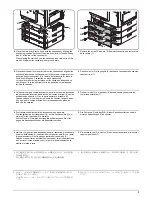
1
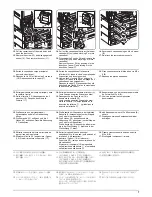
9.
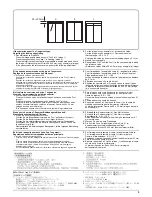
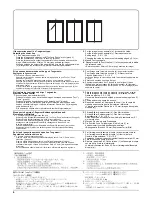
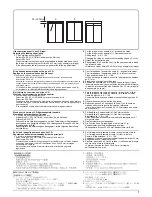
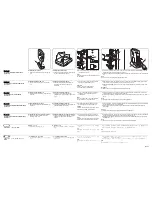
Open the conveyer unit (11) and connect the connector (12) of the duplex unit (A) to the main
body.
10.
Slot the wire guide (C) into latch (13) and then latch (14) on the main unit.
11.
Reattach the removed parts to their original
positions.
12.
Close the conveyer unit (11) and left cover (1).
Checking the operation
Connect the power plug of the machine to the
wall outlet and turn the main power switch on.
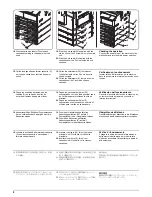
9.
Ouvrez l'unité d'entraînement (11) et connectez le connecteur (12) de l'unité recto-verso (A)
au corps principal.
10.
Glissez le guide câble (C) dans le verrou (13) puis dans le verrou (14) de l'unité principale
11.
.Remettez les pieces enlevees a leurposition d'origine.
12.
Fermez l'unité d'entraînement (11) et le couvercle gauche (1).
Vérification du fonctionnement
Insérer la fiche d’alimentation de la machine
dans la prise murale et mettre la machine sous
tension.
9.
Abra la unidad transportadora (11) y conecte el conector (12) de la unidad duplex (A) en el
cuerpo principal.
10.
Encajar la guía para el cable ( C ) en el pestillo (13) y, a continuación, en el pestillo (14) de la
unidad principal.
11.
Vuelva a instalar las piezas desmontadasen sus posiciones originales.
12.
Cerrar la unidad transportadora (11) y la cubierta izquierda (1).
Verificación del funcionamiento
Conecte el enchufe eléctrico de la máquina en
un tomacorriente de la pared y conecte el
interruptor principal.
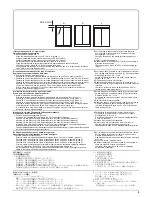
9.
Die Fördereinheit öffnen (11), und den Steckverbinder (12) der Duplex-Einheit (A) an die
Haupteinheit anschließen.
10.
Schieben Sie die Kabelführung (C) in die Raste (13) und dann die Raste (14) an der
Haupteinheit
11.
Die entfernten Teile wieder an ihrenursprunglichen Positionen anbringen.
12.
Schließen Sie die Fördereinheit (11) und die linke Abdeckung (1).
Überprüfen des Betriebs
Den Netzstecker der Maschine in die Steckdose
stecken und den Betriebsschalter einschalten.
9.
Aprire l’unità convogliatore (11) e collegare il connettore (12) dell’unità duplex (A) al corpo
principale.
10.
Inserire la guida cavi (C) nel fermo (13), e quindi il fermo (14) sull'unità principale.
11.
Rimontare le parti rimosse nelle loroposizioni originali
12.
Chiudere l'unità convogliatore (11) e il coperchio sinistro (1).
Verifica di funzionamento
Collegare la spina del cavo di alimentazione
della macchina alla presa a muro della rete
elettrica e accendere l’interruttore principale di
alimentazione.
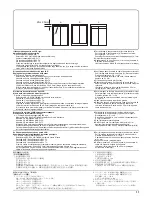
៝ㅍ࡙࠾࠶࠻ ࠍ㐿߈ޔ
ਔ㕙࡙࠾࠶࠻ # ߩࠦࡀࠢ࠲ ࠍᧄߦធ⛯ߔࠆޕ
㔚✢ࠟࠗ࠼ % ࠍᧄߩߪㄟߺㇱ ޔ
ߩ㗅ߦߪㄟޕ
ขࠅᄖߒߚㇱຠࠍరㅢࠅߦขࠅઃߌࠆޕ
៝ㅍ࡙࠾࠶࠻ ߅ࠃ߮Ꮐࠞࡃ ࠍ㐽ߓࠆޕ
േ⏕
ᯏ᪾ᧄߩ㔚Ḯࡊࠣࠍࠦࡦࡦ࠻ߦᏅߒㄟ
ߺޔ
ࡔࠗࡦࠬࠗ࠶࠴ࠍ 10 ߦߔࠆޕ
Содержание d-Copia 1800
Страница 1: ...d Copia 1800 d Copia 2200 Digital Copier SERVICE MANUAL Code Y110980 1...
Страница 4: ...This page is intentionally left blank...
Страница 10: ...This page is intentionally left blank...
Страница 14: ...2KL 2KK This page is intentionally left blank...
Страница 20: ...2KL 2KK 1 1 6 This page is intentionally left blank Service Manual Y110980 1...
Страница 38: ...2KL 2KK 1 2 18 This page is intentionally left blank Service Manual Y110980 1...
Страница 108: ...2KL 2KK 1 3 70 This page is intentionally left blank Service Manual Y110980 1...
Страница 142: ...2KL 2KK 1 4 34 This page is intentionally left blank Service Manual Y110980 1...
Страница 198: ...2KL 2KK 1 5 56 This page is intentionally left blank Service Manual Y110980 1...
Страница 224: ...2KL 2KK 2 2 6 This page is intentionally left blank Service Manual Y110980 1...
Страница 240: ...2KL 2KK 2 3 16 This page is intentionally left blank Service Manual Y110980 1...
Страница 271: ...INSTALLATION GUIDE FOR PAPER FEEDER...
Страница 285: ...INSTALLATION GUIDE FOR DUPLEX UNIT...
Страница 294: ...INSTALLATION GUIDE FOR Printing System Z...
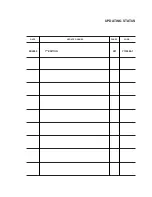
Страница 297: ...UPDATING STATUS DATE UPDATED PAGES PAGES CODE 09 2009 1ST EDITION 297 Y110980 1...