


22
C
E
11
13
13
12
C
11
12
C
C
E
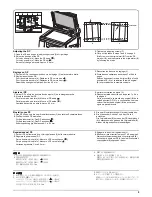
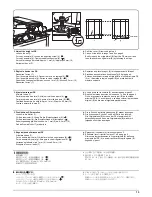
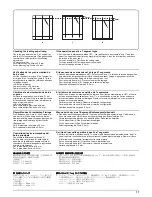
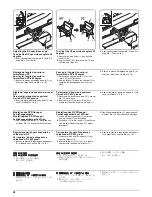
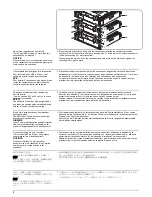
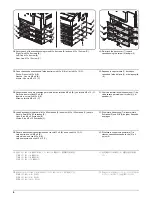
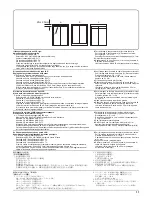
Einstellen des DP-Öffnungs-/
Schließungswinkels
Einstellung des DP-Öffnungs-/
Schließungswinkels auf 60 Grad
1.
Den Winkeleinstellhalter (C) einsetzen und
mit einer M4 × 14 Schraube (E) befestigen.
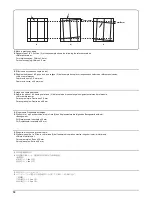
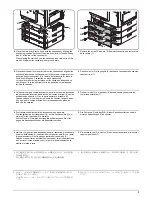
Einstellung des DP-Öffnungs-/
Schließungswinkels auf 30 Grad
1.
Die zwei Sicherungsringe (11) entfernen,
und die Achse (12) herausziehen.
2.
Die Achse (12) in die Löcher (13) einführen,
und die zwei Sicherungsringe (11) wieder
anbringen.
3.
Den Winkeleinstellhalter (C) einsetzen und
mit einer M4 × 14 Schraube (E) befestigen.
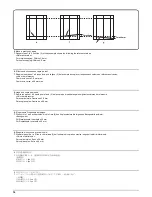
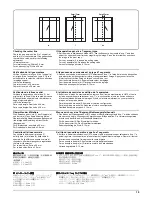
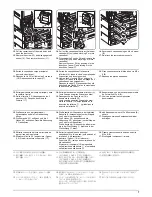
Ajuste del ángulo de apertura/cierre del
DP
Para ajustar el ángulo de apertura/
cierre del DP a 60 grados
1.
Inserte la placa de ajuste de ángulo (C) y fije
con el tornillo M4 × 14 (E).
Para ajustar el ángulo de apertura/
cierre del DP a 30 grados
1.
Desmonte los dos aros de tope (11) y tire del
eje (12) hacia fuera.
2.
Inserte el eje (12) en los orificios (13) y
vuelva a colocar los dos aros de tope (11).
3.
Inserte la placa de ajuste de ángulo (C) y fije
con el tornillo M4 × 14 (E).
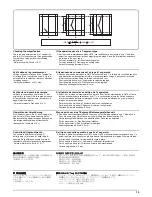
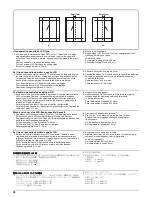
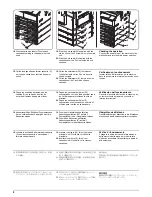
Réglage de l’angle d’ouverture/
fermeture du DP
Pour régler l’angle d’ouverture/
fermeture du DP à 60 degrés
1.
Insérez la plaque de réglage d’angle (C), et
fixez-la à l’aide d’une vis M4 × 14 (E).
Pour régler l’angle d’ouverture/
fermeture du DP à 30 degrés
1.
Retirez deux bagues d’arrêt (11) et tirez
l’arbre (12) vers l’extérieur.
2.
Insérez l’arbre (12) dans les orifices (13) et
remettez les deux bagues d’arrêt (11) en
place.
3.
Insérez la plaque de réglage d’angle (C), et
fixez-la à l’aide d’une vis M4 × 14 (E).
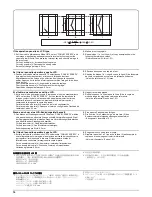
Regolazione dell’angolo di apertura e
chiusura del DP
Per regolare l’angolo di apertura e
chiusura del DP a 60 gradi
1.
Inserire la piastra di regolazione dell’angolo
(C) e fissarla con una vite M4 × 14 (E).
Per regolare l’angolo di apertura e
chiusura del DP a 30 gradi
1.
Rimuovere i due anelli di arresto (11) ed
estrarre l’albero (12).
2.
Inserire l’albero (12) nei fori (13) e fissare
nuovamente i due anelli di arresto (11).
3.
Inserire la piastra di regolazione dell’angolo
(C) e fissarla con una vite M4 × 14 (E).
䇗ᭈ
䇗ᭈ
䇗ᭈ
䇗ᭈ '3
'3
'3
'3 ⱘ㾦ᑺ
ⱘ㾦ᑺ
ⱘ㾦ᑺ
ⱘ㾦ᑺ
䆒ᅮ
䆒ᅮ
䆒ᅮ
䆒ᅮ
ᑺⱘ
ᑺⱘ
ᑺⱘ
ᑺⱘ '3
'3
'3
'3 ᓔ䯁㾦ᑺᯊ
ᓔ䯁㾦ᑺᯊ
ᓔ䯁㾦ᑺᯊ
ᓔ䯁㾦ᑺᯊ
ᦦܹ䇗ᭈᵓ &ˈ⫼ Ͼ㶎ϱ
0 h ( 䖯㸠ᅮDŽ
䆒ᅮ
䆒ᅮ
䆒ᅮ
䆒ᅮ
ᑺⱘ
ᑺⱘ
ᑺⱘ
ᑺⱘ '3
'3
'3
'3 㾦ᑺᯊ
㾦ᑺᯊ
㾦ᑺᯊ
㾦ᑺᯊ
ᢚϟ Ͼℶࡼ⦃ ˈᢨϟ䕈 DŽ
ᇚ䕈 ᦦܹᄨ ˈᑊᇚ Ͼℶࡼ⦃
ᣝॳḋ㺙དDŽ
ᦦܹ䇗ᭈᵓ &ˈ⫼ Ͼ㶎ϱ
0 h ( 䖯㸠ᅮDŽ
&2
&2
&2
&2 㐿㐽ⷺᐲ
㐿㐽ⷺᐲ
㐿㐽ⷺᐲ
㐿㐽ⷺᐲߩ
ߩ
ߩ
ߩ⺞ᢛ
⺞ᢛ
⺞ᢛ
⺞ᢛ
&2
&2
&2
&2 㐿㐽ⷺᐲ
㐿㐽ⷺᐲ
㐿㐽ⷺᐲ
㐿㐽ⷺᐲࠍ
ࠍ
ࠍ
ࠍ
q
q
q
qߦ
ߦ
ߦ
ߦ⸳ቯ
⸳ቯ
⸳ቯ
⸳ቯߔࠆ
ߔࠆ
ߔࠆ
ߔࠆ႐ว
႐ว
႐ว
႐ว
⺞ᢛ᧼ % ࠍᝌߒޔࡆࠬ / ' ᧄߢ
࿕ቯߔࠆޕ
&2
&2
&2
&2 㐿㐽ⷺᐲ
㐿㐽ⷺᐲ
㐿㐽ⷺᐲ
㐿㐽ⷺᐲࠍ
ࠍ
ࠍ
ࠍ
q
q
q
qߦ
ߦ
ߦ
ߦ⸳ቯ
⸳ቯ
⸳ቯ
⸳ቯߔࠆ
ߔࠆ
ߔࠆ
ߔࠆ႐ว
႐ว
႐ว
႐ว
ࠬ࠻࠶ࡊࡦࠣ ࠍᄖߒޔゲ ࠍ
ᒁ߈ᛮߊޕ
ゲ ࠍⓣ ߦᝌߒޔࠬ࠻࠶ࡊࡦࠣ
ࠍరㅢࠅขࠅઃߌࠆޕ
⺞ᢛ᧼ % ࠍᝌߒޔࡆࠬ / ' ᧄߢ
࿕ቯߔࠆޕ
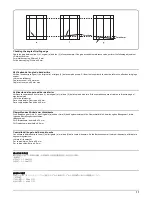
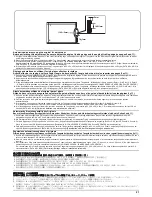
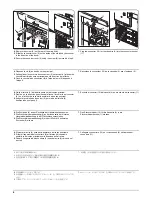
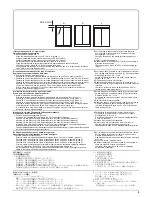
Adjusting the DP open/close angle
To adjust the DP open/close angle to 60
degrees
1.
Insert the angle adjusting plate (C) and fit it
using M4 × 14 screw (E).
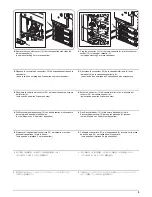
To adjust the DP open/close angle to 30
degrees
1.
Remove two stop rings (11) and pull the
shaft (12) out.
2.
Insert the shaft (12) into the holes (13) and
refit two stop rings (11).
3.
Insert the angle adjusting plate (C) and fit it
using M4 × 14 screw (E).
Содержание d-Copia 1800
Страница 1: ...d Copia 1800 d Copia 2200 Digital Copier SERVICE MANUAL Code Y110980 1...
Страница 4: ...This page is intentionally left blank...
Страница 10: ...This page is intentionally left blank...
Страница 14: ...2KL 2KK This page is intentionally left blank...
Страница 20: ...2KL 2KK 1 1 6 This page is intentionally left blank Service Manual Y110980 1...
Страница 38: ...2KL 2KK 1 2 18 This page is intentionally left blank Service Manual Y110980 1...
Страница 108: ...2KL 2KK 1 3 70 This page is intentionally left blank Service Manual Y110980 1...
Страница 142: ...2KL 2KK 1 4 34 This page is intentionally left blank Service Manual Y110980 1...
Страница 198: ...2KL 2KK 1 5 56 This page is intentionally left blank Service Manual Y110980 1...
Страница 224: ...2KL 2KK 2 2 6 This page is intentionally left blank Service Manual Y110980 1...
Страница 240: ...2KL 2KK 2 3 16 This page is intentionally left blank Service Manual Y110980 1...
Страница 271: ...INSTALLATION GUIDE FOR PAPER FEEDER...
Страница 285: ...INSTALLATION GUIDE FOR DUPLEX UNIT...
Страница 294: ...INSTALLATION GUIDE FOR Printing System Z...
Страница 297: ...UPDATING STATUS DATE UPDATED PAGES PAGES CODE 09 2009 1ST EDITION 297 Y110980 1...