background image

- 68 -

4. Print

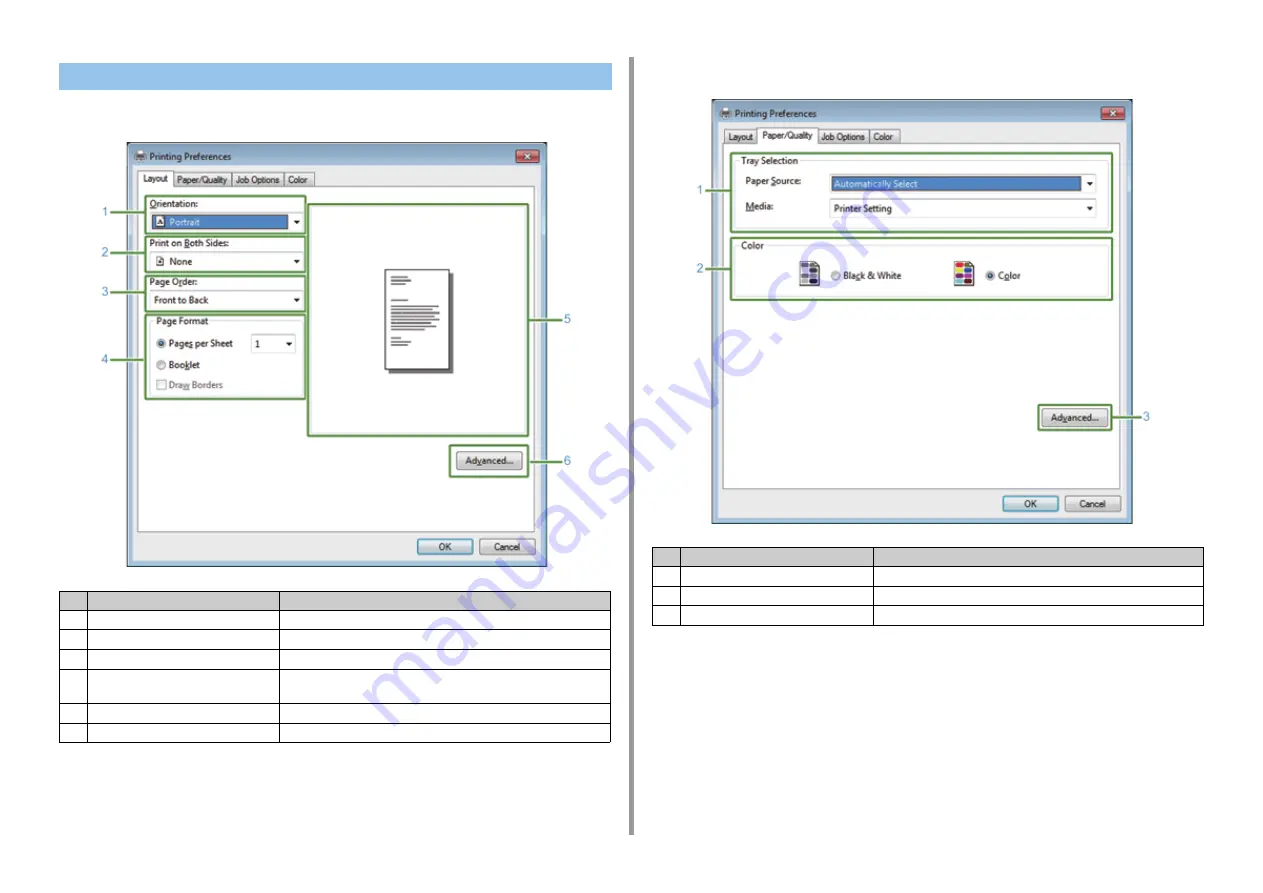
• [Layout] Tab

• [Paper/Quality] Tab

Windows PS Printer Driver

Item

Description

1

Orientation

Specifies the printing direction.

2

Print on Both Sides

Specifies this setting when you want to perform duplex printing.

3

Page Order

Specifies a page order to print.

4

Page Format

Specifies the number of pages that is printed on a sheet of paper and 
booklet printing.

5

Image layout

Displays a sample image for the set layout.

6

Advanced

Allows you to set detailed settings for print quality and a paper size.

Item

Description

1

Tray Selection

Changes the paper feed tray.

2

Color

Selects Color or Black & White.

3

Advanced

Allows you to set detailed settings for print quality and a paper size.

Содержание C542

Страница 1: ...C542 ES5442 User s Manual...

Страница 2: ...he Operator Panel 44 Names and Functions 44 Name and Functions on the Touch Panel 45 Adjusting the Angle of the Operator Panel 46 Entering Characters 47 Turning the Machine On or Off 49 Turning the Ma...

Страница 3: ...17 Setting the Length of Idle Time Before Entering Power Save Mode 117 Setting the Length of Idle Time Before Entering Sleep Mode 118 Restrictions in Power Saving Function 118 Automatically Turning th...

Страница 4: ...1 Before starting Cautions Related to Safety General Cautions About This Manual Trademarks and Other Information License...

Страница 5: ...ting Cautions Related to Safety Indicates additional information which if ignored or not followed may result in personal injury or death Indicates additional information which if ignored may result in...

Страница 6: ...left plugged into the outlet for an extended period of time dust adheres on the bases of the plug blades and a short may occur possibly resulting in fire Do not vacuum spilled toner with an electric...

Страница 7: ...field of vision Do not touch a broken liquid crystal display Injury may result If you get liquid liquid crystal spilled from the liquid crystal display into your eyes or mouth immediately rinse with a...

Страница 8: ...ay be reproduced in any form or by any means without prior written permission from Oki Data Corporation 2016 Oki Data Corporation Manual Composition The following manual is included in this product Se...

Страница 9: ...other items that are displayed on the touch panel of the operator panel Indicates a menu window or dialog box name that is displayed on the screen on a computer They can be clearly distinguished in d...

Страница 10: ...2004 108 EC compliance and configurations other than this may affect that compliance EMERGENCY FIRST AID Take care with toner powder If swallowed give small amounts of cold water and seek medical att...

Страница 11: ...nquiries contact your local distributor IMPORTER TO THE EU AUTHORISED REPRESENTATIVE OKI Europe Limited Blays House Wick Road Egham Surrey TW20 0HJ United Kingdom For all sales support and general enq...

Страница 12: ...reby granted free of charge to any person obtaining a copy of this software and associated documentation files the Software to deal in the Software without restriction including without limitation the...

Страница 13: ...cking the Accessories Unpacking and Installing the Machine Installing the Optional Equipment Connecting the Power Code Connecting This Machine to a Computer Loading Paper Setting Up This Machine Insta...

Страница 14: ...nstall this machine in a location where temperature becomes high or near open flames Do not install this machine in a location where chemical reactions may occur such as a laboratory Do not install th...

Страница 15: ...n a closed room or other locations with bad circulation and ventilation If you use this machine in a small room continuously for an extended period of time make sure to ventilate the room Install this...

Страница 16: ...16 2 Setting Up Side view when the additional tray unit is installed...

Страница 17: ...nstalled in the image drums which are installed in the machine before shipment The starter toner cartridge is not installed in the ES model Install the toner cartridge that is included in this machine...

Страница 18: ...m for 5 minutes or more Packaging and cushioning materials are required for transporting the machine Do not dispose of it and keep it for future use 1 Remove the machine from the box and then remove a...

Страница 19: ...the tip aligns on the lug of the cartridge Turn the levers of all 4 toner cartridges 6 Pull the locking levers on the fuser unit toward you to unlock 7 Hold the fuser unit handle and lift the fuser u...

Страница 20: ...cartridges place the fuser unit into the machine 10 Push the levers on the fuser unit to lock 11 Close the output tray a slowly and push the center of the output tray for confirmation When the error...

Страница 21: ...all the wireless LAN module when you want to use a wireless connection 1 Check that the machine is turned off and power cord and all the cables are unplugged Installing the wireless LAN module with th...

Страница 22: ...tray unit when increasing the number of sheets or paper to be set is needed Up to 2 trays can be installed Set the number of trays on the printer driver after installing them 1 Check that the machine...

Страница 23: ...o install two additional trays fix them together with the lock pieces 3 Slowly stack the machine on the additional tray unit aligning their back sides and right sides 4 Screw the machine and additiona...

Страница 24: ...machine is connected via USB interface When the optional equipment is installed before the printer driver is installed Setting Additional Tray s to the Windows PCL Printer Driver 1 Click Start and the...

Страница 25: ...number of trays for Available Trays in Installable Options 5 Click OK Setting Additional Tray s to the Mac OS X Printer Driver 1 Select System Preferences from the Apple menu 2 Click Printers Scanner...

Страница 26: ...cord into the outlet Do not plug or unplug the power cord with wet hands Install the power cord in a location where users cannot step on it and do not place any object on the power cord Do not bundle...

Страница 27: ...27 2 Setting Up 1 Plug the power cord into the power connector 2 Plug the power cord into the outlet...

Страница 28: ...tion set Enabling Default Gateway to Wireless Do not place any electric appliances that emit weak radio waves such as microwaves or digital cordless telephones close to the machine If there is metal a...

Страница 29: ...02 11 a b g n Access method Infrastructure mode 2 Check if the wireless LAN access point supports WPS If it does not support WPS check the SSID and encryption key by referring to the instruction manua...

Страница 30: ...face cover on the back side of the machine pressing the center part of it 4 Insert one end of the USB cable into the USB interface connector on the machine Do not insert the USB cable into the network...

Страница 31: ...directly connect wireless devices computers tablets smartphones etc 1 Check if your wireless devices match the following requirements Standards IEEE 802 11 b g n Security WPA2 PSK AES 2 Check if your...

Страница 32: ...r Types That Can be Loaded 1 Pull the paper cassette out 2 Slide the paper guide a to the width of paper to be loaded 3 Slide the paper stopper b to the length of paper to be loaded 4 Fan a stack of p...

Страница 33: ...33 2 Setting Up 7 Replace the paper cassette into the machine Push the paper cassette until it stops...

Страница 34: ...Up This Machine Follow the on screen instructions to set required information 1 Turn the machine on 2 Follow the on screen instructions to set required information When the machine is set up install...

Страница 35: ...this machine before installing This machine is turned on For network connection this machine is connected to the network via a LAN cable and required information such as IP address is already set 1 In...

Страница 36: ...e and computer and then click Next If the Windows Security Alert dialog box is displayed click Allow access 7 Select the model name of the machine and then click Next 8 Click Install Optional Software...

Страница 37: ...37 2 Setting Up 9 Make sure that the software is successfully installed and then click Complete 10 Click Next...

Страница 38: ...int a test page in step 15 1 Make sure that the machine and a computer are connected and the machine is turned on 2 Insert the Software DVD ROM into a computer 3 Double click the OKI icon on the deskt...

Страница 39: ...t OKI C542 PS is displayed for Use To change the name enter a new name into Name 11 Click Add 12 If Installable options is displayed click Continue Types of Names Displayed in the Connection Methods L...

Страница 40: ...d to Printers and OKI C542 PS is displayed for Kind If OKI C542 PS is not displayed for Kind correctly click delete the machine from Printers and then newly perform steps 8 to 12 14 Click Open Print Q...

Страница 41: ...3 Basic Operations Names of Components Basic Operations on the Operator Panel Turning the Machine On or Off Loading Paper...

Страница 42: ...name of each component Front View Rear View Inside of the machine Front View Symbol Name a Operator panel Basic Operations on the Operator Panel b USB port c MP tray Multipurpose tray d Open button e...

Страница 43: ...ce connector cover d Network interface connector e USB interface connector Inside of the machine Symbol Name a LED head b Fuser unit c Toner cartridge Image drum Y yellow d Toner cartridge Image drum...

Страница 44: ...e touch panel hard or poke it with a pointed object It may damage the touch panel and cause malfunction Names and Functions No Name Function 1 Touch panel Allows you to select or set an item by pressi...

Страница 45: ...tion Settings Device Settings RESET Logout Antenna mark appears when the wireless LAN is enabled Only available buttons are displayed on the selected menu 2 Title and operation guide area Displays the...

Страница 46: ...or panel can be tilted to improve the visibility 1 Hold the upper center of the operator pane and pull it forward To set the operator panel back to the original position pull the operator panel forwar...

Страница 47: ...the character you want to enter The screen below shows an image when holding down the a button Switching the Entry Mode Numbers Alphabetic Characters 1 Press Alpha or Symbol Entering Characters Item D...

Страница 48: ...panel or the CLEAR button on the operator panel The character before the cursor is deleted To delete an entered character move the cursor to the right of the character To move the cursor press or Ente...

Страница 49: ...the machine is turned on the power switch LED lamp lights up The Easy Setup menu appears If you select Yes the wireless LAN setting is performed Select the Do not show this page again check box if yo...

Страница 50: ...to force shut down the machine Use this method only if a problem occurs For troubleshooting of this machine see Troubleshooting 1 Press the power switch for approximately a second The Shutdown in pro...

Страница 51: ...If You Do Not Use This Machine for an Extended Period of Time If you do not use this machine for an extended period of time due to holidays trips or other reasons unplug the power cord from the outle...

Страница 52: ...ng Paper in the MP Tray Paper Storage Available paper types About Paper Sizes Weight and Number of Sheets That Can be Loaded Recommended paper Available paper types To perform high quality printing be...

Страница 53: ...6 5x7inch 5 x 7 Custom size Width 64 to 216 Length 90 to 1321 Paper size mm The value enclosed with brackets is indicated in inches Paper weight Monarch 98 4 x 190 5 3 875 x 7 5 Envelopes must be mad...

Страница 54: ...se carrier page is entirely covered by labels Other types of label stocks may damage the machine due to the labels peeling off during the printing process Available paper size Tray capacity Paper weig...

Страница 55: ...r guide a to the width of paper to be loaded 3 Slide the paper stopper b to the length of paper to be loaded 4 Fan a stack of paper well and then align the edges of the paper 5 Load paper with the pri...

Страница 56: ...n is displayed If you open and close the MP tray vigorously the paper feed roller of MP tray may fall and get in the way of loading paper If the paper feed roller of MP tray has fallen raise the paper...

Страница 57: ...its edge touches the paper feed entrance Do not load paper above the mark When a printer is in the power saving mode press the Power Save button to restore from the mode 7 Set Paper Size Media Type a...

Страница 58: ...unlight Near the inside of an exterior wall On an uneven surface Where static electricity may be generated Where temperature excessively rises high and temperature rapidly changes Near this machine an...

Страница 59: ...4 Print Printing from a Computer Windows Printing from a Computer Mac OS X Cancelling a Print Job About Screens and Functions of Each Printer Driver Names and Functions of Screen Items for Print...

Страница 60: ...rom a Computer Windows For Windows PCL Printer Driver For Windows PS Printer Driver 1 Open the file to print 2 Select Print from the File menu 3 Select the printer driver 4 Click Preferences For Windo...

Страница 61: ...settings in each tab to suit your needs 6 Click OK 7 Click Print on the Print Screen 1 Open the file to print 2 Select Print from the File menu 3 Select the PS printer driver 4 Click Preferences For W...

Страница 62: ...62 4 Print 5 Change the settings in each tab to suit your needs 6 Click OK 7 Click Print on the Print screen...

Страница 63: ...er size paper tray and paper weight and paper type with the printer driver 1 Open the file to print 2 Select Print from the File menu 3 Select the machine from Printer 4 Select the paper size from Pap...

Страница 64: ...64 4 Print If setting details are not displayed in the print dialog box for Mac OS X10 8 5 to 10 11 click Show Details at the bottom of the dialog box 6 Click Print...

Страница 65: ...ancel printing follow the steps below The pages that are ready to be printed on this machine cannot be cancelled If the operator panel indicates that printing is in progress for a long time delete the...

Страница 66: ...weight paper feed method or other settings 4 Finishing Mode Specifies the multi page printing booklet printing poster printing or other settings 5 2 Sided Printing Duplex Specifies this setting when y...

Страница 67: ...Specifies the print type 5 Advanced Sets other printing settings 6 Default Resets each setting value in the tab to its default setting value Item Description 1 Watermarks Specifies when you want to u...

Страница 68: ...page order to print 4 Page Format Specifies the number of pages that is printed on a sheet of paper and booklet printing 5 Image layout Displays a sample image for the set layout 6 Advanced Allows you...

Страница 69: ...n paper of a different size from that of the document 4 Watermarks Specifies when you want to use stamp print 5 Overlays Sets when printing print formats which are registered to the printer beforehand...

Страница 70: ...Border Specifies a type of a boundary 4 Two Sided Specifies when performing duplex printing 5 Reverse page orientation Reverses the direction of a page to print by selecting this check box 6 Flip hori...

Страница 71: ...size check box is selected 6 Scale down only Only reduces a document to fit the output paper size by selecting this check box Item Description 1 All Pages From Specifies the paper feed tray If you sp...

Страница 72: ...use monochrome printing 2 Color Specifies alignment to color mode when printing in color Item Description 1 Print Options Specifies alignment to the items that have been set such as print quality pap...

Страница 73: ...ntication 3 Password The password for user authentication 4 Authentication type Specify an authentication type to be used 5 Summary Account Specify an account name and type Item Description 1 Job Type...

Страница 74: ...74 4 Print Supply Levels Panel Item Description 1 Consumables Displays the remaining amount of consumables...

Страница 75: ...e current print job to their default settings 10 Device Settings Specifies various settings such as Administrator Setting 11 Online Switches this machine online Item Description 1 Stationary button ar...

Страница 76: ...5 Maintenance Replacing Consumables Cleaning Each Part of the Machine...

Страница 77: ...pilled toner with an electric vacuum cleaner Vacuuming spilled toner with an electric vacuum cleaner may result in ignition due to sparks from electric contacts or other reasons If toner spills on the...

Страница 78: ...l If you replace the toner cartridge image drum while it is being used the toner consumption will not be counted normally By opening and closing the output tray after the message COLOR toner has run o...

Страница 79: ...it them to the LED head 6 Unpack a new toner cartridge 7 Shake the cartridge several times vertically and horizontally 8 Remove the tape d from the toner cartridge 9 Insert a new toner cartridge c by...

Страница 80: ...ver b of the toner cartridge and turn forward until the tip aligns on the lug of the cartridge If the toner cartridge is not securely attached printing quality may deteriorate 11 Wipe the lens of the...

Страница 81: ...following the unpacking of the toner cartridge Replace the toner cartridge with a new one Although opening and closing the output tray may extend the life of an image drum for a while it is recommende...

Страница 82: ...dentify the image drum that reached its lifetime by its label color 4 Remove the image drum b from the machine and place the image drum on a flat surface While removing consumables be careful not to h...

Страница 83: ...n h on the image drum so that the toner cartridge and image drum color label align Then insert the right side gently into place 11 Hold the cartridge pinch the tip of blue lever g of the toner cartrid...

Страница 84: ...tra care when handling the image drum the green cylinder because it is fragile Do not expose the image drum to direct sunlight or strong light approximately 1 500 lux or more Do not leave the image dr...

Страница 85: ...emove the desiccant pack 7 Remove the toner cover 8 Unpack a new toner cartridge 9 Shake the cartridge several times vertically and horizontally 10 Remove the tape c from the toner cartridge Possible...

Страница 86: ...he cartridge pinch the tip of blue lever g of the toner cartridge and turn forward until the tip aligns on the lug of the cartridge 13 Check a label color of a new image drum and place the drum into t...

Страница 87: ...se solvents such as methyl alcohol or thinners because they may damage the LED head Do not expose the image drum to direct sunlight or strong light approximately 1 500 lux or more Even under room ligh...

Страница 88: ...88 5 Maintenance 2 Wipe the four lenses of the LED heads with a soft tissue paper lightly 3 Close the output tray a slowly and push the center of the output tray for confirmation...

Страница 89: ...6 Troubleshooting If Paper Jams Occur Print Problems If an Error Message is Displayed on the Operator Panel...

Страница 90: ...391 392 393 If the Error Code is 409 1 Press the button A and open the output tray a completely 2 Remove the four image drums from the machine and place the image drums on a flat surface While removi...

Страница 91: ...ear of the machine the direction of the arrow if an edge of jammed paper can be seen 5 If paper jams in the fuser unit press the jam release lever b on the fuser unit and slowly pull the jammed paper...

Страница 92: ...lt unit toward you and remove the belt unit by holding the lock levers 9 Remove the jammed paper slowly by pulling the edge of paper 10 Hold the lock levers of belt unit and place the belt unit into t...

Страница 93: ...place the fuser unit into the machine 13 Tilt the lock levers on the both sides of the fuser unit 14 Replace the four image drums into the machine 15 Close the output tray a slowly and push the cente...

Страница 94: ...hit them to the LED head 3 Cover the removed image drums with paper so that the image drums are not exposed to light 4 Remove the jammed paper slowly by pulling the edge of paper 5 If paper jams in t...

Страница 95: ...of the fuser unit toward you 7 Hold the fuser unit e handle and lift the fuser unit out of the machine 8 If jammed paper remains in the machine hold the both sides of the paper to remove it gently 9 H...

Страница 96: ...g 10 Tilt the lock levers c on the both sides of the fuser unit 11 Put all four image drums back into the machine 12 Close the output tray a slowly and push the center of the output tray for confirmat...

Страница 97: ...image drums on a flat surface While removing consumables be careful not to hit them to the LED head 4 Cover the removed image drums with paper so that the image drums are not exposed to light 5 Open...

Страница 98: ...all four image drums back into the machine 7 Close the output tray a slowly and push the center of the output tray for confirmation 8 When loading paper on the MP tray load the paper with the print si...

Страница 99: ...ced Manual This procedure uses Tray 1 as an example 1 Gently pull out from the machine the tray for which an error is indicated 2 Remove the jammed paper If jammed paper cannot be found check the posi...

Страница 100: ...Opening and closing the output tray starts printing 1 Close the rear output tray 2 Press the button A and open the output tray a completely 3 Remove the four image drums from the machine and place th...

Страница 101: ...s with paper so that the image drums are not exposed to light 5 Remove the jammed paper slowly by pulling the edge of paper 6 If paper jams in the fuser unit press the jam release lever on the fuser u...

Страница 102: ...t of the machine 9 Tilt the lock levers on the both sides of the belt unit toward you and remove the belt unit by holding the lock levers 10 Remove the jammed paper slowly by pulling the edge of paper...

Страница 103: ...13 Hold the fuser unit handle and place the fuser unit into the machine 14 Tilt the lock levers on the both sides of the fuser unit 15 Put all four image drums back into the machine 16 Close the outp...

Страница 104: ...ssage List The interface setting is disabled Whether there is a consistency with the machine s settings and the network connection environment check the settings of the interface that you are using on...

Страница 105: ...omplete Received invalid data is displayed on the touch panel and the machine does not print Press Device Settings select Admin Setup Print Setup Print menu Printer Adjust Timeout Injob on the touch p...

Страница 106: ...itialized Wait for a while until the machine connects to the network Checking File System File system in the hard disk is being checked Wait for a while Inspection is required PU Flash Error Turn the...

Страница 107: ...that matches your machine Error Postscript A postscript error has occurred Image Drum Near Life The image drum indicated on the screen is near life Have a new image drum ready C Cyan blue M Magenta r...

Страница 108: ...the message press Close If you performed private printing the data was deleted because it was incomplete Print again Received data has been discarded because Job Type is restricted Data whose job typ...

Страница 109: ...ible C Cyan blue M Magenta red Toner empty Replace with new Toner Cartridge Error 410 411 412 413 The indicated cartridge ran out of toner Opening and closing the output tray can resume printing for a...

Страница 110: ...mage drum with a new one Opening and closing the output tray can resume printing for a while Replace with a new one as soon as possible however C Cyan blue M Magenta red Y Yellow K Black Image Drum Li...

Страница 111: ...log into the SMTP server ended up an authentication error Check the network settings SMTP Auth Unsupported The SMTP server does not support the authentication system Check the network settings POP3 Lo...

Страница 112: ...ata sent to this machine Check the image data Process has been canceled as there is no space on the device Please free up enough memory space by reducing usage and try again Processing data was cancel...

Страница 113: ...rsists contact your dealer Firmware Update Error Please try again If network doesn t work please try firmware update over USB Updating the firmware failed Update again Registering with Google Cloud Pr...

Страница 114: ...s Close Changing Language Panel operation is disabled Display language is being changed Wait for a while Language Change Failed Error num CODE Switching display languages failed Press the Power button...

Страница 115: ...Management Specifications Changing the Administrator Password Saving Power Consumption with the Power Save Function Specifications This section describes how to manage the machine and its specificatio...

Страница 116: ...t to forget the set password 1 Press Device Settings on the touch panel 2 Press or several times and press Admin Setup 3 Enter the administrator name and password and press OK The factory default admi...

Страница 117: ...rning the Machine Off Auto Power Off Setting the Length of Idle Time Before Auto Power Off Works For details on how to change the idle time before entering Power Save mode see Setting the Length of Id...

Страница 118: ...lished with Telnet or FTP When the transition time to enter Sleep mode or Deep Sleep mode from Power Save mode elapses and the connection is disconnected the machine enters Sleep mode Wireless LAN is...

Страница 119: ...the following conditions A LAN cable is connected to the network interface connector Wireless LAN is enabled Enable If you do not use the machine for a certain period of time the machine automatically...

Страница 120: ...3 Enter the administrator name and password and press OK The factory default administrator name and password are admin and 999999 respectively 4 Press or several times and press Management 5 Press Po...

Страница 121: ...on 670 W Idle 90 W Peak 1250 W Sleep mode Less than 1 5 W w o option Power save mode Less than 20 W w o option Auto power off mode Less than 0 5 W Operating condition Operating Temperature 10 32 C Hum...

Страница 122: ...nches L Duplex 148 216 mm W 210 356 mm L 5 8 8 5 inches W 8 2 14 0 inches L Media type Plain paper 64 g m2 256 g m2 Envelopes Label Feeding method Automatic feeding from Tray 1 MP tray and Additional...

Страница 123: ...user is encouraged to try to correct the interference by one or more of the following measures Reorient or relocate the receiving antenna Increase the separation between the equipment and receiver Con...

Страница 124: ...nvironment and meets the FCC radio frequency RF Exposure Guidelines and RSS 102 of the IC radio frequency RF Exposure rules This equipment should be installed and operated keeping the radiator at leas...

Страница 125: ...ce Hotline 43 0 2236 677 110 501 OKI Systems Danmark a s Hersted stervej 27 2620 Albertslund Danmark Adm 45 43 66 65 00 Website www oki dk Fax 45 43 66 65 90 E mail salg oki dk support oki dk Oki Data...

Страница 126: ...46472602EE Rev1...

Отзывы: