


CHAPTER 4 TESTING
Ohaus Corporation www.ohaus.com
24
Navigator Series Service Manual
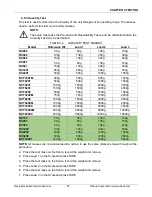
Note:
If the balance does not meet specifications, move it to a suitable location, ensure
that it is level, and try again. If it still does not meet specifications, perform a service
calibration, and try again. (See Appendix B for Service Calibration)
Содержание Navigator Series
Страница 1: ...SERVICE MANUAL NavigatorTM Series Scales...
Страница 2: ......
Страница 50: ......
Страница 51: ......


