


3-6
CHAPTER 3 REPAIR PROCEDURES
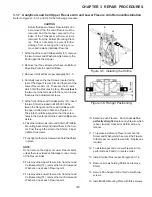
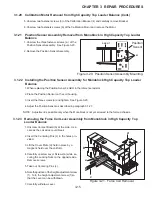
3.1.8 Removing the Lever and Coil.
1.Remove the Hanger and shims.
2.Remove the Vane (e) from the Lever.
3.Remove the 4 screws (f) holding the magnet
holder.
4.Remove the magnet holder.
CAUTION:
The magnet is made of brittle material, care
should be taken not to break off pieces.
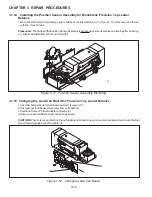
5.Note the original position of the vertical stop and
turn it so that the ear on the Lever aligns with the
slot.
6.Remove the Lateral Stop (g).
7.Unsolder the contact strips at the Lever board.
8.Remove the screws from the vertical guides (pil
low block bearings) from the chassis. And lift the
Lever out.
Figure 3-7. Lever Removal/Installation.
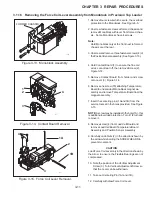
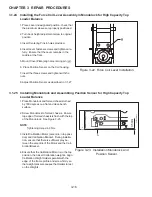
3.1.9 Replacing the Vertical Flexures (Pillow
Block Bearings)
1.Place the Lever on a flat surface and remove the
bad Flexures.
2.The round hole of the Flexure goes to the Lever
side.
3.Make sure the tops of the Flexures are flush with
the top of the Lever.
4.The distance from Flexure to Flexure is 46mm
(1.81in)
Figure 3-8. Vertical Guide (Pillow Block Bearing)
Installation.
Содержание EXPLORER
Страница 2: ......
Страница 4: ......
Страница 62: ...4 10 CHAPTER 4 TESTING ...
Страница 80: ...5 18 CHAPTER 5 DRAWINGS AND PARTS LISTS Figure5 8 ExplodedViewofExplorerDisplay 1 2 3 O T O T 4 ...
Страница 88: ...5 26 CHAPTER 5 DRAWINGS AND PARTS LISTS ...
Страница 106: ...APPENDIX B EXPLORER PRO EP LOADER B 10 ...
Страница 112: ...APPENDIX D REPLACING BOTTOM DISPLAY BOARD D 4 ...
Страница 113: ......
Страница 114: ...PN 80250985 SERVICE MANUAL EXPLORER EXPLORER PRO AND VOYAGER BALANCES 80250985 ...


