background image

11  Editing the Examination Programmes

48 / 86

Instruction Manual Mesotest II (G/62800/0715/en)

Change order

Select an examination

Press the [Up] or [Down] button as many times as necessary until the 
examination has moved to the wanted position.

Press the [Save] button.

The selection list is adapted accordingly.

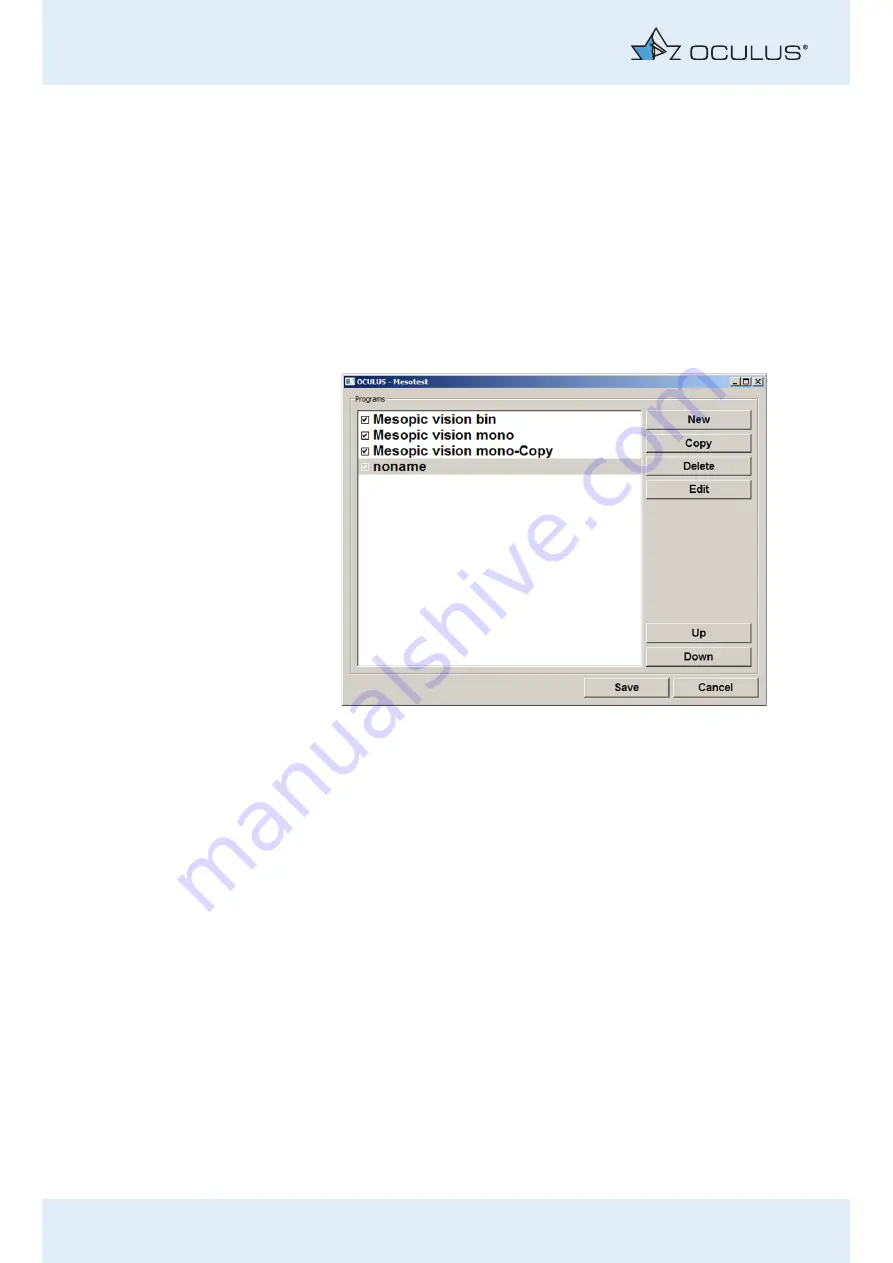
11.2 Create A New Examination Programme

Mesotest II > Settings > Edit programmes

Press the [New] button.

A new programme appears at the end of the list under the name 
„noname“. The [Delete] and [Edit] buttons appear.

Fig. 11-2: List of activated/deactivated examination programmes.

Содержание Mesotest II

Страница 1: ...OCULUS Mesotest II INSTRUCTION MANUAL Examination of mesopic vision and glare sensitivity...

Страница 2: ...tructions The Mesotest II is used for testing the mesopic visual acuity of the human eye Due to ongoing development the diagrams shown may depict minor changes to the actual device delivered If you ha...

Страница 3: ...e Installation 19 7 5 Switching the Device On and Off 19 8 Before Conducting the Examination 20 8 1 Prepare the Unit for Routine Operation 20 8 2 Prepare the Patient for the Examination 20 8 2 1 Patie...

Страница 4: ...1 12 Patient Data Management 52 12 1 Rename Patient Data 52 12 2 Exporting Patient Data 53 12 3 Importing Patient Data 54 12 4 Data Backup 55 12 4 1 Backup data 56 12 4 2 Reconstruct data 56 12 4 3 Au...

Страница 5: ...1 Liability for proper function or damages 77 17 2 Address of the manufacturer and service department 78 18 Declaration of Conformity 79 19 Technical Data 80 20 Appendix 82 20 1 Electromagnetic Compat...

Страница 6: ...v v Instruction Manual Mesotest II G 62800 0715 en...

Страница 7: ...in the proper manner for any servicing or repairs that may arise You can thus avoid unnecessary damage and costs Components Order Number Mesotest II or Mesotest II konkav minus lenses can be swung in...

Страница 8: ...and all safety related instructions for use of the Mesotest II Software Installation The introduction to the Software Installation describes how to install the Mesotest II software and the associated...

Страница 9: ...software version is displayed on the Settings screen within the Patient Data Management sec 12 5 page 57 The software version of the Mesotest II programme is shown on the Change Settings screen within...

Страница 10: ...ormation about the product and its use which require special attention 4 2 Safety Instructions for Use Attention Personal injury or property damage due to improper operation Observe the following safe...

Страница 11: ...e the Mesotest II in rooms used for medical purposes after they have been set up according to the VDE Regulations 0100 710 Do not operate the equipment included in the packing list in explosive enviro...

Страница 12: ...comply with the IEC 60601 1 standard use an isolation transformer Instrutions to us a ME system The Mesotest II and a connected computer are a medical electrical system ME system according to DIN EN...

Страница 13: ...ized dealer If an error occurs which you are unable to correct label the Mesotest II as out of order and contact our service department or an authorized dealer Instructions for disassembly and disposa...

Страница 14: ...are using a multiple socket extension chord it has to be supplied with a isolation transformer If you are using a new computer for the Mesotest II Check the electrical safety Call OCULUS Service for t...

Страница 15: ...ce Description Instruction Manual Mesotest II G 62800 0715 en 9 86 6 Device Description 1 Viewer enclosure 4 Yoke spring 2 Device viewer 5 Air vents 3 Housing Fig 6 1 Front view of the Mesotest II 3 1...

Страница 16: ...tion Manual Mesotest II G 62800 0715 en 1 Back of the viewer with grey pane 5 Serial interface port 2 Housing 6 On Off switch 3 Control pad 7 Nameplate 4 Device plug with fuse holder Fig 6 2 Back view...

Страница 17: ...contrast sensitivity is an important supplement to photopic vision testing especially for the assessment of night driving ability Pre and post operative testing of the mesopic vision and glare sensiti...

Страница 18: ...in six different positions Four contrast levels without glare ambient luminance 0 032 cd m and four contrast levels with glare ambient luminance 0 10 cd m are tested The optotypes can be presented in...

Страница 19: ...he will no longer be able to see the optotypes to begin with This can lead to a delay in the examination procedure as he needs some time approx 10 30 seconds to readapt Test procedure Control Pad The...

Страница 20: ...or each contrast level The visual requirement is deemed to be met when the patient has recognised at least 3 of 5 positions of the Landolt ring 60 criterion Mark this in the software accordingly sec 1...

Страница 21: ...trongest contrast i e this level is the easiest to see Testing mesopic vision with glare Testing of mesopic vision can also be conducted with additional glare The glare comes from the left just as it...

Страница 22: ...are completed by our service or by a professional authorized by OCULUS 7 2 Information About the Room in which the Device is Set Up The Mesotest II should be set up in a moderately bright or darkened...

Страница 23: ...grips 7 3 Set up and Connection Note Risk of damage to the device if not handled correctly Do not expose the Mesotest II to any vibrations shocks contaminants moisture or high temperatures Handle the...

Страница 24: ...extension cord Use a socket with a protective earth connection which is fully operating If you are going to operate the Mesotest II via a computer laptop connect the latter in the same way as the con...

Страница 25: ...r data are susceptible to greater security risks We recommend that you Disconnect your computer from the internet and use it as a stand alone solution or Upgrade to the latest Windows version You can...

Страница 26: ...2 Prepare the Patient for the Examination Prepare the patient for the examination as follows Check to be sure that any adaptation disorder has been resolved sec 8 2 1 page 21 Check the patient s glass...

Страница 27: ...ed 8 2 1 Patient Adaptation Before the examination the patient s eyes need about 5 minutes to adapt to the darkness When the Mesotest II is set up in a darkened room this is not a problem If the unit...

Страница 28: ...Pad This chapter explains The control pad sec 9 1 page 22 How to fill out a test sheet sec 9 2 page 25 How to start an examination sec 9 2 1 page 25 How to test mesopic vision sec 9 3 page 26 How to...

Страница 29: ...s lenses option Landolt ring position Top Right RO 2nd function interpose 1 5 D minus lenses option Landolt ring position Bottom Left LU Landolt ring position Bottom U Landolt ring position Bottom Rig...

Страница 30: ...ion aids are switched on Test no 7 Optotype O CONTRAST 1 2 7 DPT R L BIN B BLEND FIX B Seventh programme step Landolt ring gap at top Presented contrast level 1 2 7 Binocular examination without minus...

Страница 31: ...ter automatic calibration of the Mesotest II test no 1 is presented After an examination Press this button The programme begins with test no 1 Instruct the patient Instruct the patient with the help o...

Страница 32: ...witch over to the test for mesopic vision with glare he may no longer be able to recog nise any optotypes to begin with This can lead to a delay in the exami nation procedure as he needs some time app...

Страница 33: ...may suffer from night myopia This should be corrected with suitable visual aids You can determine the extent of the night myopia by swinging in lenses of different powers 0 5 1 0 1 5 D 9 4 2 Monocula...

Страница 34: ...ec 10 1 page 28 How to change settings if necessary sec 10 2 page 31 How to conduct an examination sec 10 3 page 36 10 1 Using the Examination Menu The general use of the examination menu is explained...

Страница 35: ...ng options Select the visual aid s worn by the patient Specify whether the visual aid is tinted or not When you select a visual aid at the beginning of an examination it is applied to all subsequent t...

Страница 36: ...k the results Click on the optotype if the patient has recognised it The recognised optotype is marked with a green tick If the patient does not recognise the optotype click twice on the optotype 10 1...

Страница 37: ...f necessary you can make some basic adjustments in the Mesotest II programme 1 If you do not want to change any settings proceed as described in sec 10 3 page 36 Select a patient from the list of pati...

Страница 38: ...box fig 10 7 page 32 item 2 Select the desired language from the drop down list The selected language will be active after the next start of the Mesotest II programme Change visual acuity data Visual...

Страница 39: ...ce Show patients sex Miscellaneous box fig 10 7 page 32 item 9 Activate the Show patients sex checkbox The patient s gender is displayed in the examination menu Prerequisite The feature Patient s sex...

Страница 40: ...fig 10 7 page 32 item 9 Activate the Demo mode checkbox Edit examination programme Press the button Edit programs fig 10 7 page 32 item 5 You can change the order in which the examination programmes a...

Страница 41: ...en is for information purposes System screen You can activate the interface to external office management programmes here Activate the checkbox GDT in the Export box 1 Press the button in the Export b...

Страница 42: ...rally has only one port COM1 A desktop computer generally has two COM1 and COM2 Save your selection Switch to the Mesotest II programme Press the Back button fig 10 7 page 32 item 8 The settings will...

Страница 43: ...ient Data Management programme from there If necessary click on the Mesotest II icon The user interface for the Patient Data Management is displayed To start the Mesotest II programme first enter a ne...

Страница 44: ...he patient data list on the left hand side of the screen displays all previously examined patients in alphabetical order Choose Search to quickly find the patient you are looking for in the list Enter...

Страница 45: ...patient name 10 4 Select and Start Exam If necessary press the Mesotest II button to start the Mesotest II programme The following dialogue appears Select a program 2 You can choose between Mesopic vi...

Страница 46: ...test mesopic vision with glare Enter a visual aid If the patient wears glasses or contact lenses the examination is conducted with the glasses or contact lenses Enter whether the patient wears visual...

Страница 47: ...hen the patient has recognised at least 3 of 5 positions of the Landolt ring 60 criterion Conduct test steps 3 through 5 in the same way Test mesopic vision with glare Select test step 6 Tell the pati...

Страница 48: ...5 Are used to test mesopic vision Test 7 10 and 17 20 Are used to test mesopic vision with glare Enter a visual aid If the patient wears glasses or contact lenses the examination is conducted with the...

Страница 49: ...elect test step 6 Tell the patient to focus on the red fixation mark Explain to the patient that he must keep looking in that direction and must not under any circumstances look directly at the glare...

Страница 50: ...has recognised at least 3 of 5 positions of the Landolt ring 60 criterion 10 4 3 Test for Night Myopia optional If your Mesotest II is equipped with minus lenses Mesotest II konkav you can conduct the...

Страница 51: ...8 86 0HVRWHVW 2 8 86 2SWLNJHUlWH PE 0 QFKKRO KlXVHUVWU HW ODU 3DWLHQW 0XVWHUPDQQ UDQ 0 DWH RI ELUWK JH DWH RI H DP 3URJUDP lPP OHQG LQ RPPHQW 5HVXOW 0HVRSLF YLVLRQ DQG JODUH WHVWLQJ RQWUDVW OHYHO ODU...

Страница 52: ...tient Data Management you can load an existing examination from there Double click on the desired examination in the list of examinations fig 10 12 page 37 item 2 The examination is displayed in the e...

Страница 53: ...1 3 page 51 11 1 Compilation of a Custom Selection List of Examinations Mesotest II Settings Edit programmes This function acts on the display in the selection list for the examination programmes You...

Страница 54: ...ntil the examination has moved to the wanted position Press the Save button The selection list is adapted accordingly 11 2 Create A New Examination Programme Mesotest II Settings Edit programmes Press...

Страница 55: ...into that field and enter the new name 1 List of test presentation variants 8 Delete button 2 Eye box for eye selection 9 Add button 3 Drop down list for contrast selection 10 Down button 4 Glare che...

Страница 56: ...highlighted test step The test number is shown in the first column Test Select the eye to be examined 2 Activate the checkbox for the eye that is to be examined 2 All test steps can be conducted binoc...

Страница 57: ...amme The newly created examination programme is displayed in the list of activated and deactivated examination programmes It is auto matically set to active sec 11 1 page 47 11 3 Edit Examination Prog...

Страница 58: ...ons Edit and Delete appear Press the Edit button Proceed as described in sec 11 2 page 48 12 Patient Data Management You can do the following to the patient data rename sec 12 1 page 52 export sec 12...

Страница 59: ...in the settings field see also sec 12 5 page 57 Depending on the settings you may not have to perform all of the follow ing steps for example selection of the directory Select the Target 1 where you...

Страница 60: ...ue to computer virus Computer viruses can cause loss of data Run a virus check before importing data from the USB stick Press the button Import The following dialog appears The options for import and...

Страница 61: ...of patient and examination data at regular intervals In case of a loss of data you can reconstruct the data from a previously created backup with the help of this function Since data backup takes sev...

Страница 62: ...ct the folder to which the data should be backed up Confirm your selection with OK To back up the data press the Save button 4 The previously selected data will then be backed up to the corresponding...

Страница 63: ...made in the Settings area Press the Settings button in the upper right portion of the Patient Data Management user interface The Settings menu page will be displayed The Main tab will appear in the fo...

Страница 64: ...rs Optional items for patient box Besides the five standard attributes of first name last name date of birth gender and ID up to five additional attributes can be freely defined Enter the identifiers...

Страница 65: ...tion of the entry fields for patient data 1 as well as in the patient list 2 The deselection of attributes in the context menu is done in the same manner The currently selected attributes are marked w...

Страница 66: ...se should be enabled or not 8 If more than one database is enabled an additional drop down list appears on the main page of the Patient Data Management user interface You can enable a user or the assi...

Страница 67: ...le using the folder selection button When you save patient and examination data in the database it is initially placed in the so called Transfer folder This folder is always created locally on the com...

Страница 68: ...hould also be backed up If the automatic backup should be executed with the specified settings enable the Enable checkbox 7 Automatic export box If you enable this checkbox every examination will be e...

Страница 69: ...gs specified in this tab for import and export of data can be overwritten These are only default values Select the folder using the folder selection button 1 which should normally be used as the defau...

Страница 70: ...on your computer but you would still like to send the databy email In this case additional entries in the SMTP box are necessary Default text group box Enter the default text for sending emails in the...

Страница 71: ...interface Default pat 3 is used if the Patient Data Management user interface is launched by a third party program Add the interface Default pat to the directory of the other program Select the third...

Страница 72: ...ata from the patient s insurance card into the Patient Data Management user interface First you have to configure the smartcard reader usually only once Press the Config button 2 A page appears for yo...

Страница 73: ...n this tab Enable the checkbox on this tab 1 on exactly one computer that has version V6 x installed Make sure that this checkbox is not enabled on any other computer which has version V6 x of the Pat...

Страница 74: ...label the Mesotest II as out of order and contact our service department or an authorized dealer Attention Risk of electric shock if the Mesotest II is not completely disconnected from the mains for t...

Страница 75: ...cleaning use a damp cloth and make sure that no liquid enters the Mesotest II Clean the plastic surfaces and painted surfaces with appropriate cleaning agents Clean the lenses with a soft cloth or len...

Страница 76: ...ion we recommend that you Have the Mesotest II checked every two years by our service department or an authorized dealer Note Faulty examinations due to damaged equipment If an error occurs that you c...

Страница 77: ...Mesotest II on its back only Use the soft cloth as an underlay Removal Remove the yoke springs To do this take hold of the yoke springs one after the other at the two round ends and unhook the spring...

Страница 78: ...ese are located in a small fuse box integrated in the mains power plug You can replace a blown fuse Note Function loss due to incorrect fuse Use only the fuse type that is specified on the rating plat...

Страница 79: ...unctional damage caused by wrong lamp Use only genuine lamps from Oculus Order number 016280006004 The bulb is changed together with the plastic holder which also acts as a glare shield Simply pull th...

Страница 80: ...have blown The unit has been switched off and back on again too quickly Plug the power cable into the socket or into the low heat de vice socket at the Mesotest II Inform the in house electrician Che...

Страница 81: ...ordance with DIN EN 60601 1 the storage conditions are Transport In accordance with DIN EN 60601 1 the transport conditions are After storage and transport Wait approx 3 4 hours after transport before...

Страница 82: ...the vicinity of heaters and moisture If you want to send the Mesotest II to OCULUS for repair you can order an empty packaging box from OCULUS Service That will help prevent po tential transport damag...

Страница 83: ...s and conditions of business and delivery apply as per the date of purchase 17 1 Liability for proper function or damages OCULUS will only accept responsibility for the safety reliability and servicea...

Страница 84: ...will furnish you with additional information Address of the manufacturer and service department Germany OCULUS Optikger te GmbH M nchholzh user Stra e 29 35582 Wetzlar Germany Tel 06412005 0 Fax 0641...

Страница 85: ...18 Declaration of Conformity Instruction Manual Mesotest II G 62800 0715 en 79 86 18 Declaration of Conformity...

Страница 86: ...6 5 kg1 4 3 lbs Max power consumption 36 VA Voltage 90 264 V AC Frequency 50 60 Hz Control pad Dimensions W x D x H Weight 82 x 152 x 45 mm 3 2 x 6 0 x 1 7 inches 256 gr 0 6 lbs Shelf life up to 10 y...

Страница 87: ...ter which is in conformity with the DIN EN 60950 standard Type of protection against electric shock Protection class 1 Level of protection against electric shock Type B Level of protection against har...

Страница 88: ...g the examination is permissible because it will not affect tthe function ality described in the intended use A short interruption of the USB connection during the examination is permissible because i...

Страница 89: ...1 feet Guidance and manufacturer s declaration electromagentic emmissions IEC 60601 1 2 5 2 2 1 table 1 The OCULUS Mesotest II is intended for operation in the electromagnetic environment specified be...

Страница 90: ...kV differential mode 2 kV line s to earth Mains power quality should be that of a typical commercial or hospital environment Voltage dips short interruptions and voltage variations on power supply inp...

Страница 91: ...ess than the compliance level in each frequency range b Interface may occur in the vicinity of equipment marked with the following symbol Note 1 Note 2 At 80 Hz and 800 MHz the higher frequency range...

Страница 92: ...ted maximum output pow er of transmitter W Separation distance according to frequency of transmitter m 150 KHz to 80 Mhz d 1 2 P 80 MHz to 800 MHz d 1 2 P 800 MHz to 2 5 GHz d 2 3 P 0 01 0 12 0 12 0 2...

Отзывы: