background image

Introduction 


1  Introduction 

Congratulations on purchasing your 

OMX-SW8x8NT


8x8 Video / Audio 

Matrix Switcher

, which is ideal for the following typical applications: 

Any professional system requiring outstanding value in an 8x8 matrix 
Production and duplication facilities 
Security, CCTV, and home theater systems 

2  Getting Started 

We recommend that you: 

Unpack the equipment carefully and save the original box and packaging 

materials for possible future shipment 

Review the contents of this user manual 

3  Overview 

The high performance 

OMX-SW8x8NT

 is a true vertical interval video / 

audio matrix switcher, letting you route any input to any or all of the outputs 

simultaneously. 

The 

OMX-SW8x8NT

 includes: 

A bandwidth of 200MHz that ensures transparency even in the most critical 

applications 

8 input and 8 output button selectors 
8 preset memory locations for quick access to common configurations 
Audio-follow-video or audio breakaway option (to switch audio 

independently from video) 

A unique vertical and horizontal sync-pulse solution 
Glitch-free transitions, which are produced when sources share a 

common reference sync, as switching occurs during the vertical interval

1


An external Sync/Genlock input that may be programmed to switch 

according to the timing of either this input or of source number 1 


1 When one video signal replaces another video signal, the switching process causes a random interruption in the first video 
signal (in the middle of a frame) and a random entrance into the second video signal (also in the middle of a frame). The 
result is a visible jump in the edited tape. This deteriorates when the tape is copied, and the disturbance on playback is more 
serious. Avoid this by switching at a very specific point during the vertical interval, allowing smooth replacement of a whole 
frame by a second whole frame as long as the video sources are Genlocked to each other  

Содержание OMX-SW8X8NT

Страница 1: ...OMX SW8x8NT ...

Страница 2: ...ng Unit Characteristics 12 7 2 Selecting and Connecting an Output and or Input 12 7 3 Choosing the Audio Follow Video or Breakaway Option 13 7 3 1 Setting the Audio Follow Video Option 13 7 3 2 Setting the Breakaway Option 13 7 4 Storing Recalling Input Output Configurations 13 7 4 1 Storing an Input Output Configuration 13 7 4 2 Recalling an Input Output Configuration 14 7 4 3 Deleting an Input O...

Страница 3: ... Panel Features 4 Table 2 OMX SW8x8NT Rear Panel Features 4 Table 3 Recommended Ambient Temperature and Humidity Range 5 Table 4 Dipswitch Settings 7 Table 5 SELF Address Dipswitch Settings 7 Table 6 Technical Specifications of the OMX SW8x8NT 15 ...

Страница 4: ... locations for quick access to common configurations Audio follow video or audio breakaway option to switch audio independently from video A unique vertical and horizontal sync pulse solution Glitch free transitions which are produced when sources share a common reference sync as switching occurs during the vertical interval1 An external Sync Genlock input that may be programmed to switch accordin...

Страница 5: ... spaces 2U of a standard 19 rack To achieve the best performance Connect only good quality connection cables thus avoiding interference deterioration in signal quality due to poor matching and elevated noise levels often associated with low quality cables Avoid interference from neighboring electrical appliances and position your OMX SW8x8NT away from moisture excessive sunlight and dust 4 Your OM...

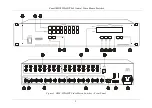
Страница 6: ...Your OMX SW8x8NT 8x8 Audio Video Matrix Switcher 3 Figure 1 OMX SW8x8NT Video Matrix Switcher Front Panel ...

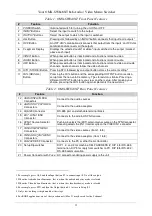
Страница 7: ...hoice pressing the RCL button again implements the new status Table 2 OMX SW8x8NT Rear Panel Features Feature Function 12 AUDIO INPUTS RCA Connectors Connect to the audio sources 13 AUDIO OUTPUTS RCA Connectors Connect to the audio acceptors 14 RS 485 Connector RS 485 port on detachable terminal block 15 EXT SYNC BNC Connector Connects to the external SYNC source 16 SYNC Source Selector Button Pus...

Страница 8: ...d enough air will still flow around the machine 3 The machine is placed straight in the correct horizontal position 4 You do not overload the circuit s When connecting the machine to the supply circuit overloading the circuits might have a detrimental effect on overcurrent protection and supply wiring Refer to the appropriate nameplate ratings for information For example for fuse replacement see t...

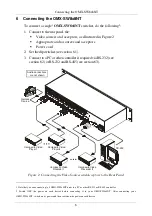
Страница 9: ...see section 6 2 or RS 232 and RS 485 see section 6 3 RS 232 Composite Video Recorder 8 Composite Video Recorder 1 Composite Video Player 8 Composite Video Player 1 Genlock Source Audio connections are not shown Figure 2 Connecting the Video Sources and Acceptors to the Rear Panel 1 Note that you can connect up to 8 OMX SW8x8NT units to a PC or other RS 232 or RS 485 controller 2 Switch OFF the pow...

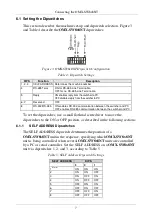
Страница 10: ...32 communication between the switcher and PC OFF enables RS 485 communication between the switcher and PC To set the dipswitches use a small flathead screwdriver to move the dipswitches to the ON or OFF position as described in the following sections 6 1 1 SELF ADDRESS Dipswitches The SELF ADDRESS dipswitch determines the position of a OMX SW8x8NT unit in the sequence specifying which OMX SW8x8NT ...

Страница 11: ...s Reply from the Matrix Switcher to the PC In some applications it may be desirable for some machines not to reply to instructions received on the RS 232 and RS 485 ports If so set the Reply dipswitch to OFF In the case of interconnection between more than two RS 485 receivers transmitters including PC the termination resistor must be disconnected on all the devices except for the first usually th...

Страница 12: ...Connect the RS 232 DB9 port on your PC to the RS 232 DB9 rear panel port on the OMX SW8x8NT unit as Figure 4 illustrates2 depending on whether the PC has a 9 pin or 25 pin connector Female DB9 From PC PIN 4 Connected to PIN 6 PINS 8 7 1 Connected together If a Shielded cable is used connect the shield to PIN 5 PIN 5 Connected to PIN 5 Ground PIN 3 Connected to PIN 2 PIN 2 Connected to PIN 3 Male D...

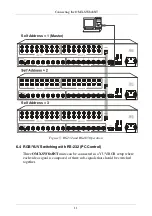
Страница 13: ...ceptors and the power cord to each OMX SW8x8NT unit 2 On each OMX SW8x8NT unit set the SELF ADDRESS dipswitches as required1 see Table 5 3 Connect the RS 232 port on the first unit to the PC2 4 Interconnect the RS 485 ports on all the OMX SW8x8NT units from the RS 485 port on the first OMX SW8x8NT unit to the RS 485 port on the second OMX SW8x8NT unit and so on up to the RS 485 port on the last un...

Страница 14: ...ter Self Address 3 Figure 5 RS 232 and RS 485 Operation 6 4 RGB YUV Switching with RS 232 PC Control Three OMX SW8x8NT units can be connected in a YUV RGB setup where each video signal is composed of three sub signals that should be switched together ...

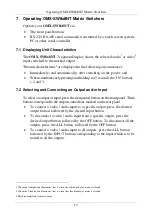
Страница 15: ...t To select an output or input press the designated button on the front panel These buttons correspond to the output connections marked on the rear panel To connect a video audio input to a specific output press the desired output button followed by the desired input button To disconnect a video audio input from a specific output press the desired output button followed by the OFF button To discon...

Страница 16: ... press either the AUDIO for audio control only or the VIDEO for video control only button If the AUDIO button illuminates switching operations relate to audio If the VIDEO button illuminates switching operations relate to video 7 4 Storing Recalling Input Output Configurations You can store and recall up to 8 input output configurations or setups in non volatile memory using the INPUT SELECTOR but...

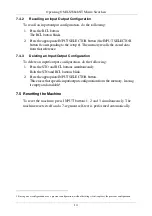
Страница 17: ...ation To delete an input output configuration do the following 1 Press the STO and RCL buttons simultaneously Both the STO and RCL buttons blink 2 Press the appropriate INPUT SELECTOR button This erases that specific input output configuration from the memory leaving it empty and available1 7 5 Resetting the Machine To reset the machine press INPUT buttons 1 2 and 3 simultaneously The machine rese...

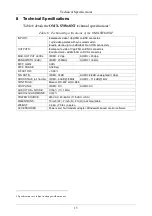
Страница 18: ...rs MAX OUTPUT LEVEL VIDEO 2 Vpp AUDIO 20Vpp BANDWIDTH 3dB VIDEO 200MHz AUDIO 100kHz DIFF GAIN 0 05 DIFF PHASE 0 03 Deg K FACTOR 0 05 S N RATIO VIDEO 74dB AUDIO 88 dB unweighted 1Vpp CROSSTALK all hostile VIDEO 50 dB 5MHz AUDIO 71 4dB 1kHz CONTROLS Manual RS 232 or RS 485 COUPLING VIDEO DC AUDIO AC AUDIO THD NOISE 0 016 1V 1kHz AUDIO 2nd HARMONIC 0 012 POWER SOURCE 230 VAC 50 60 Hz 115 VAC USA DIME...

Отзывы: