10
-
English -
Pos: 26 /Pumpen/Schlammsauger/Varionaut 2 USA/Hinweis Legionellen Varionaut USA @ 7\mod_1204798176756_121.doc @ 45031 @
Important safety information
Please read these instructions carefully prior to starting up the unit!
The water system on which the operation of this product is based requires utmost care and maintenance, possibly also
the use of chemicals, in order to prevent and keep the occurrence of micro-organisms and harmful bacteria, especially
legionellae that are responsible for legionnaire’s disease, under control. Non-observance of this information about
correct maintenance and care can entail the spreading of harmful bacteria. Due to the fact that for decorative pur-
poses, water nozzles distribute water in the air, water droplets containing harmful bacteria can enter your lungs and
cause life-threatening diseases.
It is the responsibility of the owner of the water system and its attendant units to ensure their maintenance and care in
compliance with the laws, directives and instructions laid down for this purpose. In order to avert harmful contamina-
tion, we urgently recommend the user to ensure cleaning and care of the water system and the water feature including
the nozzle, and to take all necessary measures to maintain the technical units, such as pumps, hoses, tubes, cable
clamp connectors, under-water lighting and nozzles to keep them in functional order in line with safety aspects. How-
ever, the maintenance and care obligation is not limited to the technical products supplied, but encompasses the entire
system.
We also recommend the owner to keep records of the dates when maintenance and care was carried out, and to
document all water tests made in conjunction with the water feature.
The owner is solely responsible for guaranteeing the safety of the water feature. Use or maintenance of the units sold
and the system are beyond OASE’S influence. OASE can only be held liable for manufacturing faults of OASE units.
Pos: 27 /Lampen/Wasserspieltechnik/Water-Jet Lightning USA/Montage Water Jet Lightning USA @ 10\mod_1235556446722_121.doc @ 60701 @
Installation
Attention! Dangerous electrical voltage.
Unit sections, connections and pond water could carry dangerous voltage if the electrical installation of the
unit is incorrectly performed.
Possible consequences:
Death or severe injury when touching unit sections, connections or in the event
of contact with the pond water.
Protective measures:
−
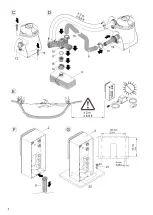
Install transformer and 12 V control box at a minimum safety distance of 2 m (6,6 ft) from the bank
(E)
.
−
Choose an installation place for the transformer and the 12 V control box that is splash-water protected.
Also protect the transformer and the 12 V control box against sun radiation (max. 40 °C / 104 °F).
Pos: 28 /Alle Produkte/Überschriften/H1 Aufstellen @ 7\mod_1202907856718_121.doc @ 43934 @
Installation
Pos: 29 /Lampen/Wasserspieltechnik/Water-Jet Lightning USA/Aufstellen Water Jet Lightning USA @ 10\mod_1235556306283_121.doc @ 60674 @
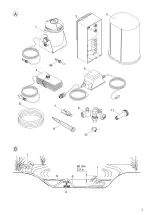
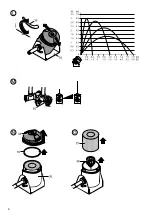
Installation of the Water Jet Lightning (B, C, D)
Plan the installation of the Water Jet Lightning. When planning, take the cable and hose lengths into account!
Install the Water Jet Lightning horizontally on a firm base. The unit can be installed dry and in the water. When in-
stalled in the water, the upper section of the Water Jet
Lightning must protrude out of the water by approx. 8 cm (3,2
in).
−
Fasten the unit foot
(12)
on the base using 2 screws
(13)
(not included in our scope of delivery).
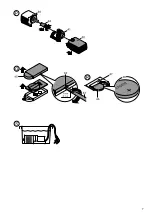
Pump installation and connection of the hoses (B, D)
Install the pump
(4)
as horizontally as possible. Raised installation can prevent the intake of dirt particles from the
bottom of the basin.
−
Slightly loosen the union nut
(14)
at the Y distributor
(15)
.
−
Screw the reduction piece
(16)
on the pump
(4)
and insert the O-ring
(17)
.
−
Tighten the union nut
(14)
at the Y distributor
(15)
.
−
Screw the hose connection
(19)
on the Water Jet Lightning
(1)
.
−
Slide a hose clip
(10)
over the hose
(6)
.
−
Slide the hose
(6)
on the hose adapter
(19)
and secure with a hose clip
(10)
.
−
Connect the other end of the hose to the Y distributor
(15)
and secure with a hose clip
(10)
.
Pos: 30 /Lampen/Wasserspieltechnik/Water Jet Lightning/Aufstellen Trafo und Steuerungsbox Water-Jet-Lightning @ 8\mod_1220884513083_121.doc @ 52067 @
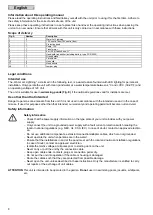
Installing the 12 V control box
Variant 1 (F)
−
Push the full length of the ground stake
(8)
into the ground at the desired position.
−
Slide the 12 V control box
(2)
on the ground stake
(8)
.
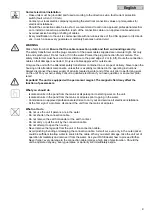
Variant 2 (G)
−
Screw the 12 V control box
(2)
to the housing of the 12 V control box
(2)
on the base using 4 screws
(21)
(not
contained in the scope of delivery) through the screw gaps
(22)
.
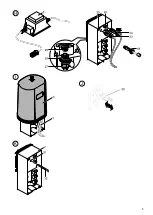
Setting up the transformer (H):
Place the transformer
(5)
close to the 12 V control box
(2)
.
Note
: Ensure that the cables are routed pull-relieved!
Pos: 31 /Alle Produkte/Dummy_module/===== Seitenwechsel ===== @ 0\mod_1125648978015_0.doc @ 1631 @


