NXP Semiconductors KTFRDM34933EVBUG Скачать руководство пользователя страница 24

NXP Semiconductors

KTFRDM34933EVBUG

FRDM-34933EVB evaluation board

KTFRDM34933EVBUG

All information provided in this document is subject to legal disclaimers.

© NXP B.V. 2017. All rights reserved.

User guide

Rev. 1.0 — 15 March 2017

24 / 39

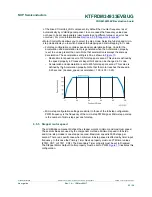
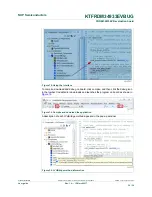
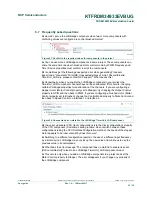
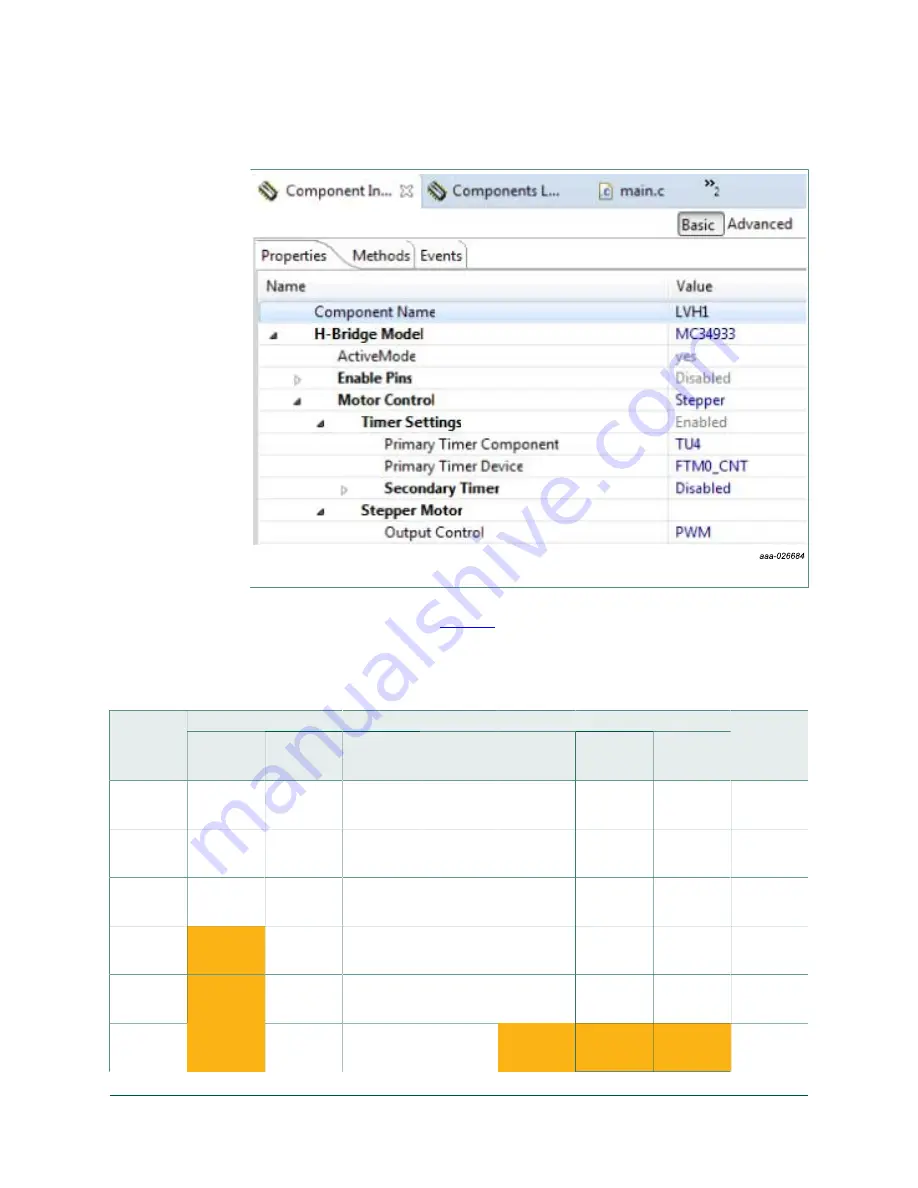
Figure 11. Stepper mode configuration that affects minimum full-stepping speed

Possible values for the timer input frequency (counter frequency property in

TimerUnit_LDD) are shown in 

Table 11

. Input frequency values depend on LVHBridge

component settings. Note that two frequency values are needed in "full-step and micro-

step mode". In one case LVHBridge component switches in runtime between these two

values.

Table 11. Minimum and maximum timer input frequency per stepper control mode

LVHBridge component properties

Primary timer input frequency

Mode

description

Timer device Secondary

timer

Output

control

Motor

control

mode

Values

Min.

Max.

Secondary

timer input

frequency

Full-step

mode

TPM

Don't care

PWM

Full-step

1

131 kHz

1.0 MHz

Any value

(user

selection)

Full-step

and micro-

step mode

TPM

Don't care

PWM

Full-step and

micro-step

1

1.2 MHz

10 MHz

Any value

(user

selection)

Full-step

mode (SW

control)

FTM or TPM

Disabled

GPIO

Full-step

1

131 kHz

1.0 MHz

Secondary

timer is not

enabled

Full-step

mode

FTM

Disabled

PWM

Full-step

1

131 kHz

1.0 MHz

Secondary

timer is not

enabled

Full-step

mode

FTM

Enabled

PWM

Full-step

1

131 kHz

1.0 MHz

The same

values as for

primary timer

Full-step

and micro-

step mode

FTM

Disabled

PWM

Full-step and

micro-step

2

1st value

for full-step:

131 kHz

1st value

for Full-

step: 1 MHz

Secondary

timer is not

enabled

Содержание KTFRDM34933EVBUG

Страница 1: ...KTFRDM34933EVBUG FRDM 34933EVB evaluation board Rev 1 0 15 March 2017 User guide 1 FRDM 34933EVB Figure 1 FRDM 34933EVB with FRDM KL25Z Freedom Development Platform...

Страница 2: ...hnical support services Should this evaluation kit not meet the specifications indicated in the kit it may be returned within 30 days from the date of delivery and will be replaced by a new kit NXP re...

Страница 3: ...roved performance in powering state of the art systems 1 Go to the tool summary page http www nxp com FRDM 34933EVB 2 Locate and click 3 Download the documents software and other information Once the...

Страница 4: ...protection Screw terminals to provide easy connection of power and loads Test points to allow probing of signals Built in voltage regulator to supply logic level circuitry LED to indicate status of l...

Страница 5: ...oard description Name Description U5 16 pin QFN H bridge motor drive IC MC34933 F1 Overcurrent fuse D5 LED output OUT1A Connect motor phase 1A to this terminal OUT1B Connect motor phase 1B to this ter...

Страница 6: ...bridge Input signal for OUT1B TP7 IN2A H bridge Input signal for OUT2A TP8 IN2B H bridge Input signal for OUT2B 4 4 3 Input signal definitions The motor drive IC has as many as five input signals tha...

Страница 7: ...2 AN1 Auxiliary MCU signal analog Not populated 4 4 6 Jumpers The board features jumper connections as shown in Table 8 Table 8 Jumpers Name Description JP1 Fuse bypass not populated JP2 VPWR to VIN...

Страница 8: ...the motor The board is connected to the FRDM KL25Z using four dual row headers The connections are shown in Table 9 Table 9 Header connections FRDM LV stepper motor FRDM KL25Z Header Pin Name Header P...

Страница 9: ...n that link to open the corresponding tool summary page Look for Jump Start Your Design Download the Motor Control GUI software to your computer desktop LVMC Steppermotor setup exe Run the installed p...

Страница 10: ...17 10 39 Figure 4 Setup for Stepper motor Figure 5 Setup for DC motors 6 2 Step by step instructions for setting up the hardware using Motor Control GUI When using the board make sure that the followi...

Страница 11: ...output terminals Attach the other phase coil of the stepper motor to terminals OUT2A and OUT2B Launch the Stepper Motor Driver GUI software 8 Make sure the GUI recognizes the FRDM KL25Z This is deter...

Страница 12: ...les Example project folder for CodeWarrior LVH_KL25Z_brush_MC34933 Example project for DC brush motor control using FRDM 34933EVB H bridge board and FRDM KL25Z MCU board LVH_KL25Z_brush_MPC17510 Examp...

Страница 13: ...er LVH_KL25Z_step_FreeMASTER Example project intended to control stepper motor using FreeMASTER tool LVH_KL25Z_stepper Example project intended to control stepper motor using FRDM 34933EVB H bridge bo...

Страница 14: ...to legal disclaimers NXP B V 2017 All rights reserved User guide Rev 1 0 15 March 2017 14 39 5 If the import is successful the LVHBridge component appears in Components Library SW User Component Note...

Страница 15: ...Workspace and then click Next 3 Locate the example in folder LVHBridge_PEx_SW CodeWarrior_Examples LVH_KL25Z_brush_MC34933 Then click Finish The project is now in the CodeWarrior workspace where you...

Страница 16: ...ed in this document is subject to legal disclaimers NXP B V 2017 All rights reserved User guide Rev 1 0 15 March 2017 16 39 2 Choose the MCU class to be used in the freedom MCU board MKL25Z128 in this...

Страница 17: ...DM34933EVBUG All information provided in this document is subject to legal disclaimers NXP B V 2017 All rights reserved User guide Rev 1 0 15 March 2017 17 39 6 5 1 Add LVHBridge component to the proj...

Страница 18: ...4933EVBUG All information provided in this document is subject to legal disclaimers NXP B V 2017 All rights reserved User guide Rev 1 0 15 March 2017 18 39 2 Double click LVHBridge component in the Co...

Страница 19: ...me of a linked TimerUnit_LDD component and the name of the hardware timer being used defined in the Primary Timer Device property Secondary Timer encompasses the properties of an additional timer Note...

Страница 20: ...ace allow you to set H bridge control function The H bridge 2 MCU Interface is shown only for dual H bridge models for example MC34933 The DC Brush group is described in Section 6 5 3 Setting up a pro...

Страница 21: ...s means you can switch the motor on or off without speed adjustments The advantage of this mode is that you do not need timer channels If you set State Control on both interfaces or you have only a si...

Страница 22: ...epper motor has four inputs Figure 10 Component settings to control a stepper motor In the Stepper Motor group set the properties that apply to your environment The Output Control property defines the...

Страница 23: ...n Figure 10 Desired motor speed is set to 100 full steps per second This value is defined by the speed property in Processor Expert GUI and can be changed in C code Acceleration and deceleration is se...

Страница 24: ...cy per stepper control mode LVHBridge component properties Primary timer input frequency Mode description Timer device Secondary timer Output control Motor control mode Values Min Max Secondary timer...

Страница 25: ...values as for primary timer 6 5 5 1 Computation of minimum full stepping speed The minimum full stepping speed depends on the timer input frequency only when the Primary Timer Device is set to FTM FT...

Страница 26: ...This section describes how to change the input frequency of the TimerUnit_LDD component 1 Launch Processor Expert and select the LVHBridge component 2 In the Processor Expert menu bar set component vi...

Страница 27: ...ard KTFRDM34933EVBUG All information provided in this document is subject to legal disclaimers NXP B V 2017 All rights reserved User guide Rev 1 0 15 March 2017 27 39 Figure 13 Enabling the manual fre...

Страница 28: ...omponent TimerUnit_LDD timing dialog select input frequency 6 5 6 Generating application code After configuration generate the source code by clicking the icon in the upper right corner of the Compone...

Страница 29: ...s NXP B V 2017 All rights reserved User guide Rev 1 0 15 March 2017 29 39 Figure 17 Generated files 6 5 7 Using the interface Application code can be written and tested in the project For example you...

Страница 30: ...guide Rev 1 0 15 March 2017 30 39 Figure 18 Using the interface To compile download and debug on board click compile and then click the debug icon in the toolbar CodeWarrior downloads and launches th...

Страница 31: ...ted in real time using integer arithmetic This solution is based on the article Generate stepper motor speed profiles in real time Austin David 2005 The stepper motor holds its position coils are powe...

Страница 32: ...input pins generated by the MCU in full step mode Figure 22 Output of the H bridge device in full step mode 6 6 2 Micro step control mode Micro stepping allows for smoother motor movement and increas...

Страница 33: ...1 I of IMAX Micro step size I of IMAX 1 2 1 4 1 8 1 16 1 32 Angle A B 1 2 1 4 1 8 1 16 1 32 Angle A B 0 0 0 0 0 0 0 0 100 4 8 16 32 64 180 0 100 1 2 8 4 91 99 88 65 182 8 4 91 99 88 1 2 5 6 9 8 99 52...

Страница 34: ...9 95 69 29 03 39 109 7 94 15 33 69 103 289 7 94 15 33 69 5 10 20 40 112 5 92 39 38 27 13 26 52 104 292 5 92 39 38 27 41 115 3 90 4 42 76 105 295 3 90 4 42 76 21 42 118 1 88 19 47 14 53 106 298 1 88 1...

Страница 35: ...gal disclaimers NXP B V 2017 All rights reserved User guide Rev 1 0 15 March 2017 35 39 micro step position Current values applied to the stepper motor coils are depicted in Figure 26 Figure 24 Logic...

Страница 36: ...force allocation of the channels If you are configuring a stepper motor Motor Control property set to Stepper try changing the Output Control property to GPIO and then back to PWM If you are configuri...

Страница 37: ...ort pages Description URL FRDM 34933EVB Tool summary page www nxp com FRDM 34933EVB FRDM KL25Z Tool summary page http www nxp com FRDM KL25Z LVHBRIDGE PEXPERT Software http www nxp com LVHBRIDGE PEXPE...

Страница 38: ...e to any products herein NXP makes no warranty representation or guarantee regarding the suitability of its products for any particular purpose nor does NXP assume any liability arising out of the app...

Страница 39: ...d 7 6 Installing the software and setting up the hardware 9 6 1 Configuring the hardware 9 6 2 Step by step instructions for setting up the hardware using Motor Control GUI 10 6 3 Installing CodeWarri...

Отзывы: