18
|
Sensor data
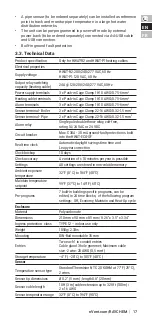
104
°F
1211 Ω
113
°F
1033 Ω
122
°F
885 Ω
131
°F
762 Ω
140
°F
658 Ω
149
°F
571 Ω
Approval
Approval/
Electromagnetic
c-UL-us, ROHS, WEEE
Electromagnetic Compatibility (EMC)
Preset key lock pass code
3000
4
. OPERATION
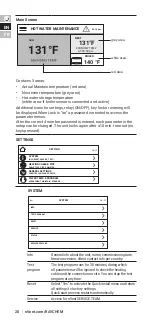
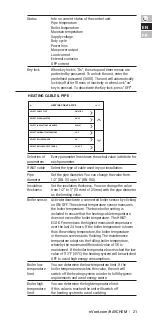
The HWAT-ECO-GF has a resistive touchscreen user interface:
The unit will go in dim mode after
10
minutes with no interaction.
The unit will switch to the main screen after
1
minute of no interaction
on the parameter input screens.
4
.
1
Quick Install
When the unit is powered up for the first time, a quick setup must be
executed before the unit is ready to start. The Quick start helps to set all
important settings, the unit will go in main screen mode automatically
when done. Quick start is sufficient for normal operations. More settings
are available in the Setup menu for special installation conditions.
4
.
2
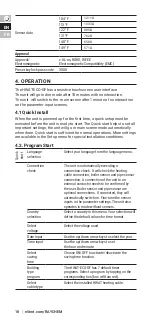
. Program Start
Quick star
t Language
selection
Select your language from the language menu.
Connection
check
The unit is automatically executing a
connection check. It will check the heating
cable connection, boiler sensor and pipe sensor
connection. A connection of the unit to an
external contactor needs to be confirmed by
the user. Boiler sensor and pipe sensor are
optional connections. If connected, they will
automatically switch on. Fine-tune the sensor
inputs in the parameter settings.The unit also
operates in mode without sensors.
Country
selection
Select a country in this menu. Your selection will
define the default values for time format.
Select
voltage
Select the voltage used.
Date input
Use the up/down arrow keys to select the year.
Time input
Use the up/down arrow keys to set
the hour and minute.
Select
saving
time
Choose ON/OFF to activate/deactivate the
saving time function.
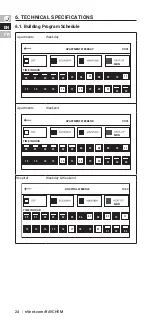
Building
type
program
The HWAT-ECO-GF has
7
default timer
programs. Select a program by tapping on the
corresponding box (box will turn red).
Select
cable type
Select the installed HWAT heating cable.
Содержание HWAT-ECO-GF
Страница 2: ...2 nVent com RAYCHEM EN FR...
Страница 7: ...nVent com RAYCHEM 7 EN FR 2 INSTALLATION INSTRUCTIONS 1A 1B 5 2 150 mm...
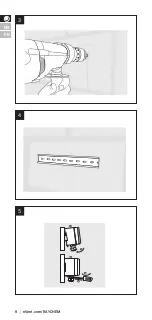
Страница 8: ...8 nVent com RAYCHEM EN FR 3 4 5 1 2 A B C...
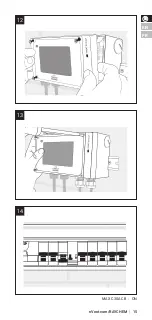
Страница 14: ...14 nVent com RAYCHEM EN FR 11 CLICK...
Страница 15: ...nVent com RAYCHEM 15 EN FR 12 13 14 MAX C30A CB ON...


